General
General reports can be used to report on nearly ANY table in the IndySoft database - with up to 4 optional sub-tables displayed beneath the main table. The General search/report dialog organizes all the tables into logical groups to quickly select the desired information. All field names are in readable format. The basic 'feel' of the General searches/reports are very similar to Equipment search/reports. This is intentional - so users will not have to re-learn basic functionality when reporting on information that is not equipment-related.
Before proceeding, please read General Search By/Report Dialogs to learn about the main sections of a General search/report and their usage when called from the main screen. This topic will deal specifically with options relating to customizing a General search/report.
When a General search/report is modified from PrintBuilder, you will notice two new buttons in the lower-right which are not visible to users that run the search/report from the main screen during normal use:
Additional Options and Save Buttons - General Search/Report Design
![]() Save Settings
Save Settings
Use this button to save your current changes to the database - overwriting the previous search/report configuration. This operation is also performed with the 'Save & Close' button to the right, which closes the dialog.
![]() Additional Options
Additional Options
This button will display an important dialog listing all the various functionality options with a General search/report. See the sections below for more details:
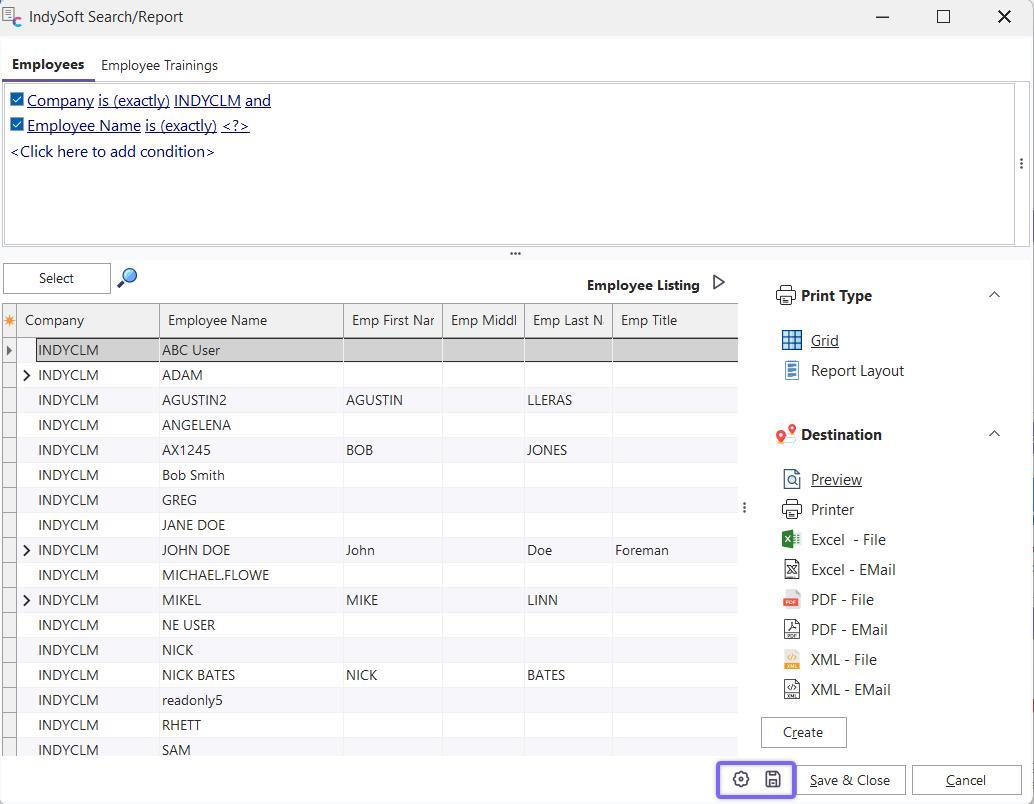
Search Options
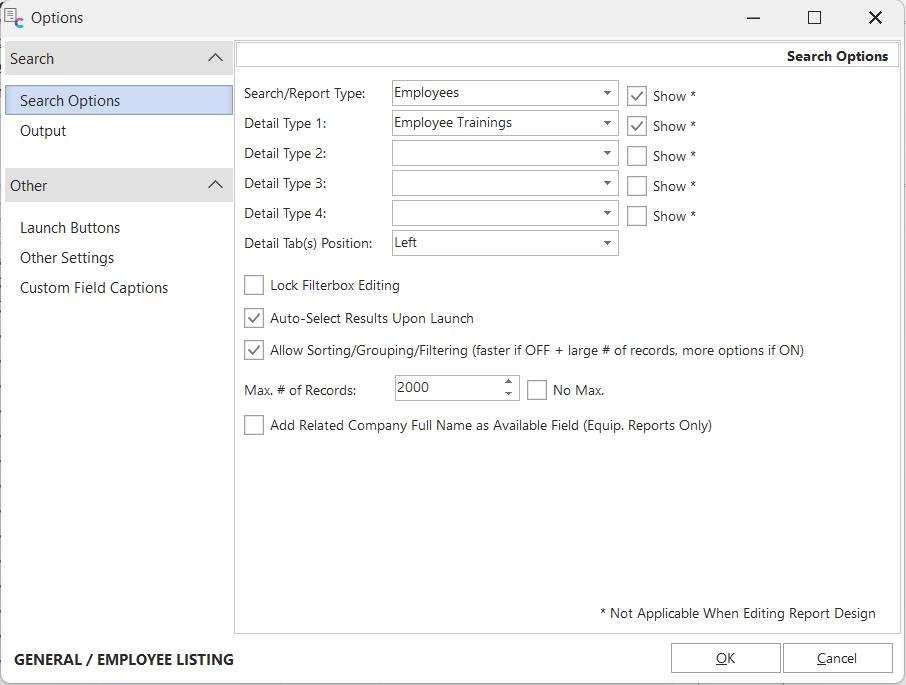
Additional Options - Search Options
General search/reports can access nearly all data types in the IndySoft database. The 'Search Options' tab gives you the options for pointing to the desired data group.
Search/Report Type - the name of the main table for the search/report. All available tables in the IndySoft database are listed in the dropdown. Check the 'Show' tab if you want to show a filterbox for this table above the results grid when the search/report is executed. Note: this 'show' option is not applicable when the report is being designed from PrintBuilder. So any filter that is input during design is still executed to filter the results. This 'Show' option determines whether the filter will be shown to the user upon execution.
Detail Type 1-4 - the name of optional detail tables that can be displayed as embedded details within each record in the main 'Search/Report Type.' Note that the tables available will be limited to only the tables that are appropriate as detail tables for the 'Search/Report Type' table selected above. Not all 'Search/Report Type' tables have potential detail tables. If more than one detail table is selected, these details will be listed as multiple detail tabs.
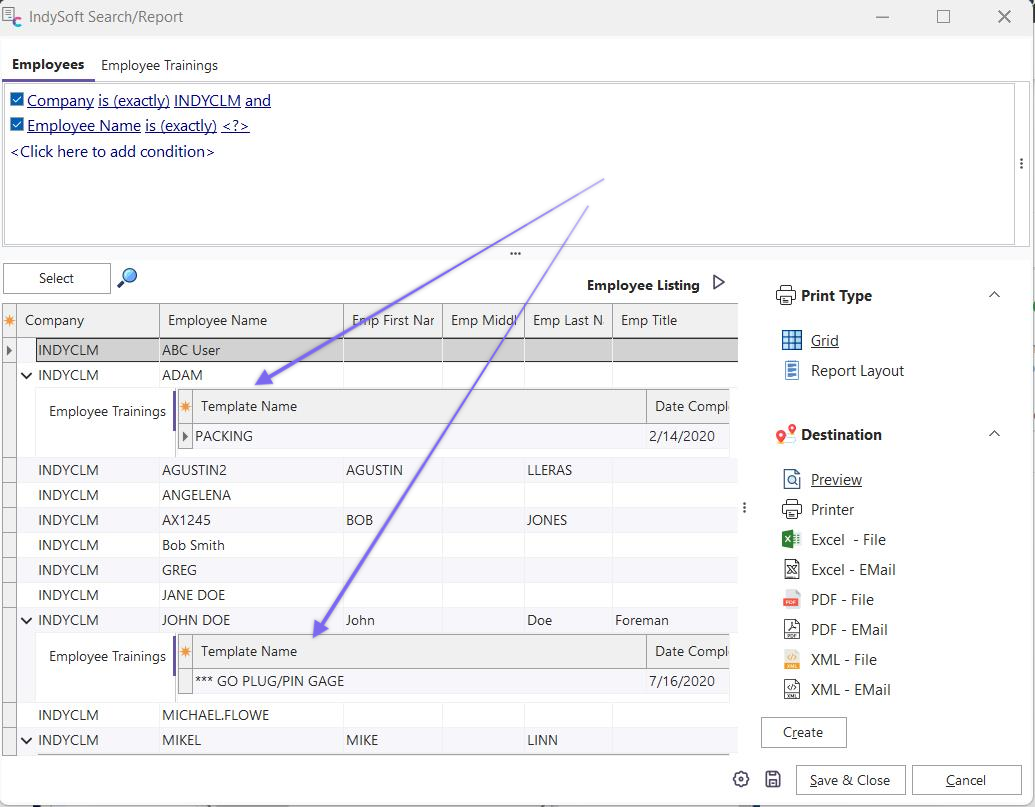
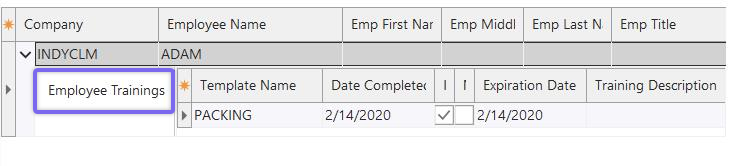
Example - Multiple Detail Types
If the 'Show' option is checked for Detail Types, these detail tables will have their filterbox on the top of the dialog, each with its tab. Each of these detail filterboxes will filter the records for that embedded detail. So in the above example, we are showing all employees that belong to 'INDYCLM' - showing additional details for each employee, listing each employee's training and time log entries. If a filter is added to the 'Employee Trainings':
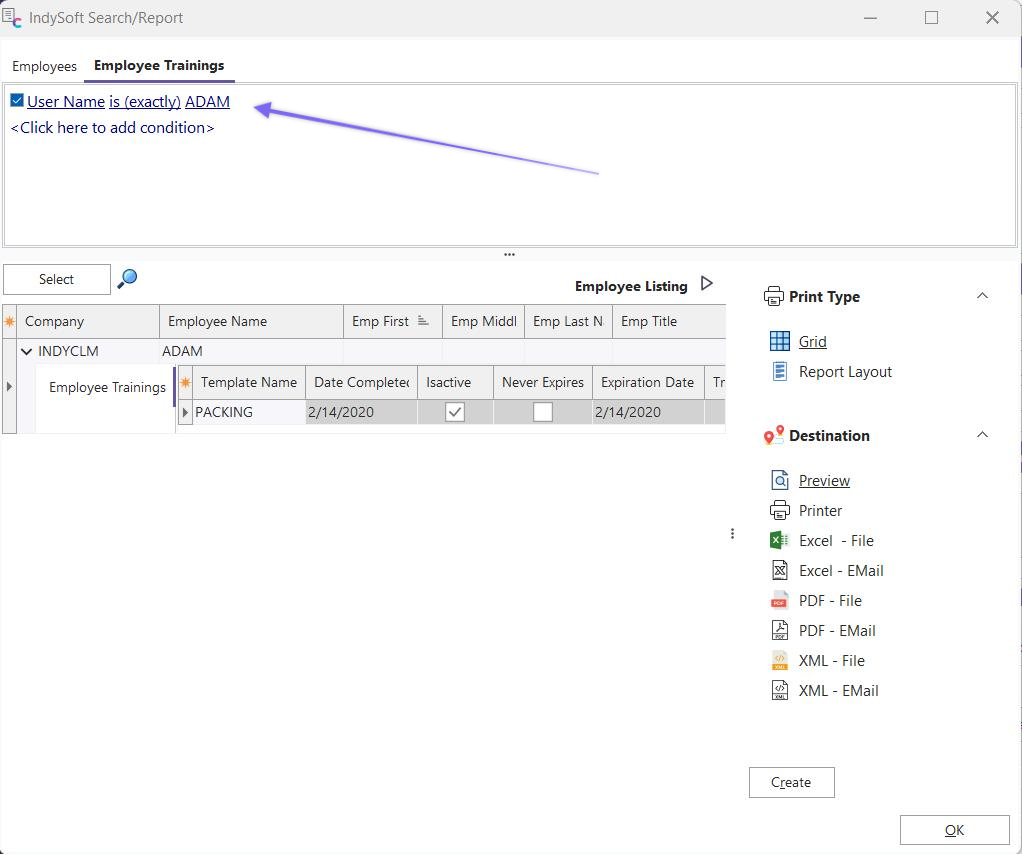
Example - Filtering Details
This filters the employee training only to return items within the last month. All selected filters are saved with the General report - making it easy to quickly return exactly the result you need for nearly any combination of tables.
Detail Tab(s) Position - this option controls the position of the descriptive tab for the detail records - select 'Left' or 'Top':
Example - Left Detail Tab(s) Position

Example - Top Detail Tab(s) Position
Extra Equip. Filter - this checkbox will only be shown if the 'Search/Report Type' table includes Company and I.D. fields. If this option is checked, a 2nd filterbox will be made available to the right of the main table's filterbox. Note: this functionality is similar to version 8's extra equipment filter that could be added to EventFinder - but in this case, the extra equipment filter can apply to many other tables besides 'Events.'
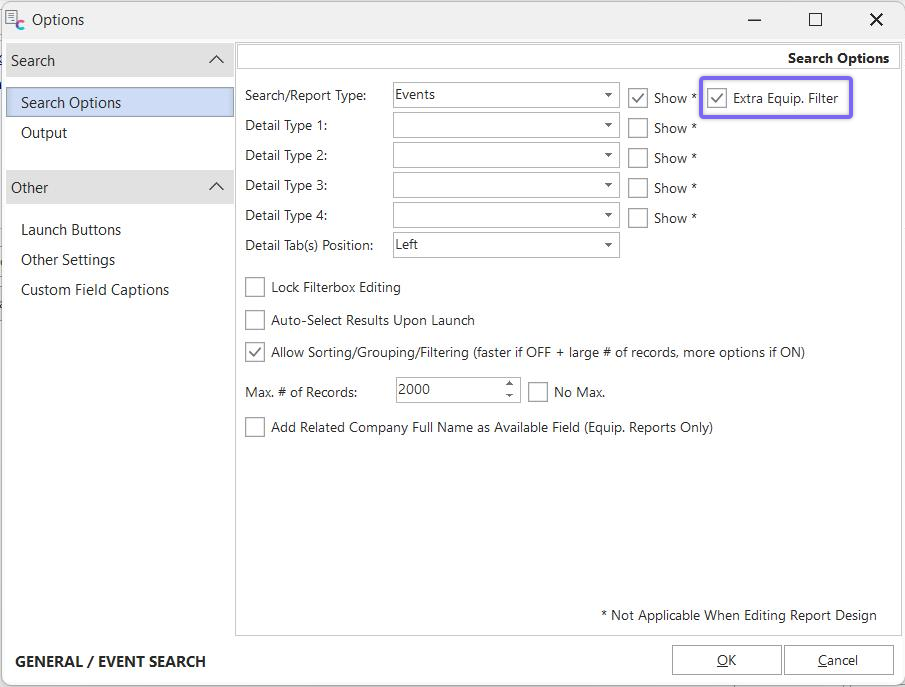
General Search Options - Show ![]() Extra Equip. Filter
Extra Equip. Filter
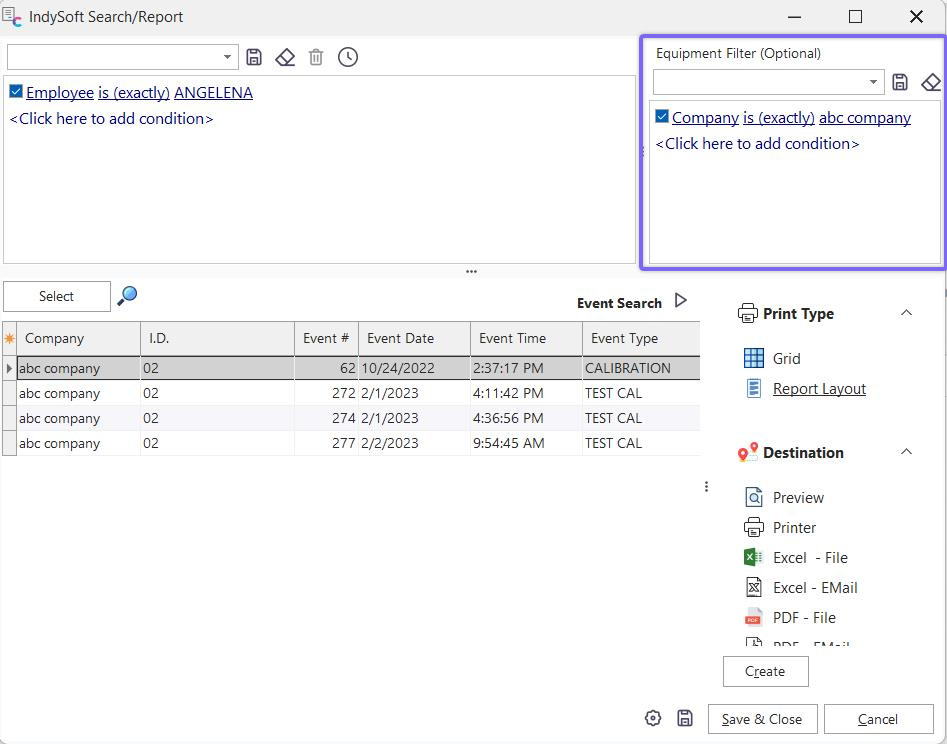
Example - Extra Equip. Filter
Lock Filterbox Editing - if this option is ON, then editing of all filterboxes will be disabled when the search/report is executed from the main screen. The filters input during design will still be used; they cannot be modified when this option is ON.
Auto-Select Results Upon Launch - enable this option to automatically execute the filter(s) when the search dialog is run to populate the selected grid. If this option is NOT enabled, the user must confirm the search filter and press the 'Select' button to populate the results.
Max # of Records / No Max. - this setting is similar to the 'Max # of Records' in User/Location Settings - General, but it applies only to this search/report. This maximum # of records will be enforced when the 'Select' button is pressed (or when the search is automatically executed) - if the maximum is exceeded, the user is alerted. Note: with General search/reports, this setting is used INSTEAD of the User Preference. Think of that User Preference setting as a catch-all for more common search screens that are not designed/customized. This setting is used for all Equipment and General search/reports. This allows for much more flexibility - because some searches/reports return only 2-3 fields, it might be acceptable to return 10,000 records. But a lower max might be advisable for other complicated searches that return dozens of fields. Turn on 'No Max.' to skip any check for # of records.
Output

Additional Options - Output
Show Output Tab - turn on this option to display the Output tab to the right of the results grid. The options below are relevant only if the 'Show Output Tab' option is ON.
Auto Create Report Upon Launch - turn on this report if you want to automatically press the 'Create' button on the Output tab upon creating the search/report dialog. The results will be returned (grid populated), and the Output report will be created based on the current settings for 'Print Type' and 'Destination.' This option is not operative when the search/report is designed in PrintBuilder.
Close Report Upon Creation - When this option is on, after the report is created and output (to screen, printer, file, etc.), the search/report dialog is closed. If this option is OFF, the search results will remain onscreen after the report is created. This option is especially easy to understand when the output is to 'preview.' The auto-create of the report will first display the preview dialog - typically large, covering your screen. When this preview window is closed, the search grid will be visible 'behind' (if this option is OFF). If this option is turned ON when the 'Auto Create Report Upon Launch' option is OFF, then after the user presses the 'Create' button on the Output tab, the search dialog will close.
For Report Layout + Excel Output Options, Output Data Only In Columns - this option is only relevant when the Output destination is 'Excel - File' or 'Excel - EMail' and the 'Report Layout' print type is used. This option is not relevant for the 'Grid' print type. When this option is OFF, the Excel output attempts to match exactly the cosmetic 'look' of the Report Layout, as set up in the IndySoft Report Designer. As an example, say your report design was as follows:
Example Report Design
If the 'For Report Layout + Excel Output Options, Output Data Only In Columns' option is OFF, then the Excel output (when viewed later within Excel) will look as follows:
Example Excel Output - if the option is OFF
If the 'For Report Layout + Excel Output Options, Output Data Only In Columns' option is ON, then the Excel output (when viewed later within Excel) will look as follows:

Example Excel Output - if the option is ON
As you can see from the above example, the only items included in the Excel output are the fields from the main table, along with the font style for these fields as set in the report design. All other bands and extraneous formatting are ignored. Also, all fields are output in consecutive columns regardless of their relative positions in the report design.
Report Types - Use this option to specify which Report Types will be available to the user when the search/report is run. All options not checked will be hidden from the Output tab.
Output Destinations - This option will specify which Output Destinations will be available to the user when the search/report is run. All options not checked will be hidden from the Output tab.
Optional File Export Location - This option is only relevant for file-related or email-related output (PDF, Excel, XML). Use this option to specify as much information as possible about the final destination for the file that will be created. Several variations are possible. First, a full directory and file name can be input. In this case, no 'select file' dialog will be shown when the report is created - it will be created to the specified location. Any existing file with the same name at that location/name will be automatically overwritten - so use this option carefully. Next, only a directory name can be specified. In this case, this file name will be automatically created in the format of:
SearchName-mmddyyyy-hhmmss.ext
Where 'SearchName' is the name of the current search/report, mmddyyyy-hhmmss is the current date and time, and .ext is the file extension that matches the Destination (pdf, Excel, XML). A third option: if you specify a file name and no directory, this file name will be used to create the file in the IndySoft \Temp directory. This is a common setup when the file is created for email output. Note: it is fine to specify a file extension here, but it is ultimately ignored when the final file is created - and replaced instead with the extension appropriate to the 'Destination' type (pdf, Excel, XML, etc.)
![]() Note about XML output.
Note about XML output.
XML output is a powerful feature of General reports - especially when the report is set up to create a fixed file location automatically. Keep in mind the format of the XML file will be simple - following these general rules:
·Only fields displayed in the grid will be output
·Fields will be output in the same order top-to-bottom in the XML file as set up in the grid field header left-to-right
·XML Output is only allowed for Grid Print Type
·The root element will be equal to the 'Search/Report Type' as selected on the Search Options page, which will contain all records
·Each record in the grid will be included inside a <row> element
·Fields in each row will be named by the same field name as used in the grid
·Details 1-4 (is applicable) will be exported within each <row> of the main table, within element names that match the detail type.
·Spaces and other extended characters in Field Names will be replaced by an underscore in the XML field name, i.e., 'Max. Bin Capacity' = 'Max__Bin_Capacity'
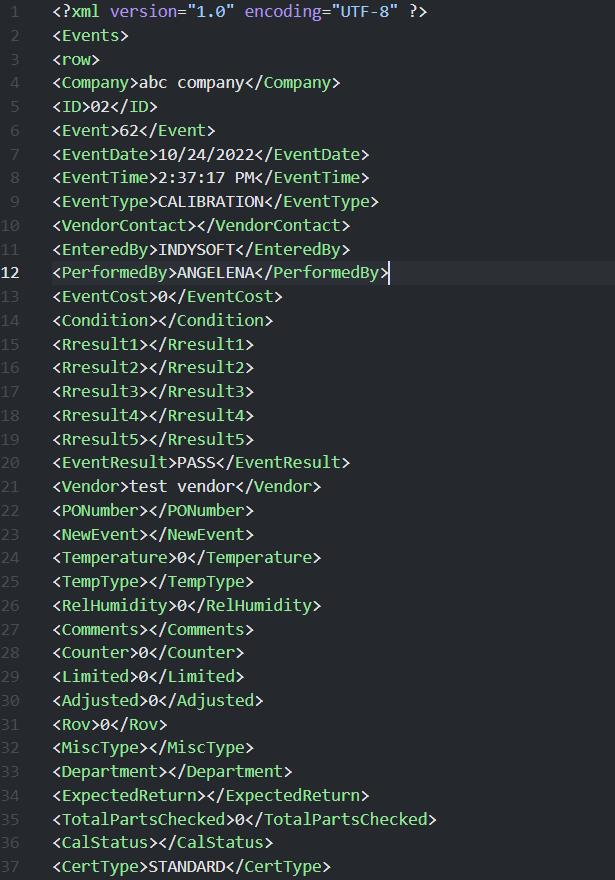
Example - XML Output
Launch Buttons
PLEASE NOTE
The following topic may include references to the custom scripting aspects of the IndySoft product line. Some aspects of the discussed features may not be accessible to end customers. For reference, the affected features will use the word 'script' or 'custom script.' Refer to the Custom Scripting Overview topic for more information about custom scripting and how it is implemented and supported within the product.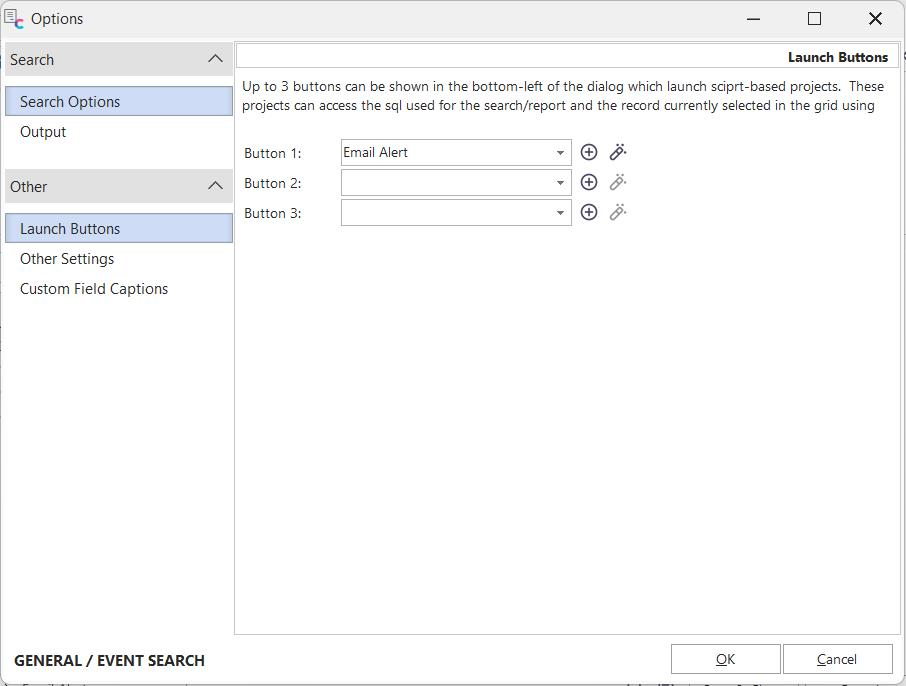
Additional Options - Launch Buttons
This option allows for displaying 1-3 buttons in the lower-left of the search/report dialog. Each button will launch a script project:
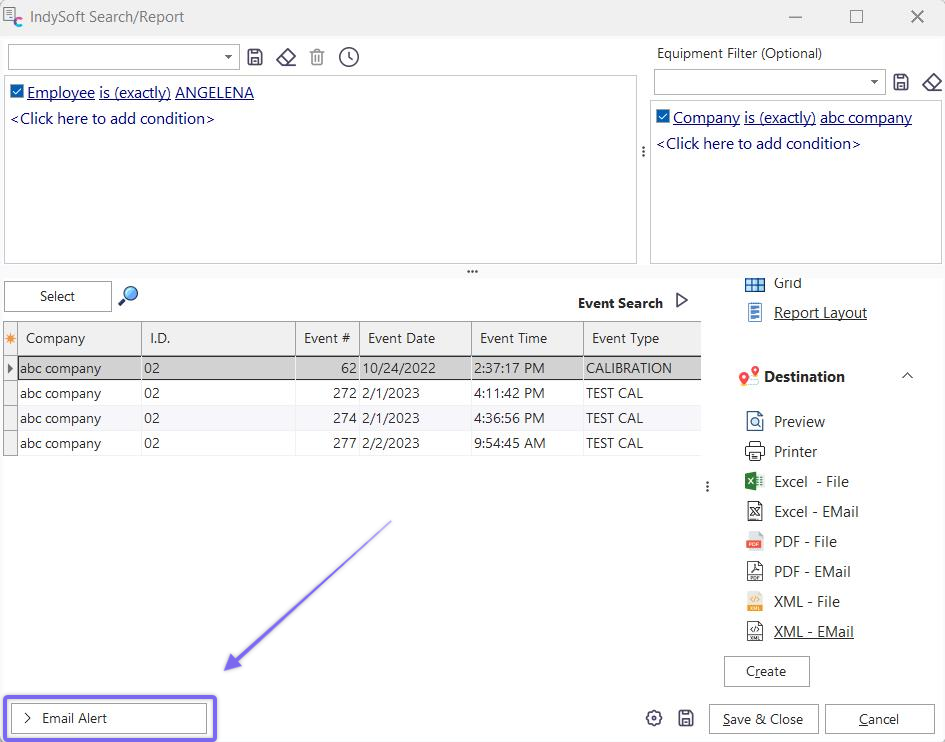
Custom Launch Button - Email Alert
To create a new script project (with a type appropriate to this usage), press the 'Add Project' button to the right of the 'Button 1-3' dropdown. To modify a script already referenced in the dropdown, press the 'View/Edit Project' button:
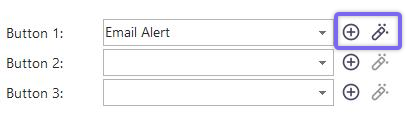
Add New Project - View/Edit Project
Script projects are created/edited through the IndySoft Project Editor.
Other Settings

Additional Options - Other Settings
This final setup step reminds the user of additional settings saved in response to the setup of the search/report dialog when being edited from PrintBuilder. As an example, this 'Options' dialog does not need a setup step for the filterbox search criteria - since the filterbox(es) is already visible on the main search/report dialog. Most of these options should be obvious - but they are listed to be thorough. The visible fields, the widths of each field, the selected 'Print Type' and 'Destination,' and the Report Layout as set up from 'Edit Report Layout' - all these settings are saved with the report, along with the options specified in this dialog. Note: the height/width of the search/report dialog is also saved - but this size is only used as an initial value when a user initially runs the search/report. The user can then modify the screen to the size of their preference, and this new size will be remembered per user and search/report (like most other IndySoft screens).
Custom Field Settings
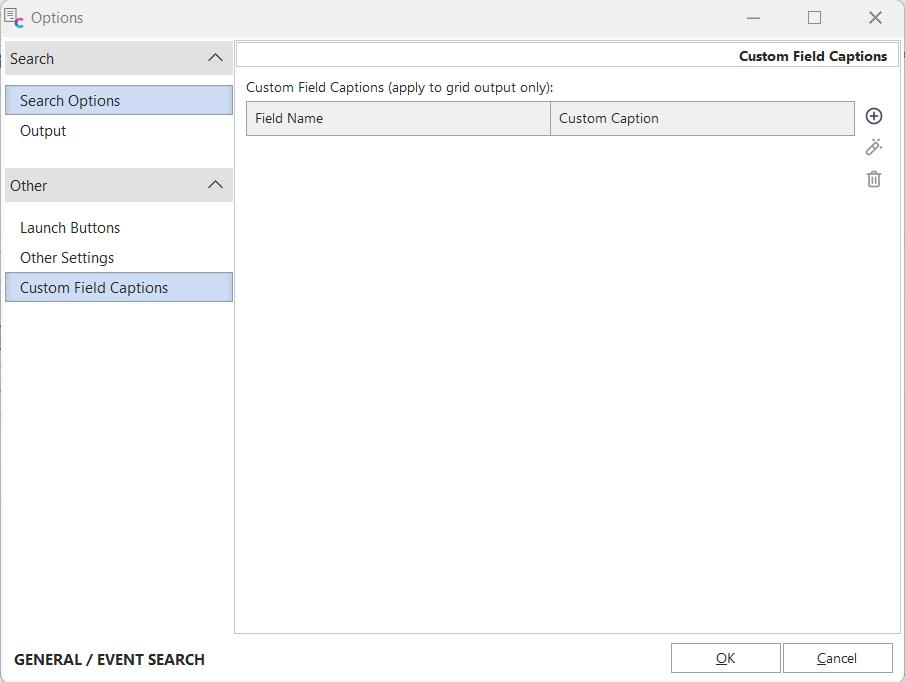
Edit Custom Field Settings
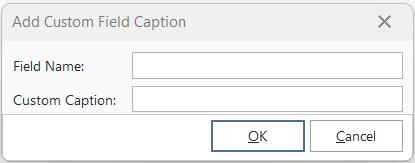
Under this tab, you can find the option of adding custom fields to your results grid. Click on the ![]() icon to the left of the grid to add a new custom field. Here, you can specify the field name and custom caption associated with that field. The 'Add' dialog is shown below:
icon to the left of the grid to add a new custom field. Here, you can specify the field name and custom caption associated with that field. The 'Add' dialog is shown below:
Add Custom Field Dialog
Edit Report Layout
Back on the main search/report dialog when it is being designed through PrintBuilder...if the Print Type selected on the Output tab is 'Report Layout,' then you will notice an 'Edit Report Layout' hyperlink will appear:
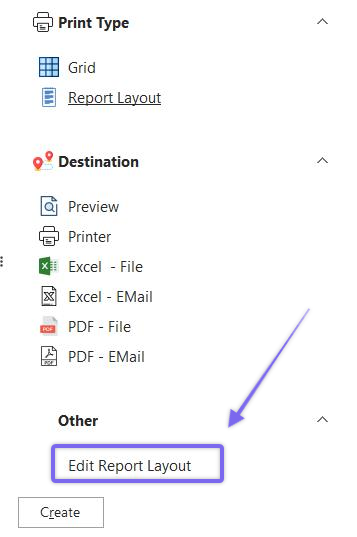
Edit Report Layout Hyperlink
Clicking on this hyperlink will launch the IndySoft Report Designer, which can be used to completely customize the layout of the fields/records in your report. This dialog is nearly identical to the IndySoft Custom Report Designer - as discussed in detail concerning Custom Reports. Please see that section for more details. But a couple of notes on minor differences:
·The Data tab is not visible, as with Custom Reports - since the table/fields are already selected from the grid.
·All field names available for display in the designer will follow the same names as seen in the results grid.
·If detail grids are mapped for display, these will also be available in the IndySoft Report Designer as table pipelines. And the master-detail linking of the appropriate fields is already completed for you behind the scenes. Create a subreport to display each detail table and point each subreport to the appropriate pipeline.
·To be most efficient, it is suggested that you use the 'Report Wizard' in the 'Options' menu. This wizard will help you quickly create a report that lays out your visible fields with field headings, a report title, and appropriate footer details.
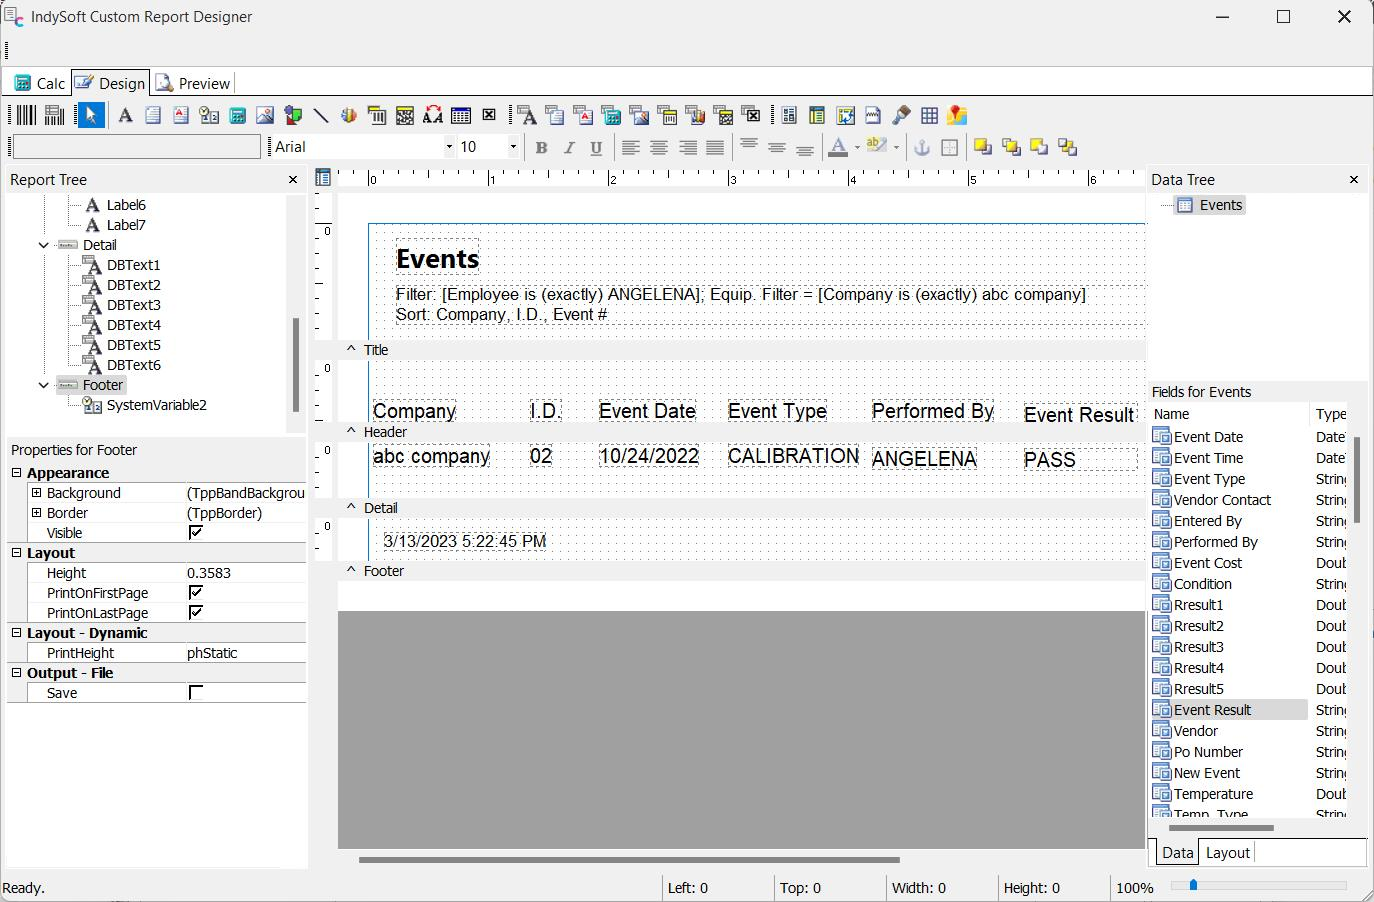
IndySoft Report Designer - General search/report example
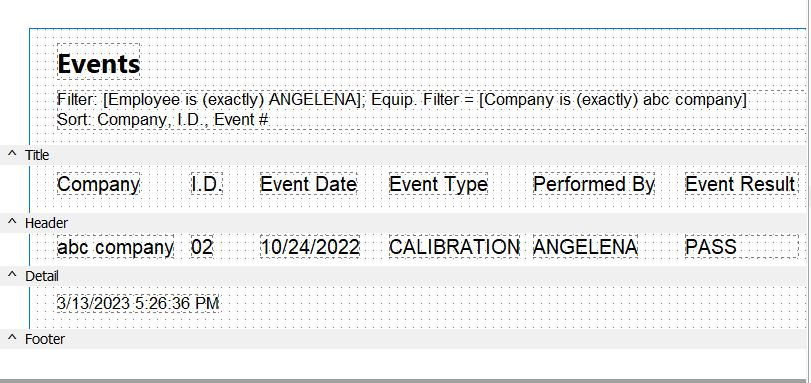
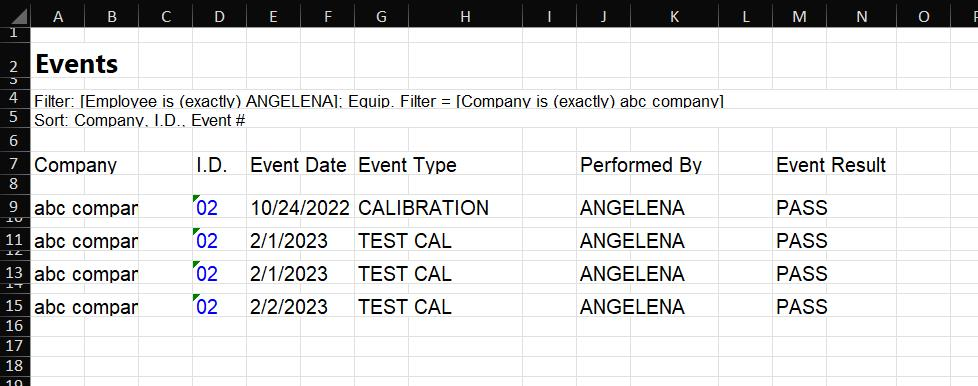
![]() Important Tip: you can place a 'System Variable' object into the report and choose the 'DocumentName' property. IndySoft dedicates this property to storing a friendly description of the search and sort criteria used to create the report. If you turn on WordWrap for this new object (a right-mouse click option on the object) and place the variable in the report header, then it will provide a quick summary of the search conditions. See the example below:
Important Tip: you can place a 'System Variable' object into the report and choose the 'DocumentName' property. IndySoft dedicates this property to storing a friendly description of the search and sort criteria used to create the report. If you turn on WordWrap for this new object (a right-mouse click option on the object) and place the variable in the report header, then it will provide a quick summary of the search conditions. See the example below:

Example - use of a System Variable with DocumentName type - to display filter and sort |