Flowchart Editor Objects
Use these three sections in the docking panel to the left of the flowchart to select an object or line type for use in the flowchart. After selecting an object, you can single-click (left mouse click) in the flowchart to create a new object of this type.

Diagram objects
Basic Objects
![]() Diagram Block
Diagram Block
This object is like an Action block but has no anchor points on the top/bottom/left/right.
![]() Diagram Line Join
Diagram Line Join
Use this object to join together multiple lines without having them intersect at a box. The object gives you a 'center point' visible inside a transparent object that you can use as an intersection point. Dragline source or target points to the center of the Diagram Line Join. Example below:

![]() Text
Text
This object is unique in that there are no borders, and the space inside the bounds of the object is transparent. So, it is a good choice for the display of simple text or for showing an image without a surrounding box.
![]() Polygon
Polygon
Polygon lines are not fixed shapes but are created manually by the user drawing a set of lines. To create the polygon, click on the Polygon object first, then single-click in the flowchart where you would like the object to begin. Then extend the first line to the desired point and single click again. Repeat this process until you have completed the polygon. As you double-click in the flowchart, the last point on the polygon will be confirmed, and a line will be drawn between this final point and the original point. If you select the object after creation, you will see handles at each junction point between the lines and surrounding the object. Note: Polygon objects do NOT have anchor points (since their shape is not fixed). Example below:

Flowchart Objects
Decision, Action, Terminal, Data, Document, Input, Comment, List, and Database objects have the same functionality and differ in shape. Each object has four anchor points: top, bottom, left, and right. Their general associations are implied from their names, but they can be used to represent anything you wish.
![]() Decision
Decision ![]() Action
Action ![]() Terminal
Terminal
![]() Data
Data ![]() Document
Document ![]() Input
Input
![]() Comment
Comment ![]() List
List ![]() Database
Database
Line Objects
The quickest way to create new lines that connect boxes/objects in the flowchart is to 'hover' the mouse over an anchor point on an object and then single-click (left mouse click) and hold the mouse button down. At the same time, you move to an anchor point on another object - then release the mouse button to create a new line. The type of new line is determined by the type selected in this toolbar - one of five different line styles.
There are four available anchor points on each object - top, bottom, left, and right - regardless of object type:

![]() Line
Line
Use this object to create a straight line between anchor points on flowchart objects.

![]() Side-Line
Side-Line
Use this object to create a sideline between 2 anchor points in the flowchart. Side Lines join the anchor points by making the smallest # of right angles possible. The middle points on each line become handles, so you can adjust the lengths of joining lines.

![]() Poly Line
Poly Line
A Poly Line includes multiple turns - so they cannot be created effectively through the automatic method by hovering over an anchor point, etc. Instead, select the same Poly Line object from the 'All Objects' tab above the flowchart, then a single left-mouse click in space in the flowchart, move to where the first turn in the line should occur, left-mouse click again, move to the next turn, left-mouse click again, then repeat this process until the line is created. Double left-mouse click when you are complete. Finally, hover with the mouse over the source and target ends of the line and drag them to anchor points on objects to attach the line to the workflow. You can hover over turns in the Poly Line and move them with a left-mouse click/drag. Example below:

![]() Arc
Arc
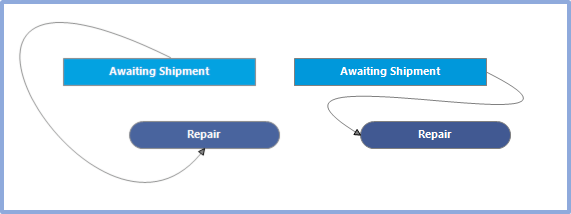
Use this option to create an Arc line between two anchor points in the flowchart. Keep in mind that the Arc line has only one curve. Use the Bezier if you want a line with two curves. Bezier lines are generally easier for moving 'around' other objects. To modify the curve's height/width, select the line and left-mouse drag the handle in the middle of the Arc. Example below:

![]() Bezier
Bezier
Use this option to create a Bezier line between two anchor points in the flowchart. Bezier lines have two curves. If you select the line, you will see two handles that can be adjusted to modify the shape of the Bezier. Examples below:
 |
|