Print This Report To
Modify Page Setup
![]() Note: this Step (Modify Page Setup) will only be available if 'Field Sets' or 'Columns' has been selected under Report Layout Type in Step 2 - Setup Print Options.
Note: this Step (Modify Page Setup) will only be available if 'Field Sets' or 'Columns' has been selected under Report Layout Type in Step 2 - Setup Print Options.
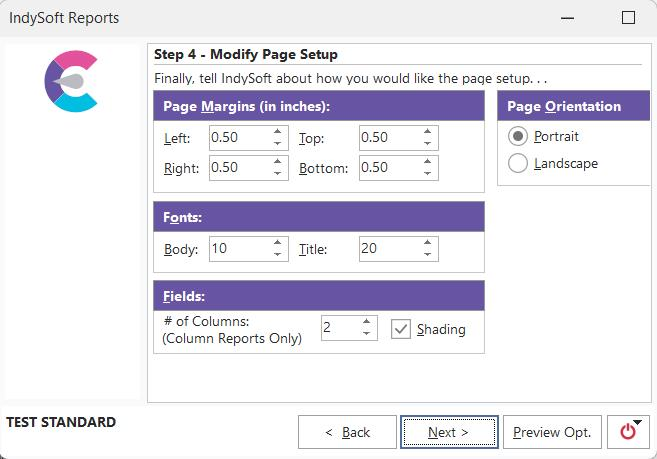
Standard Reports - Modify Page Setup
This step in the reports setup wizard contains the report options that most generally affect the way the report is displayed on the page. These options can be set for only the current report or all report types.
Page Margins
These four settings affect the amount of 'white' space around the report text. This space is in addition to any gutter space your printer might have. Gutter space is any portion of the page that your current printer cannot print on.
Fonts
These two settings will change the size of the fonts used in the reports. Using smaller fonts will enable more information to fit each report line. The minimum font size for both body and title is 6. The maximum font size for the body of the report is 25, and the maximum font size for the report's title is 40.
Fields
The first setting, '# of Columns,' refers to the number of columns that should be drawn when printing a report whose report layout type is set to 'columns.' The second setting, shading, refers to whether any fields will be shaded in the report. Shading makes the reports more easily readable, but some printers do not support shading. See Print Options for an example of a columnar-based report.
Page Orientation
This setting will affect the way the report is drawn on the page - whether the report is wider than it is tall or whether the report is taller than it is wide.
Print Report To
The final step, Print This Report To, could also be the first step you see if selecting a report from the Report Menu, as mentioned earlier. Notice the button highlighted in red in the lower left corner. This button will only be available when in Step 2 - Setup Print Options, either Design or Grid is selected in Report Layout Type, and the Preview Opt. button is pressed. You will be given the option of 'Design Report' or 'Edit Grid.' Otherwise, the button will not show.
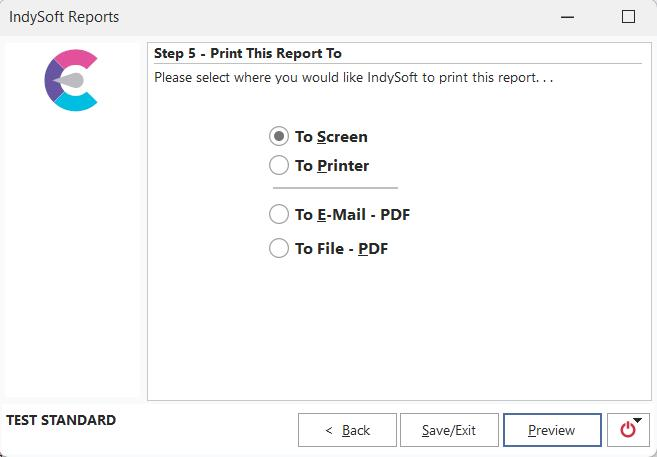
Standard Reports - Print This Report To
To Screen
Choosing 'To Screen' will preview the report on screen in the IndySoft report viewer.
To Printer
Choosing 'To Printer' will send the report directly to your printer. To choose a specific printer to send the report to, press the Print Setup button (only visible when the To Printer is selected). Pressing the Finish button will immediately start printing the report.
To Email - PDF
Choosing 'To EMail' will launch your default MAPI EMail program (i.e., MS Outlook, MS Outlook Express, Netscape, etc.) with the current report attached. Some simple report information (title of the report, number of pages, date of printing, etc.) will be parsed into the EMail text. Modify or append the EMail text information, then send the email as normal.
To File - PDF
Choosing 'To File' will first display a standard Windows 'Open File' dialog requesting the file name for the report that is to be saved. Once this dialog is confirmed, the report is previewed from this file in the Adobe Acrobat window. The report will be permanently saved to the file location specified. |