Table Properties Dialog
This is the main dialog that controls many of the settings listed above. See the Table Properties section below for more details. There are three tabs, Table, Row, and Cell:
Table Tab - this tab controls all settings about the entire table. If you select this 'Table Properties' dialog even when only a subset of the cells are currently selected (or none at all), then this first tab will still be dedicated to the settings for the entire table.
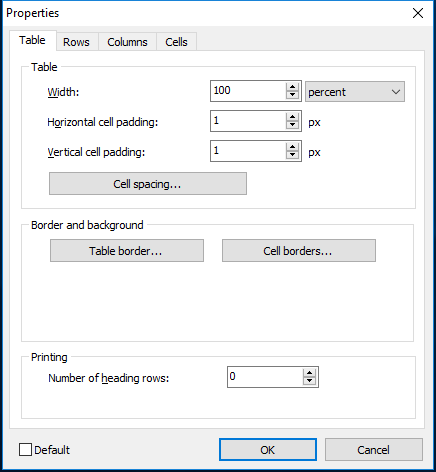
Table Properties - Table Tab
Width - specify the width of the entire tab, either in a fixed # of pixels or a percentage of the available space (after considering the page size and paragraph indents/borders)
Cell Padding - pad space inside each cell surrounding the contents - see more below under 'Cells Tab.'
Cell Spacing - pad space in between all cells - see example below.

For Cell Spacing, the spaces by default are equal on all four sides of cells - but if you want to have unequal spacing, un-check the 'Equal values' button.
Table Border - this option allows you to customize the look/feel of the outside border surrounding the table. Or, you can hide this border altogether:

Table Border Options
Select the color from the 40 preset colors or choose 'More Colors' to define custom colors. Next, modify the border width and select a border type from the options below. Select 'None' for 'Border Type' to hide the border.
Cell Borders - this option allows you to customize the look/feel of the inside borders between cells. Or, you can hide this border altogether:

Table Cell Borders Options
Select the color from the 40 preset colors or choose 'More Colors' to define custom colors. Next, modify the border width and select a border type from the options below. Select 'None' for 'Border Type' to hide the border.
Productivity Tip -
Single Pixel Cell Borders
IMPORTANT: keep in mind that each cell has all four borders drawn. So even if you have a 0 for Cell Padding and a Flat Border Type with a Width = 1, the effect will be that the inside borders between cells are 2 pixels in width/height - 1 pixel for each 'side.' If you want a table with only 1 pixel used for the table cell borders (in between cells), meaning a table that looks as 'flat' as possible, then use a Cell Padding value of -1.Printing - you can typically disregard this section; it does not apply to normal layout usage in IndySoft, since an infinitely 'tall' canvas is used.
Rows Tab - this tab defines the default vertical alignment for all text within cells on this row.
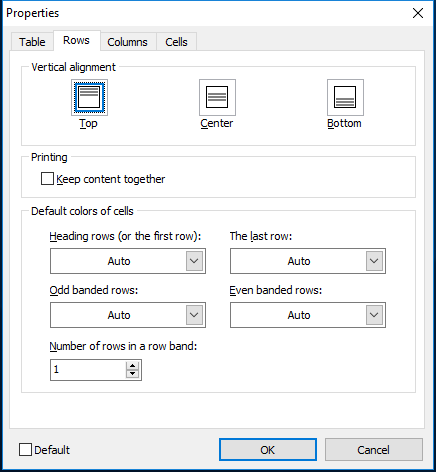
This default vertical alignment can be overwritten per cell from the 'Cells' tab. Changes made on the 'Cells' tab only apply to the currently selected cells. If you select the 'Default' Vertical Alignment from the' Cells' tab, it will point back to this Row Tab Vertical Alignment setting.
Columns Tab - this tab defines the default formatting on the table's columns. See the dialog below:
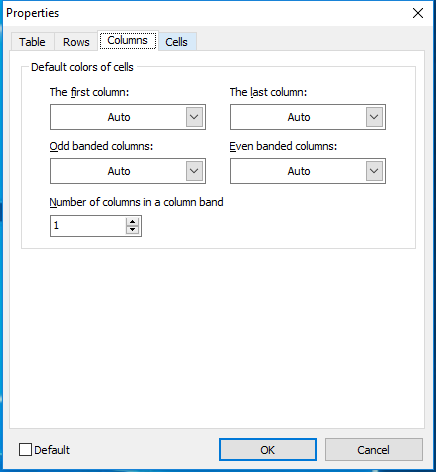
Here you can adjust the number of columns in a column band and apply conditional formatting (color-wise) to your table columns.
Cells Tab - this tab defines cell-level settings, but only for the currently selected cell(s)
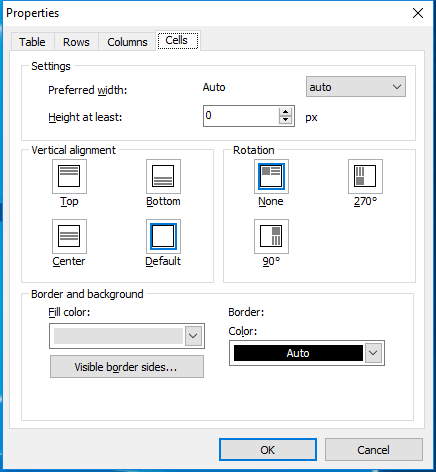
Table Properties - Cells Tab
Preferred width - specify the preferred width of each selected cell. This width can be defined either using a fixed # of pixels or as a percentage of the available table width. If you set up a percentage width (necessary when creating tables that automatically resize when the form is resized), then be careful to set up the table so that all cell width percentages (per column) add up to 100 percent. So if you have three columns in your table, and your table (on the Table tab) is set up with a Preferred Width of 100%, select all the cells in the table, and go to Table Properties...Cells tab, enter a Preferred Width for each cell of 33 percent. If you want the 1st column to take up half the page and columns 2 and 3 to take up the right side equally, select all the cells in column 1 and go to Table Properties...Cells tab, enter a Preferred Width of 50 percent. Then select all the cells in columns 2 and 3, and go to Table Properties...Cells tab, enter a Preferred Width of 25 percent. Those 2nd-grade word problems are finally paying off...
Height at least - if Word Wrap is turned on (Paragraph Menu) for text within a cell, then the cell's height will automatically grow based on the cell text. This setting defines the minimum height, in pixels, for the cell. The cell will always be at least this tall, even if the cell text does not require it.
Fill Color - the background color for the selected cell(s). This setting is parallel to the Table tab Fill Color setting. If you want to select a picture instead of the cell(s) background, press the 'Picture' button. The functionality is the same as when defining a picture for the table background on the Table tab. It is possible to have one background for the entire table and then 'exceptions' for individual cell backgrounds.
Vertical alignment -use this setting to override the default Vertical Alignment as defined on the Rows tab. This vertical alignment applies to all text and other objects inside each cell.
Border - select the border sides that you would like to be visible for the selected cell(s), along with the border color. Important: Note that these settings work together with the 'Cell Borders' settings on the Table tab - which apply to all cells in the table. Think of these visible sides and color selections as per-cell exceptions.
Productivity Tip
Remember that settings from the Cells tab only apply to the currently selected cells. So if things don't appear 'right' in your table, and you aren't sure which cell's settings are affecting the look (if any)...then sometimes it is best to remove any cell-specific settings and start over.
To do this, select all cells in the table, and go to the Table Properties dialog...Cells tab, and set the Cell options for all cells at once. Now you are back to where you started, and you can select individual cells...go back to the Cells tab on the Properties dialog...and enter any cell-specific exceptions.
Modifying Tables/Cells Within Layouts
Certain operations can be performed upon tables directly in the layout through mouse operations. If you have NO cells currently selected:

Then after clicking with the mouse (after the mouse changes to an arrow, as in the above screenshot):

This same operation can be performed on the left and right sides of the table for quickly selecting entire rows.
Also, you can hover with the mouse over the inner borders between cells, then left-mouse click to modify row width and cell height:
 |
|