Template Editor - Overview
To enforce a consistent equipment database, you can use Equipment Templates. This subject is highly important, and a little up-front planning can help you build a system that can
1. Allow new users to enter equipment without understanding equipment details (schedules, test point setups, default masters/standards, etc.)
2. Provide an extremely fast way of entering equipment data and
3. Ensure that all new equipment information entered into the system is done so in a consistent manner.
Launching Template Editor
Launch the Template Editor utility to add or manage the System-Wide Templates. This can be launched in multiple ways:
1. There is a 'Template Editor' hyperlink on the left side of the default Home Layout:

Template Editor Menu Link - default IndySoft Home Layout
Or, 2. you could use the Admin Panel:

Template Editor Link - Admin Panel
The Template Editor dialog will open as follows:
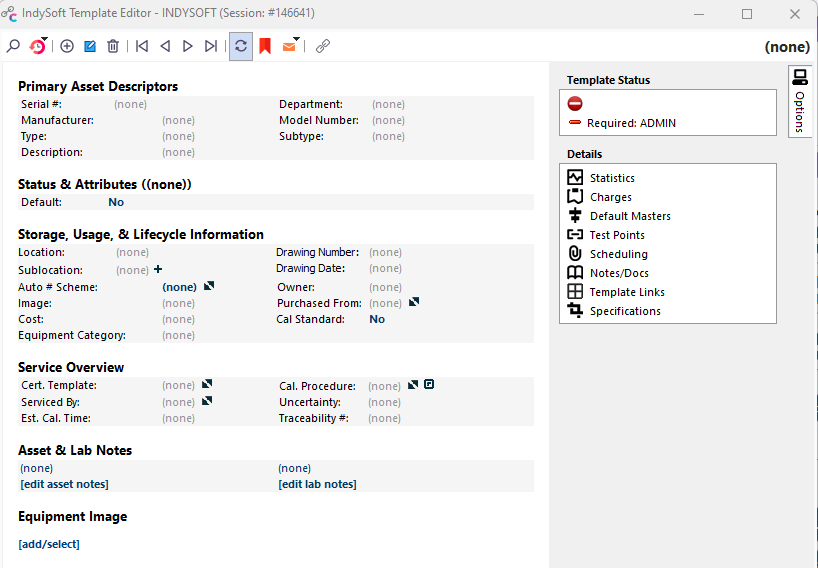
IndySoft Template Editor
General Interface
Editing a template is similar to editing an asset from the main screen's Equipment View. Nearly all the fields can be cut/pasted from an Equipment Layout into a Template Layout (or vice-versa) in LayoutBuilder. When a template is modified, all assets currently related to that template are automatically updated if that field is linked to the template. Detail dialogs can be launched from the right-hand side. Detail dialog data is synced back to the equipment level when the dialog is closed.
Template Editor - Header Options
![]()
Template Header
![]() Search For Template
Search For Template
Displays the template search dialog, as shown below:
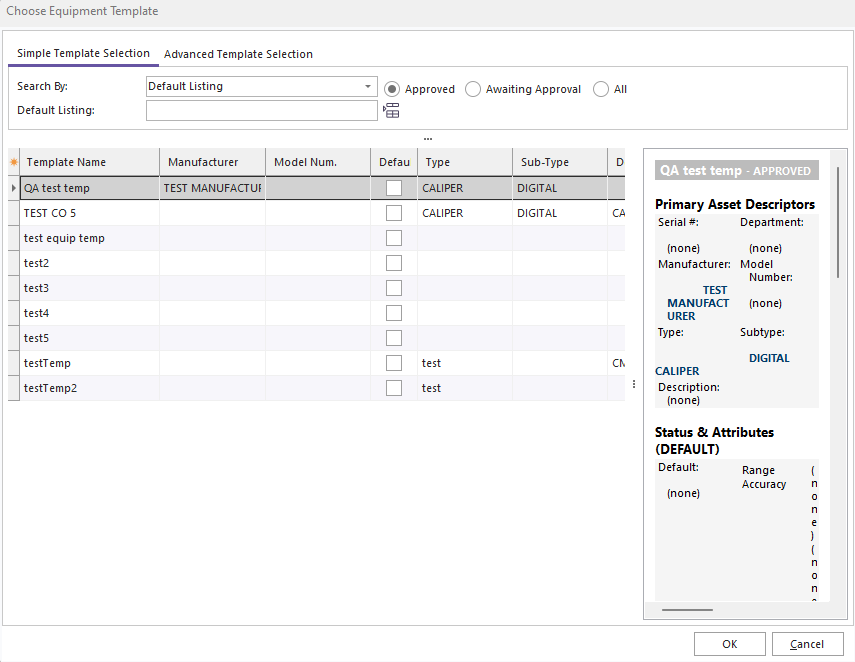
Choose Equipment Template
Note that the template selected in the grid can be previewed in a layout to the right. This layout is specifically the template 'SEARCH BY' layout, as designed in LayoutBuilder. This dialog allows for three search options:
·Default Listing - search by the name of the template - the 'Template Name' in the grid
·Type/Sub-Type - search by both Type and Sub-Type fields
·Manuf./Model Num. - search by both Manufacturer and Model Number
The templates will be automatically filtered as initial search characters are input in the edit box(es) above the grid. Note that User/Location Settings related to the search will come into play. Press the 'List All' button above the grid to select all templates.
![]() Most Recent Templates
Most Recent Templates
Like Equipment View, IndySoft remembers the last ten templates viewed - use this button to recall one of these templates quickly.
![]() New Template
New Template
Launches the new Equipment Template dialog. This dialog is much like the template search dialog but with a couple of additional items:
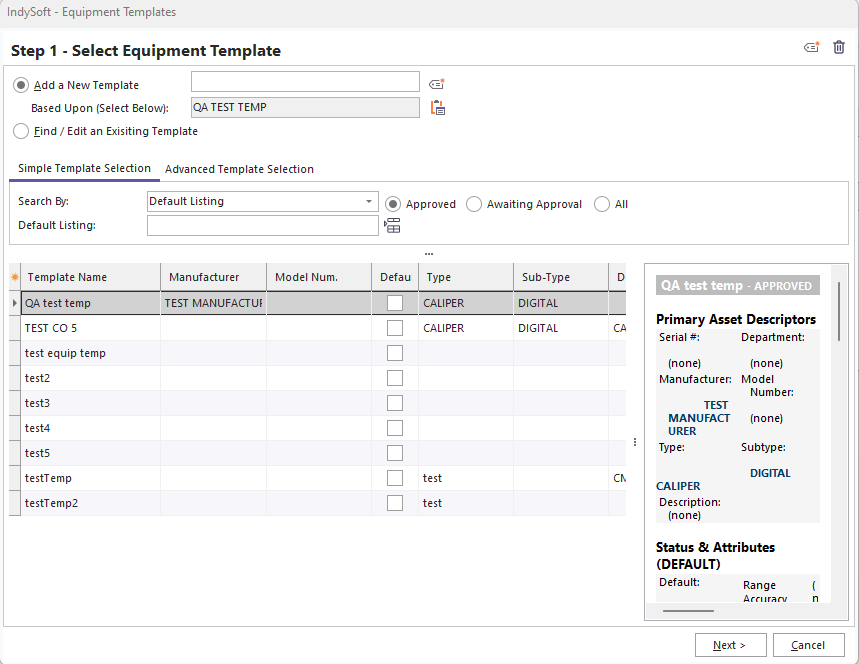
New Template Dialog
Input the name for the new template in the 'Add a New Template' edit box on the top. Use the search options on the bottom (similar to the standard template search dialog) to find the template that should be cloned for the new template. Use the 'Select Template From Main Screen' button to find the current template quickly.
![]() Rename Template
Rename Template
After confirmation, this will display a small dialog for changing the name of the current template.
![]() Delete Template
Delete Template
After confirmation, this option permanently deletes the current template.
![]() Template Navigation
Template Navigation
Use these four buttons to quickly locate the first, prior, next, or last template. Note that templates are system-wide, so company selection is not relevant.
![]() Synchronize Changes With the Main Screen
Synchronize Changes With the Main Screen
This button toggles on/off an automatic refresh of the main screen's Equipment View layout whenever a template edit is performed. It is possible that the asset currently displayed in the Equipment View's layout was also modified from the template change. The equipment data is changed regardless - this sync only affects the cosmetic refresh onscreen.
![]() Bookmark Template
Bookmark Template
Toggling this button down will bookmark the current template for quick retrieval. To go back to this template later, un-toggle the same button.
![]() Email Template
Email Template
This button provides four quick ways to email the current template. These options are similar to what is provided from the Equipment View on the main screen through a right-mouse click.
![]() Equipment Linked
Equipment Linked
The caption for this button will display a count of the # of assets currently linked to the current template. Note that this # does not help identify exactly which fields might be linked (or not linked) - which assets have a general association to this template - even if no specific fields are currently linked. Pressing this button will prompt confirmation before creating a Navigator Group containing all the assets currently linked to the template. Type a unique name for the group when prompted:

Specify Group Name
Having these assets in a navigator group is helpful when double-checking similar equipment values. To launch the Navigator from the main screen, go to the Header...Gear button...Navigator.
The name of the current template is displayed on the right side of the header above the layout.
Right-Mouse Click Options - Template Header
PLEASE NOTE
The following topic may include references to the custom scripting aspects of the IndySoft product line. Some aspects of the discussed features may not be accessible to end customers. For reference, the affected features will use the word 'script' or 'custom script.' Refer to the Custom Scripting Overview topic for more information about custom scripting and how it is implemented and supported within the product.
Right-Mouse Click Options - Template Header
·Copy Template Name to Clipboard - quick method of copying the name of the current template to Windows clipboard.
·Template Custom Rules - launches a dialog for adding/editing/deleting Template Scripts - see Custom Scripting.
·System-Wide Prefs - quick method of launching the System-Wide Preferences dialog. Notably, this dialog contains an option for filtering template link fields - which can be relevant to the default template links shown in this Template Editor (Variables tab...Edit Template Link Filter)
Statistics Dialog
Note that one detail dialog is unique to the template system - not common to Equipment editing. The Statistics dialog can be enabled through the Dialogs form in the Template Layout in LayoutBuilder. Template statistics allow for the association of vendors and charge types to a template - to track the proven capability of vendors for performing certain charge-type operations. The interface is simply a grid showing vendors+charges associated with the current template, allowing add/edit/delete:

Statistics Edit
To add/edit a statistic, the following dialog will be displayed - input the vendor and charge type. 'Capability On' flags whether this vendor+charge combination is valid for the selected template. This capability can be looked up from event scripts if the automatic response to this capability is desired.

Statistic Edit
Use the Display Template Statistics module to view template statistics across all templates for a group of vendors/charges.
Right-Mouse Click Options - Template Layout

Right-Mouse Click Options - Template Layout
Most importantly, users can use the right-mouse click options to quickly switch between template layouts that have been mapped for visibility for the current login. In the example above, only the 'Standard Layout Multi Panel-Layout' template view is active, and 'Testimporteqview' is selectable. Other options include:
·Copy Selected - copies selected text to the Windows Clipboard.
·Select All / Copy - selects all text in the layout and copies to the Windows Clipboard. Note that all standard text formatting (fonts, sizes, tables, etc.) are included but will be retained upon paste only if the receiving application supports these rtf-type options (like Microsoft Word, etc.) However, if the selected layout is pasted into Notepad, only simple text will be retained.
·Edit Current Layout (System Administrators Only) - this option allows for the immediate editing of the current layout, saving the time of launching LayoutBuilder, selecting Template Layouts, and finding the current layout. Note that only 'System Administrators' will see and be able to use this option.
·Print Equipment View - sends the current template layout (as seen onscreen) to the printer. A print confirmation dialog will first be shown - allowing for the selection of a printer, etc.
·Export Equipment View to RTF - allows for quickly exporting the current template to an RTF file.
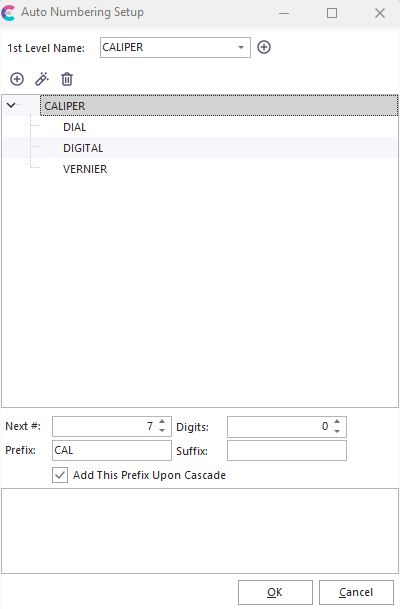
Automatic Numbering - Templates
Templates have an automatic numbering field, which in the default layout appears in the 'Additional Info.' section of the template layout:
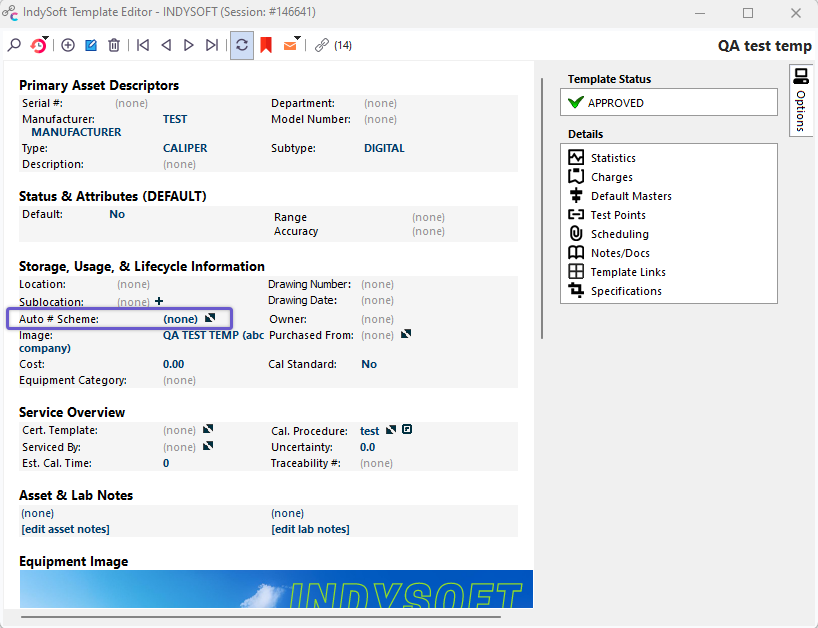
Automatic Numbering Field - Templates
Press the 'diagonal arrows' button/hyperlink to modify the automatic numbering scheme. This scheme will be utilized when the template creates new assets. Note that the Auto-Numbering Dialog has a 'Clear' button when called from the Template Editor. This clear button can clear the associated auto-numbering scheme from the template. Selecting an auto-numbering scheme from the tree will associate the new scheme with the template. Modifying any of the settings for the scheme ('Next #,' 'Digits,' 'Prefix,' 'Suffix,' etc.) is equivalent to modifying the settings from the main Auto-Numbering dialog, as called from the Home View.
Automatic Numbering - Templates |