Flowchart Editor - Options, Tracking Statuses, Event Types
There are many specific options related to the usage of the flowchart in the Dashboard interface and to aid in quickly creating flowcharts:
Options, Tracking Statuses, Event Types
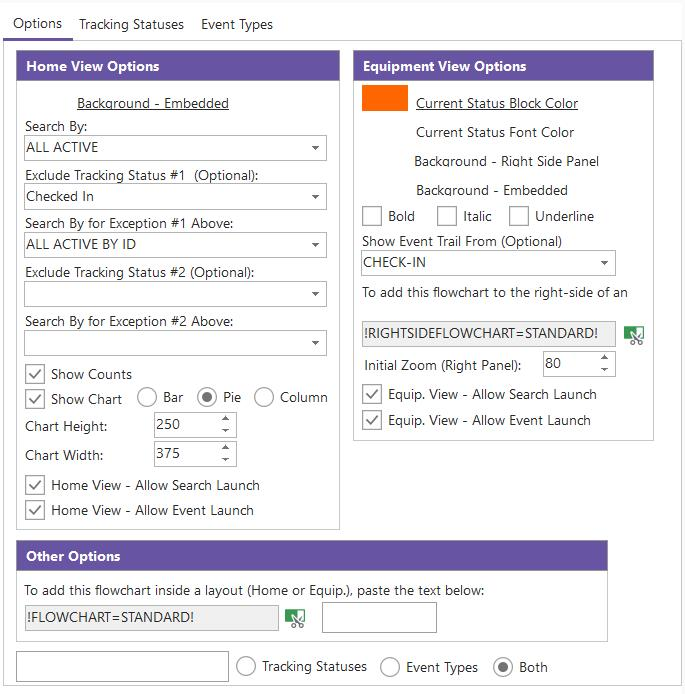
Options Tab
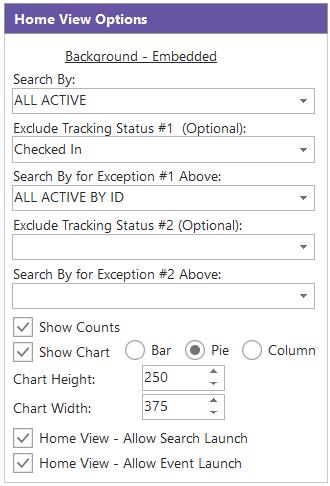
Home View Options - Options Tab
Background - Embedded
This option controls the flowchart's background color when embedded into a Home View. Remember that Home Views always have a white background in IndySoft - typically, a white background is preferred for home view flowcharts unless you want to 'set off' the flowchart from the rest of the layout. Also, remember that the same flowchart can be used in Home View layouts and Equipment View layouts - so the background you currently see in the Flowchart Editor when designing is not necessarily the background used when the flowchart is embedded. This option controls the background color. Click on the 'Background - Embedded' hyperlink to select a color. Select one of the 40 default colors or press 'More Colors' to design your custom color. You can also press 'Default' to return to the default color of white.
To use the current color selected for 'Background - Embedded' (Home View) in the flowchart while designing, then single-click on the color preview box to the left of 'Background - Embedded.' For instance, you might have a background color of white for when the current flowchart is embedded in a Home View. But you might have a background color of gray when the current flowchart is shown in the right-side panel of the Equipment View. So it is your preference which background color you want to display while designing in the Flowchart Editor.
Search By
When the flowchart is used in a Home View, all the objects (boxes) in the flowchart with captions equal to tracking statuses become interactive. You can single-click on these boxes and launch into custom search by dialogs that highlight assets with this particular tracking status - and then possibly launch events from within these custom search by dialogs. So, use these settings to tell IndySoft which custom Search By (set up in Setup Custom Searches / Reports / Layouts) should be used. The only thing that is 'added' to this custom search by's default settings is the inclusion of the selected tracking status in the filter. Also, IndySoft automatically follows the flowchart's arrows that extend from the currently selected box and finds any events that occur next in the flow. These events are automatically added to the custom search by dialog as the 'Event Quick Launch' buttons.
Let's take an example. Say you use this setting to point the flowchart towards the 'IN MAIN LAB' custom search by dialog. It is set up in Profile Manager... Setup Custom Searches / Reports / Layouts with these settings:
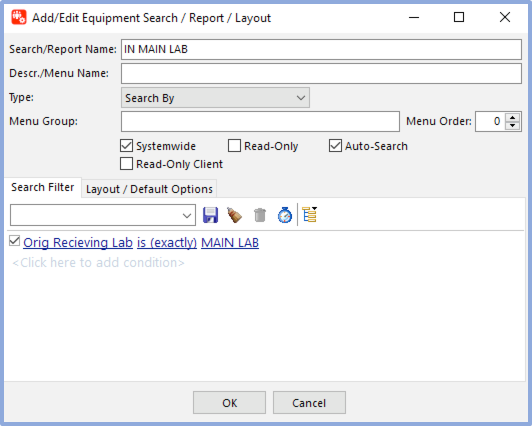
Example Settings - IN MAIN LAB, custom search by
First, note that the 'Systemwide' checkbox is irrelevant here - that checkbox (along with any company/user/profile exceptions) is only used when drawing the search-by options in the 'Search/Report' header menu in the Dashboard Main Screen. Next, note that this search by has a filter of 'Orig. Receiving Lab is (exactly) MAIN LAB'. ('Orig. Receiving Lab' is a Current status field relabeled to 'Orig. You are receiving Lab' in this example). So this filter is applied anytime this custom search by is used - even if it is launched from a flowchart. But if you launch the search-by by clicking on a tracking status-related object in a Home View flowchart...like clicking on 'Awaiting Shipment' below...

Then the filter used in the search by will be 'Orig. Receiving Lab is (exactly) MAIN LAB' plus 'Tracking Status is (exactly) 'Awaiting Shipment' - as seen in the example below:

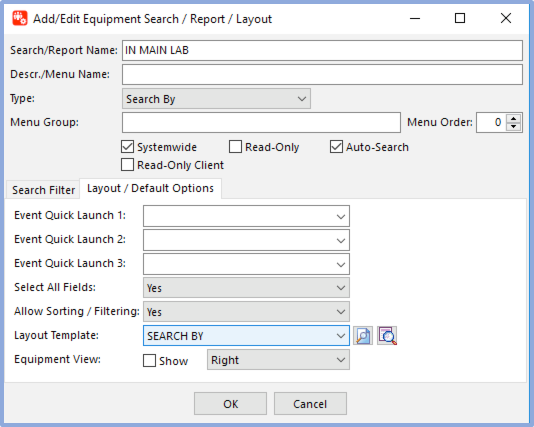
Custom Search By Launched From Home View Flowchart
Also, note that the 'Routing' quick event launch button was automatically added to the custom search by - and not defined in the custom search by dialog settings in Profile Manager. This is because the quick launch event buttons are automatically added based on the flow of the events in the flowchart. IndySoft takes the clicked object, in this case, 'Awaiting Routing,' then follows any arrows that extend from that object in the flowchart to other objects. If those objects have text corresponding to events in the database, then IndySoft knows that these events are appropriate next-event choices and are drawn as quick launch buttons in the search by. Note: If you define the 'Quick Launch' buttons in the Setup Custom Searches / Reports / Layouts dialog, they will only be drawn explicitly when the custom search by is launched from the Dashboard's 'Search/Report' header menu panel. When the search by is launched from a flowchart the quick launch buttons are only created by IndySoft following the flowchart and looking for appropriate events.
Exclude One Tracking Status (Optional)
The above option for 'Search By' works great for all tracking statuses that apply to statuses used while the asset is 'in process' - like after it is received, serviced, etc. Because in these statuses, you typically flow assets with certain key fields like 'current location,' etc., which are used in the filter set up in the 'Search By' option above. But typically, one tracking status means 'Returned to Customer,' 'On Shop Floor,' or 'Active' - that means the asset is back in use and will likely not return for another 'round trip' until the next scheduled event. Suppose a search by dialog is called from the flowchart for assets with this tracking status. In that case, we can't apply the same general filter for these assets since they are not currently assigned to any location. All the tracking status filters in our above example could be combined with our general filter of 'Orig. Receiving Lab is (exactly) MAIN LAB,' but this would not work for assets currently in the 'Returned to Customer' tracking status - since the 'Orig. Receiving Lab' field is cleared when assets have this status (just an example). So...this option lets you set up which tracking status is this 'exception,' with the option below, you can point the search by that is launched from objects in the flowchart that have this tracking status toward a different set of search by dialog settings.
Also, this exception is helpful when the 'Show Bar Chart' option below is used. If you included this general tracking status in the bar chart, the chart would likely not be readable. For instance, say you are tracking 1,000 assets in your workflow at your current location ('MAIN LAB'). This means that 1,000 assets flow in and out of service locations on service schedules, etc. At any time, 950 of the assets might be 'in use' (out on the shop floor...at the customer site, etc.) while the other 50 are somewhere in your service workflow. If you included the 'Returned to Customer' tracking status in the bar chart, then the 'Returned to Customer' bar would be 20 times longer than the other bars, making it nearly impossible to click on the other bars since they are so small.
Search By for Exception Selected Above
Suppose you have selected an exclusion tracking status from the above option. In that case, you can use this option to point this tracking status toward a different search by dialog for settings, as set up in Setup Custom Searches / Reports / Layouts.
Show Counts
If this option is checked, the Home View flowchart objects tracking status-related will automatically display a count of the number of assets that match this tracking status (and any filter included in the 'Search By' setting). So, this count gives the user a preview of the number of assets to save them from having to click on each dialog to confirm. When this option is turned on, you will also notice that non-zero counts for tracking status objects have a highlighted border. See examples below:
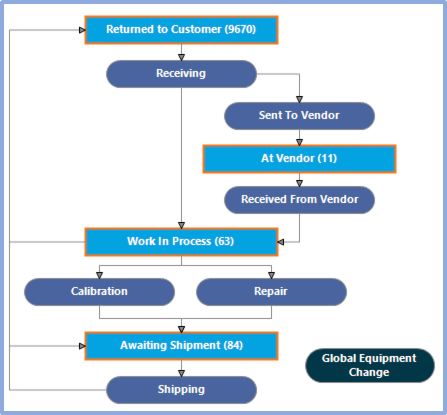
With Show, Counts Turned On
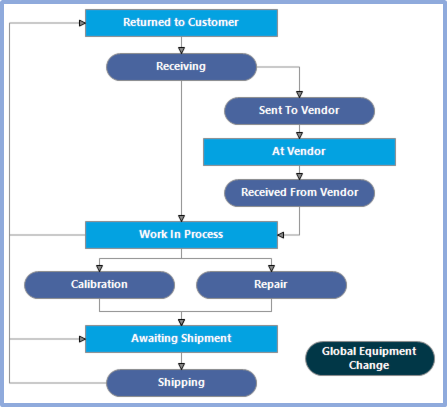
With Show, Counts Turned Off
Show Chart
When this option is checked, you will see a small chart to the right of the flowchart in the Home View. You can choose between a bar, pie, and column chart. This bar chart summarizes the same non-zero counts displayed in the flowchart. Only tracking statuses with non-zero counts are included in the bar chart. The chart is interactive, just like the flowchart. Just single-click on any bar or section to launch a custom search by for all assets that have this tracking status. This operation is equivalent to clicking on the same tracking status in the flowchart to the left. So, train your users to always click on the longest bar, and they will see things flowing smoothly (at least in terms of the number of assets). Example below:

Example - Show Bar Chart in Home View Flowchart
Chart Height (per line)
If you have the 'Show Chart' option enabled above, then this option controls the height of the bar chart, as shown in the Home View. Note: This height is per line, not for the entire bar chart. This ensures that the bar chart will look consistent in terms of the height of each bar, if the bar chart has 12 distinct bars or only 3, etc.
Chart Width
If you have the 'Show Chart' option enabled above, this option controls the width of the overall bar chart, as shown in the Home View.
Equipment View Options - Options Tab
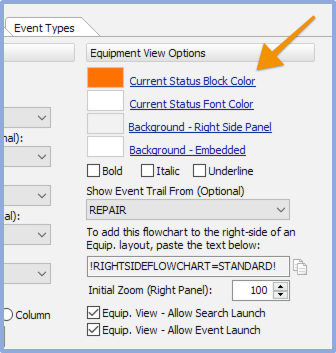
Current Status Block Color
When a flowchart is used with an Equipment View IndySoft notes the tracking status of the asset currently displayed in the Equipment View and highlights this status in the flowchart. This option controls the color of this highlighting. In the example below, the current asset is 'Awaiting Cal':
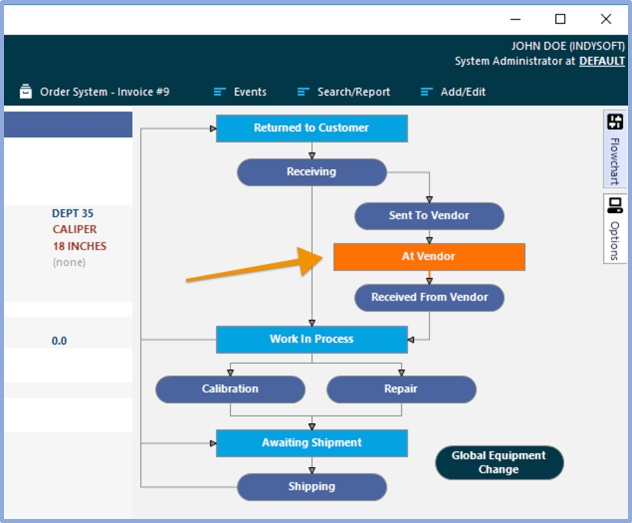
Highlighting for Current Status Block Color
Note that this same highlight color is used when coloring the text of the events that have been previously completed in the workflow (for this 'round trip'). So in the example above, the asset is 'Awaiting Cal' and has already been through the 'Receive' and 'Routing' events (since the text on those events is highlighted blue). Finally, note that any arrows that extend from the current tracking status to other events are also highlighted in blue. So in the example above, the next appropriate step is 'In-House Cal.'
Current Status Font Color
This setting and the 'Current Status Block Color' are used above. This setting controls the font color used on the current tracking status block.
Background - Right Side Panel
A different background color can be selected for when the flowchart is displayed on the right side of the Equipment View and when it is embedded within it. This setting controls the background color for the right side panel. Typically this background color is gray - to blend in with the surrounding objects.
Background - Embedded
A different background color can be selected for when the flowchart is displayed on the right side of the Equipment View and when it is embedded within it. This setting controls the background color for embedded flowcharts in the Equipment View. Typically this background color is white - to blend in with the surrounding objects.
Bold / Italic / Underline
Use these three options further to highlight the text for the current tracking status box. Examples below:

Bold / Italic / Underline Options Off

Bold / Italic / Underline Options On
Show Event Trail From (Optional)
As noted above, the highlight color is used in the flowchart to note the events that have occurred before the current status in the current cycle through the workflow. This same flow of events can be duplicated in an 'event trail' shown at the bottom of the Equipment View. The events are shown linearly, much like a 'breadcrumb' trail:
![]()
Event Trail
So in the above example, the asset is currently 'Awaiting Cal,' and the 'Receive' and 'Routing' events have already been performed. If you hover over one of the events, you will see a reminder of the event date/time and who performed the event. If you click on the event from the Event Trail, you can review the event, just as if the event was launched from the History grid.
To draw the Event Trail properly, IndySoft must confirm your workflow's first (or 'topmost') event. This event begins each round-trip - normally a 'receive' type event. Confirm this event type through the 'Show Event Trail From' drop-down.
To add flowchart to right-side of Equip. layout...
This text is provided as a convenience - so you are reminded of the appropriate text that can be pasted into an Equipment View to trigger the flowchart to be used on the right-hand side of the layout. This text will be replaced with empty text when the layout is drawn.
Initial Zoom
Sometimes layouts can become rather large, so they take up too much space in the layout or the right-side panel. This setting can set up an initial zoom percentage applied whenever the flowchart is redrawn onscreen. If you want to return the flowchart to the full size, use the percentage tool on the toolbar.
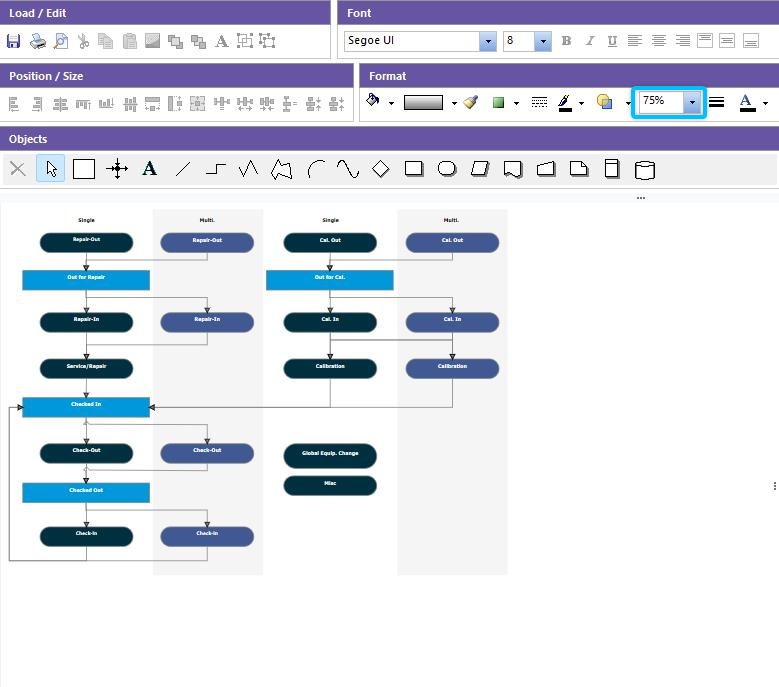
Zoomed 75%
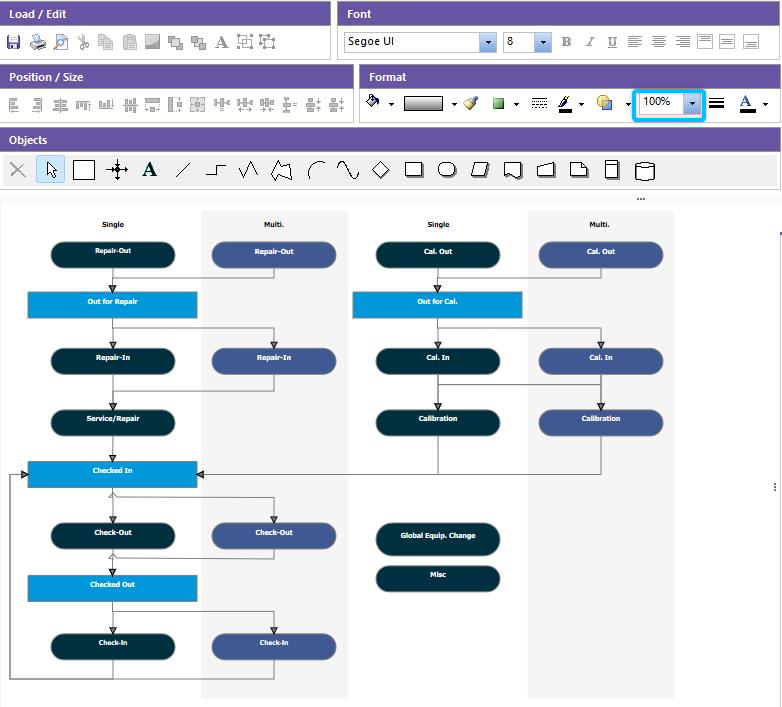
Full Size

Other Options - Options Tab
To add this flowchart inside a layout... - Paste Merge Item !FLOWCHART-STANDARD!
Test Flowchart - This allows you to test the interactive features of your flowchart.

Tracking Status Tab
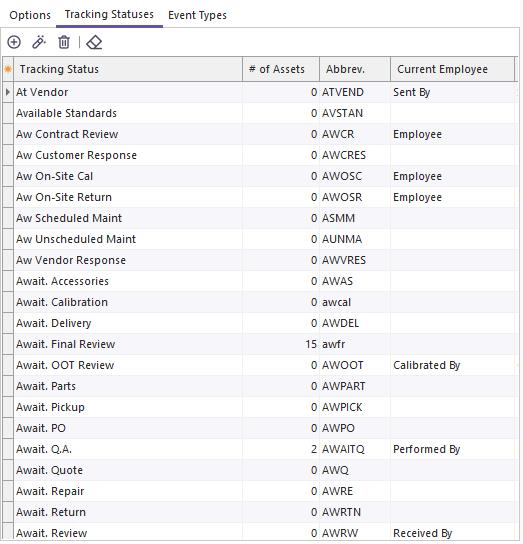
Tracking Status Tab
This tab is provided as a convenience - to remind you of the available tracking statuses in the workflow - as defined in the Workflow Configuration Module. Drag/drop any tracking status from the grid to an object in the flowchart - upon drop, the object's text will be changed to the dropped tracking status.
Event Types Tab
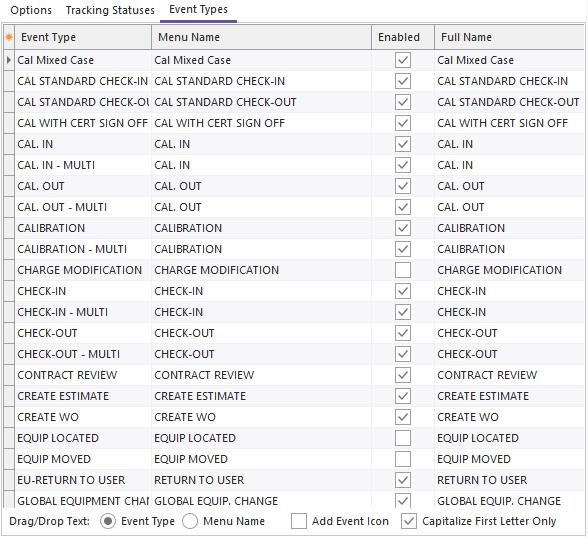
Event Types Tab
This tab is provided as a convenience - to remind you of the available event types in the workflow - as defined in the Workflow Configuration Module. Drag/drop any event from the grid to an object in the flowchart - upon drop, the object's text will be changed to the dropped event. If you would like for the event type text to be used, select 'Event Type' from below the grid. If you would like the event's Menu Name to be used instead (which might differ from the Event Type), select 'Menu Name.' For either option, select 'Capitalize First Letter Only' (the default) if you want the first letter of each word capitalized but all following letters lowercase - otherwise, all characters will be uppercase.
Finally, you can drag/drop event images to the flowchart by selecting the 'Event Icon' option. It is often best to drag/drop these images to 'Text' objects with no text value. 'Text' objects work well because they have a transparent background - so only the image will be shown (and any text). |