Sync Maps Launched From Export/Import
Often a sync map is run behind the scenes through a Windows Task without any user interface. But calling a sync map on-demand from within the Export/Import system is possible. All sync maps are visible from the starting page of the Export/Import wizard:
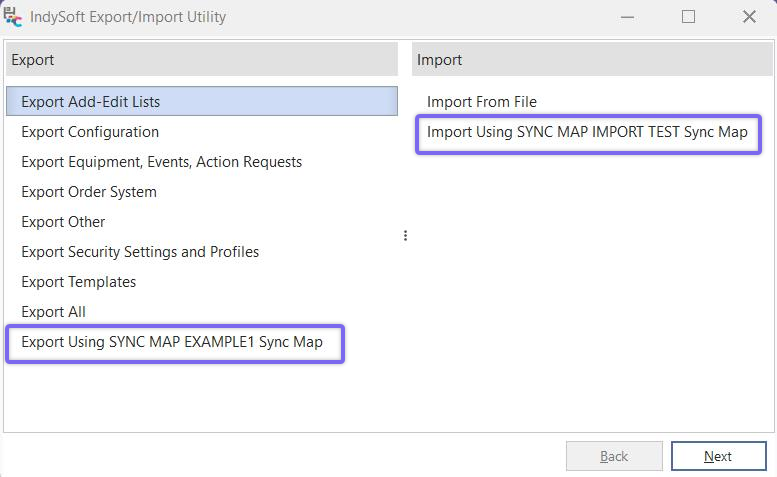
Sync Map options in Export/Import Utility
Select one of the export or import-related syncs and press 'Next' to proceed. If an export-type of sync map is selected, a filter box will be displayed asking for confirmation of the assets to be exported. This filter box will default to the display of the filter as setup in the 'Export Selection Filter' step of the sync map setup wizard:
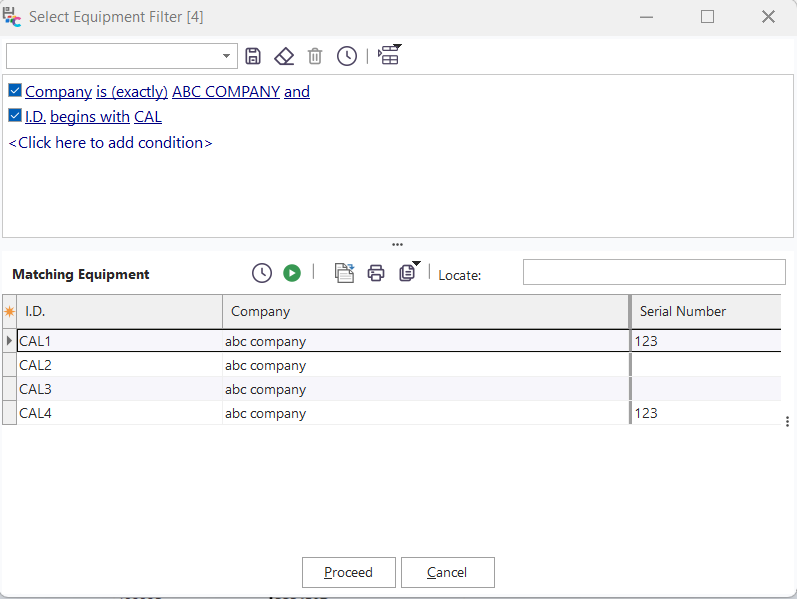
Sync Map Export from Export/import Module - Select Equipment Filter.
This filter could be modified (for this sync only) and re-executed. Confirm the selected assets to be exported, then press 'Proceed.' If 'Cancel' is selected, the sync export will be aborted. As soon as 'Proceed' is checked, the export of each asset to the desired location will begin:

Export-type Sync Map - Export/Import Module - Progress
Note that a progress bar onscreen will be displayed when exporting assets through a sync map with the Export/Import utility. The top progress bar shows you how many total assets have been exported. The bottom progress bar shows you the progress in exporting the current asset. Once the export is complete, press 'Repeat' to return to Step 1 of the Export/Import wizard.
From Step 1 of the Export/Import wizard, if an import-type sync map is selected, the import files in the related directory (network or cloud - as set up in the sync map setup wizard) will be automatically downloaded and imported after an initial Yes/No confirmation. A progress bar will display during import:

Import-type Sync Map - Export/Import Module - Progress
Finally, you can also drag-drop a sync map zip from Windows Explorer onto Step 1 of the Export/Import dialog to immediately begin an import of that one asset using its included sync map. Or, you can select 'Import From File' and then select a zip created from a sync map export. The Export/Import wizard will detect that the zip was created from a sync map and then allow a preview of the zip contents and related sync map before import. This one-file import is a good confirmation to use when testing or when you want to double-check the import requirements (as contained in the sync map embedded in the import file) before performing the actual import:
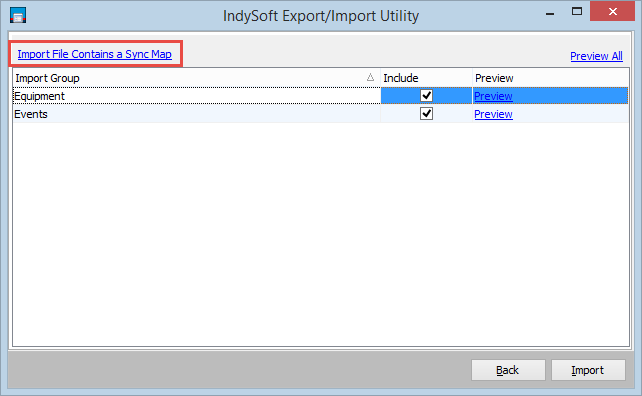
Import Sync Map File - Preview Step
IndySoft will know the import file was created from a sync map based on the embedded sync map within the zip. This sync map can be reviewed (not edited) by pressing the 'Import File Contains a Sync Map' hyperlink text. IMPORTANT: any import of a sync map file will use the import settings mandated by the sync map embedded within the zip - think of these settings a negotiated agreement between the databases. The sending database only agrees to export this data if it is imported using the embedded rules. The actual equipment data can be previewed by selecting 'Preview' for 'Equipment' or 'Events', or 'Preview All' above the grid. Press 'Import' when you are ready to proceed with the import or 'Back' to cancel the import. |