Add/Edit..Documentation...Documents
![]() *Version 13.1 ||*Revamped interface for Add/Edit Document Dialog - now displays in new tabbed structure
*Version 13.1 ||*Revamped interface for Add/Edit Document Dialog - now displays in new tabbed structure
- Review the tabs below for more information
Overview | This section allows every individual Company to have their documents. The documents can be in pictures, scanned images, or any other existing document on your computer. Documents can be added to a company by using the Add/Edit Document dialog.
Adding Documents to a Company
To add to or manage the Documents, in the IndySoft left-hand panel, click the Add/Edit icon and select Documentation...Documents from the drop-down menu.
This grid will show any documents already in the system for each selected Company.

Add/Edit Documents
![]() 'New Item' to add a new document
'New Item' to add a new document
![]() 'View Edit Item' to edit the document
'View Edit Item' to edit the document
![]() 'Delete Item' to delete selected document
'Delete Item' to delete selected document
Note: Be sure that you have selected the correct company before adding new documents.
| Main Information | Main Information:

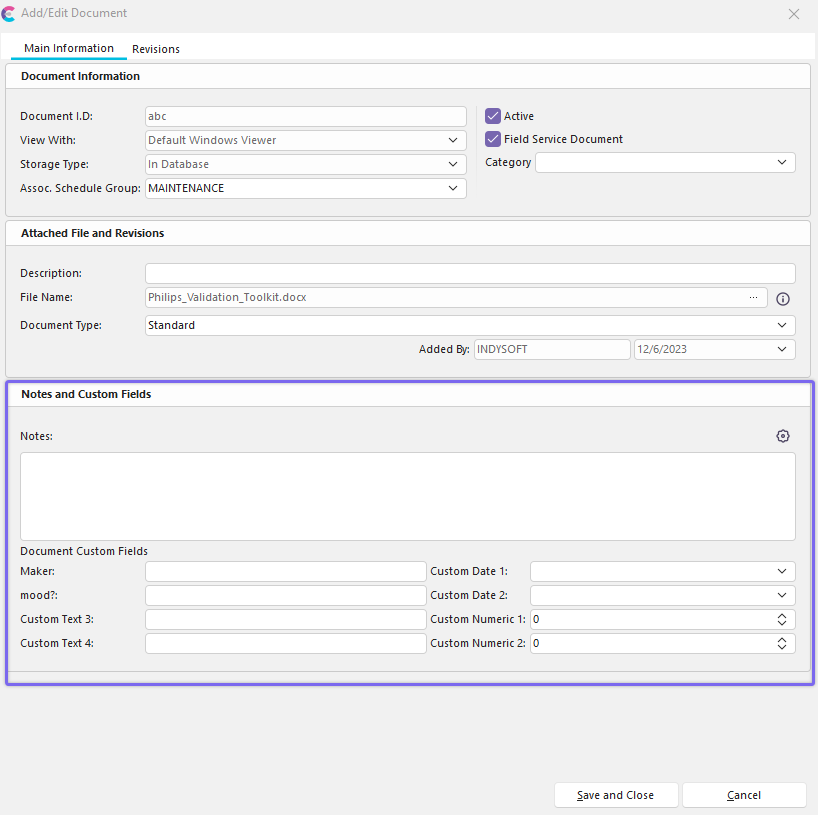
Add/Edit Document Dialog - Main Information Tab
This tab provides an overview of all information related to the selected document.
Add/Edit Procedures and Documents has received a new look and feel in 13.1. Instead of the wizard step process, there is a new tabbed navigation structure. There are new fields for Category and Field Service that can be utilized as well.
Document Information
Document I.D.
Here you will give the document a name in the 'Document I.D.' field.
View With
- Default Windows Viewer - A pop-up window of the selected document will appear on the screen
- Web Browser - Choosing this view will affect the following step; asking you to give the web address in which this document can be found
- No Viewer- Reference Only
Storage Type
- In Database - The document will be stored along with the IndySoft client files in the central database. This gives you more options when sharing the document and security.
- In Central Location - This option allows users to save to a single-user hard drive or network-accessed hard drive.
Assoc. Schedule Group
Schedule group that the document is associated with - based on Add/Edit...Systemwide...Scheduling...Schedule Groups
Active
Specifies if the document is active or inactive
Field Service Document
Specifies whether the document is considered for Field Service - controls if the document is synced over to Field Service machines
Category
New in 13.1, specify the category the document is associated with - based on Add/Edit...Documentation...Categories
Attached File and Revisions
Description
A more detailed description of the document that the 'document I.D.' does not specify
File Name OR Web Address
(depending on how you chose to view this document)
Document Type
- Standard
- Embedded Calibration Doc
- Visual Cal Program
- Custom Program
Notes and Custom Fields
Notes
This area allows you to write additional notes related to the document.
Document Custom Fields
This area allows you to add values to the custom fields you have created. These values will appear under the field heading in the Add/Edit Documents display window.
The custom field labels can be setup through the cogwheel icon ![]()
Setup Custom Labels for Add/Edit DocsRevisions | Revisions:
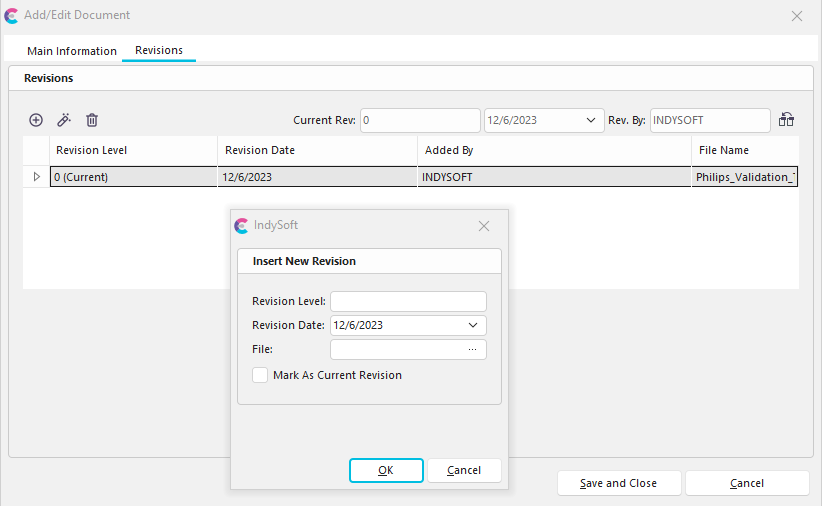
Add/Edit Document Dialog - Revisions Tab
This tab addresses the possibility of having multiple documents that might be updated or revised every so often.
Adding Procedures and Documents received several updates in version 13.1. One major update to be aware of is that adding documents through the standard Add/Edit Interface now automatically creates revisions. Upon saving the document, a revision will automatically be created and marked as current with a revision level of 0. The upgrade process from version 13 to 13.1 also automatically creates revisions (revision level 0) where none were created before. If procedures or documents already had existing revisions, they will remain untouched.
By clicking 'New Item' (plus sign icon), you can add a new revision (or version) of the document you're entering/editing.
Revision Level
For example: if this document is updated every 12 months, you might put the level as the year it was created/updated.
Revision Date
Specify the date the revision occurred.
Mark as Current Revision
Checking this checkbox will make the document you're adding the default revision.
Note: If you've created a list of documents and afterward decided which document is the current one, you can click this icon ![]()
and it will designate the highlighted document as the current default revision. |
![]() Productivity Tip
Productivity Tip
The Add/Edit Documents dialog box can be filtered and customized in many ways. See General Interface for more information.
Buttons and Icons are detailed here.