Home Tab
The Home Tab in Dashboard is always the first screen that greets users after login. The screen should be configured to show a quick overall view of the workflow appropriate to the user logged in. This tab also contains optional hyperlinks for launching into advanced configuration utilities and modules. Here is an example of a typical Home tab - keep in mind there can be vast differences in content between various versions (because of the wealth of configuration options):
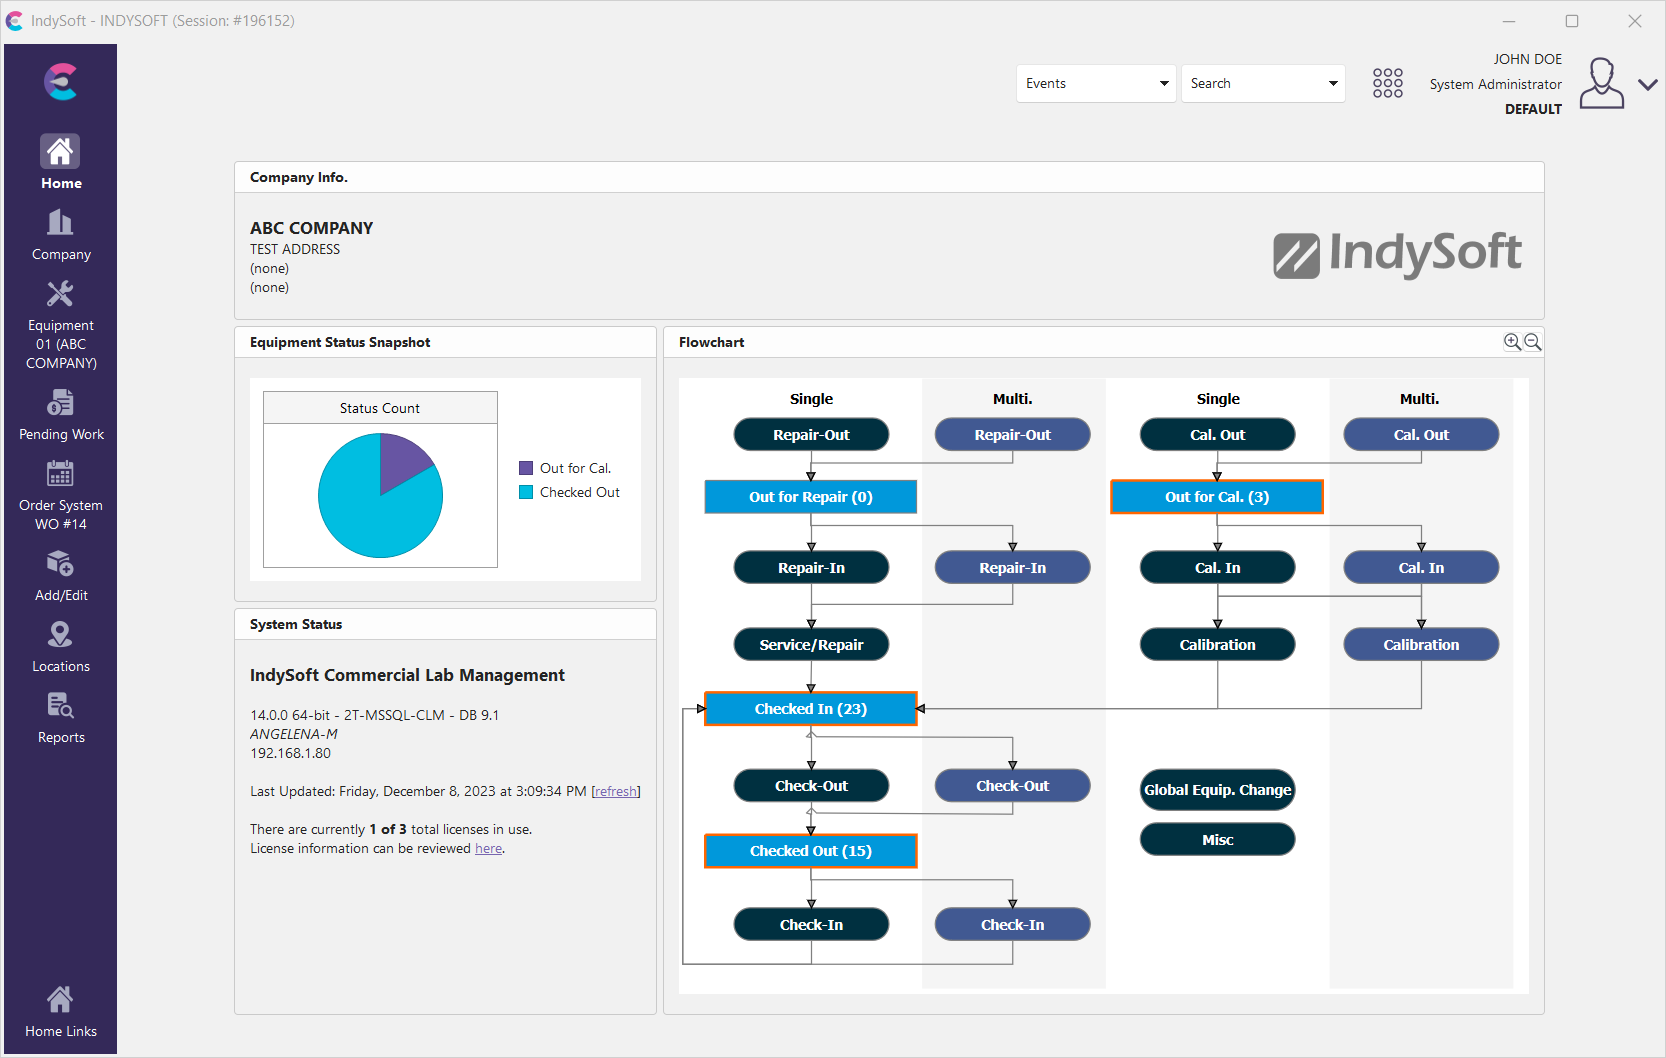
Example Dashboard Home Tab
The first and most important thing to remember with the Home View (and the Equipment View) is that EVERYTHING is configurable. The 'look and feel' is entirely determined by a Layout Editor utility in LayoutBuilder. Typically only 'System Administrators' have access to editing/configuring the layouts, but the options are there. If you want, the Home Layout could be a big white page with a single hyperlink (or nothing at all!) - or it can be configured to closely match internal or legacy systems with important terminology and metrics. If you can make a great-looking document in Microsoft Word, you can efficiently work on the layout of the Home View. Home Views are modified through LayoutBuilder...Home Layouts. But first, let's take the above example, Home View, and talk about the general structure and how to use the Home View.
What is on a Home View?
There are four big categories of items that can be placed on a Home View:
1. Merge items:
| | Think of the Home View (and Equipment View) as a living document. Certain text items in the document can reference database fields, login information, or other 'live data.' The layout is designed with 'merge items' (think mail merge) at certain places in the document that are replaced with live data when the document is drawn or refreshed. As an example - text in your Home View could contain:![]()
Notice that there are 3 'merge items' in the above example: '!USER!', '!EMPLOYEE!', and '!PROFILE!'. When the Home View is created/refreshed, these text items are replaced with the appropriate values:![]()
Easy enough - it is like a mail-merge Christmas letter that you did as a kid (thank you for the !GIFT!...). So the extra text, the fonts, sizes, font styles, paragraph settings...all of that is static, and the merge items are dynamic.
![]() Version 13.0.12 || New Home Layout Merge Items added for hide Locations, hide Add/Edit -- allows the ability to hide these tabs along the left-hand panel of the new dashboard screen
Version 13.0.12 || New Home Layout Merge Items added for hide Locations, hide Add/Edit -- allows the ability to hide these tabs along the left-hand panel of the new dashboard screen
- This will also add security to block access to add/edit from the equip view field captions.
| | |
2. Hyperlinks:
| | We all understand this concept from interacting with web pages. Certain text is 'clickable,' opening the door to further functionality in the software. These hyperlinks are the doorway to the hundreds of functions available in IndySoft. If you don't like or need a function, remove the hyperlink from the Home View or Equipment View. That way, your users do not even know the function exists.![]() ../Storage/indysoft-help-publication/hm_clip0252.png
../Storage/indysoft-help-publication/hm_clip0252.png
Note that in the above example, the hyperlink was colored blue and underlined. This is the default for Home Views - but hyperlinks can be modified in terms of font style just as any other text. But even if all font styling is removed (to match the other non-hyperlink text), users will see the mouse cursor change to a 'hand point' when hovering over a hyperlink.
3. Flowchart:
| | It is common for the Home View to contain a flowchart that gives an overview of the workflow tracked by IndySoft - or at least the section of the workflow that is relevant to the user currently logged in. Below is an example: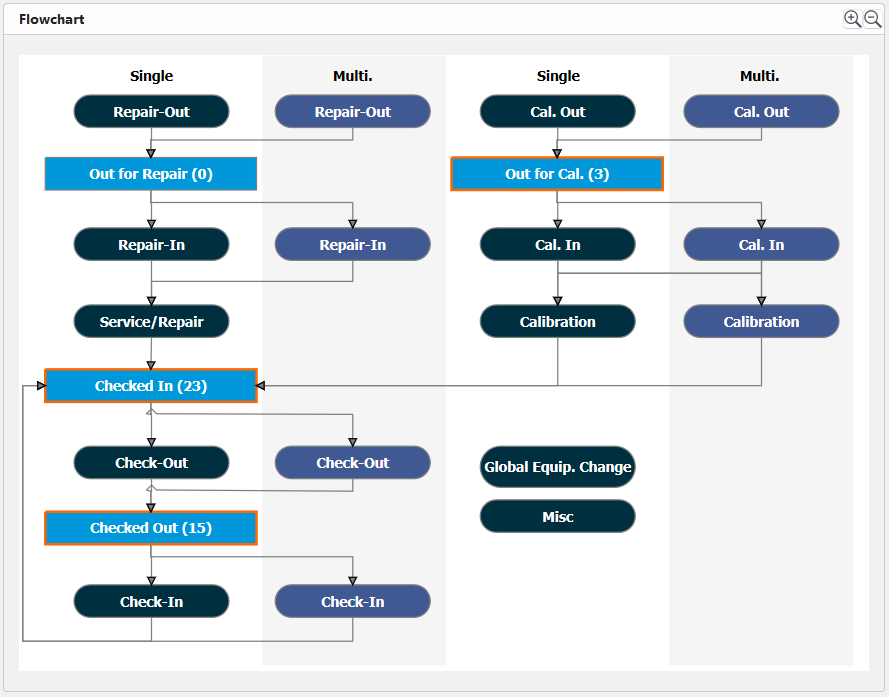 ../Storage/indysoft-help-publication/bw_clip0063.png
Flowchart Example
See the Flowcharts - Overview topic for more information on how flowcharts are designed and modified. But from an end-user perspective, let's take the example above and discuss how this alerts the user to work that needs to be performed and allows them quickly perform this work. In the above example, all tracking statuses are gray boxes, and events are rounded white boxes with event images in the lower right. When a flowchart is embedded in a Home View, the tracking status boxes in the flowchart will automatically launch custom search by dialogs that list all assets that match this tracking status. From within the search-by dialog, the user can quickly launch relevant events.
Note that each tracking status box has a count that is appended to the tracking status name - this summarizes the number of assets that match this status. This saves the user the time of having to click on each search by to learn if there are matching items. As another time-saver, all non-zero tracking status boxes are colored with a blue border. In the above examples, there are 23 assets currently 'Checked In,' 3 are 'Out for Cal,' and 15 are 'Checked Out.' If you ship one of the 15 'Checked Out' assets, click on the 'Checked Out (15)' box in the flowchart (single left-click on the mouse). The following search-by dialog will appear:
Example Search-By - as called from Home View
Behind the scenes, the format of this custom search-by is configured with a default filter - in this case, 'Active is Checked.' For more details on setting up this default filter, see FlowChart Editor. This default filter represents the sub-set of assets that should relate to the user logged in. In addition, a filter for 'Tracking Status is (exactly) Checked Out' is added to the filter - since this search by was launched from the 'Checked Out' box in the flowchart. Users can browse through the grid in the lower left from this search to see matching assets. A preview of the asset is shown on the right as they scroll. This preview is similar to the 'Equipment View' tab on the main screen. If the user would like to review an asset on the main screen, they can double-click on the asset in the grid or select and press 'OK.' If they want to launch a related event, they can select the asset (or assets) from the search-by dialog and press the event button in the lower-left of the dialog. In the example above, pressing the 'Check-Out' button would launch a 'Check-Out' event for the asset. Important: note that the event buttons available in the custom search are drawn based on the actual flow of events in the flowchart. So if the flowchart shows two arrows extending from a tracking status to two possible event choices, these two event choices will appear as buttons in the search launched from clicking on that tracking status in the flowchart.
After events are performed (launched from search-by's on the Home View), the Home View is automatically updated to reflect this event's completion. So all counts will be reduced or increased. In this example, now only 82 assets are 'Awaiting Shipment.4. Charts:
| | Two types of charts can be displayed within a Home View. The first type is a standard chart that can mirror the counts shown in the flowchart. This chart is made visible through an option in the Flow Chart Editor.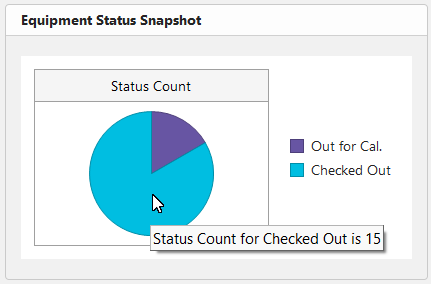 ../Storage/indysoft-help-publication/bw_clip0066.png
Home View - Equipment Status Snapshot
This chart summarizes every tracking status box in the Flowchart with a non-zero value - these counts and tracking statuses are shown in graph form. This chart is also interactive - you can hover over bars in the chart and single click (left mouse click) to launch related search-by's. Clicking on the 'Checked Out' bar in the chart would be equivalent to clicking on the 'Checked Out' tracking status box in the flowchart. Note also that, depending on the setup options for the flowchart, one particular tracking status might be omitted from this chart. Typically this omitted tracking status will correspond to the status of equipment that is 'Returned to Customer' or 'Active' or 'In Use' - that status in your database for 'when assets aren't currently in the workflow.' There is an option to omit this status because thousands of assets could be in this common 'out' status. If you had 6,000 assets currently 'Returned to Customer,' then graphing that bar on the chart would considerably throw off the scale of the chart on the horizontal axis - and your 'Checked Out' bar (which is only 5 in the above example) would be minuscule - too small to click easily.
To summarize: this 'Work to Perform' chart is just a quick review of everything currently in process and relevant to the user currently logged in. Train your users to always click on the longest bar in the chart and complete work from that pile...and they will keep on track!
Next, custom charts can be embedded in a Home View. These custom charts require System Administrators (or users with security rights to modify Home Layouts) to include special syntax in the Home View that contains SQL for retrieving the data. See Home Layouts for more details.5. System Status:
| | In the lower-left-hand corner of the IndySoft home screen is the system status. Here, you can quickly and easily access information about your software such as the type of software and version, the number of licenses being used, and even the date and time of the last page update, which is important to ensure you view the most recent and accurate data. See the dialog below:
 ../Storage/indysoft-help-publication/98741393.png
Home Screen - System Status
In this example, we can easily see that we are currently using the IndySoft Commercial Lab Management software, version 14.0 (database version 9.1). We can see that we are currently using 1 out of our 3 potential licenses. We can also see that the page was last updated on Friday, December 8, 2023, at 3:19:35 PM. You can easily click the [refresh] button to prompt a page refresh instantly.
Multiple Home Views - Right Mouse Click Options
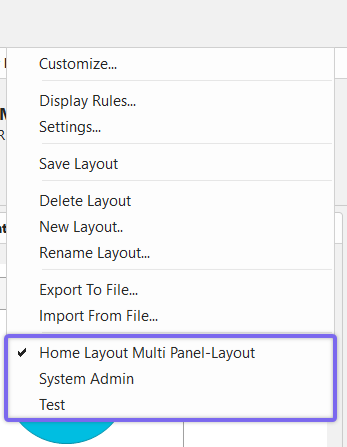
It is possible to have access to multiple Home View layouts at once. Visibility rights for home views are set up in Profile Manager (or in a parallel screen in PrintBuilder/LayoutBuilder). See Setup Custom Searches / Reports / Layouts for more details. All Home Layout options will appear as right-mouse-click options from within the Home Layout:
 ../Storage/indysoft-help-publication/bw_clip0065.png
Home View Layout Options
The last Home View Layout selected before exiting IndySoft will be remembered and recalled upon the next login. This feature is helpful for managers and administrators. If you need to answer a specific IndySoft question from a user with a different default layout, you can quickly right-mouse click and select their design, then understand their perspective. Or if you need hyperlinks to some uncommon functions but don't normally want to be bothered with the 'clutter,' you can create alternative layouts and right-mouse click when you want to use them.
Additional right-mouse click options:
·Copy Selected - copies the selected text to the Windows Clipboard. Note that all font styling is retained, so if you paste it into a rich text editor (like Word), the text will have a similar appearance.
·Select All / Copy - selects all text in the layout and copies to the Windows Clipboard. Note that all font styling and table structure are retained - so if you paste into a rich text editor (like Word), the text will have a similar appearance.
·Edit Current Layout (System Administrators Only) - this option will only appear for users with a 'System Administrator' profile. This allows you to edit the current layout in LayoutBuilder immediately.
·Print Home View - sends the current Home View (exactly as currently seen) to a printer. You will be prompted to confirm the printer.
·Export Home View to PDF - quickly export the current Home View (exactly as currently seen) to a PDF file. You will be prompted for file location and file name. The default file name will be 'IndySoft Home View.pdf.'
![]() Productivity Tip
Productivity Tip
If you have a Home View similar to a printed report, PDF, or email that you can imagine needing routinely from IndySoft...
Rather than spending the time to create a PrintBuilder report that mimics your Home View, consider cloning the Home Layout to a new layout. Then modify the layout to look more like a report (remove obvious buttons and hyperlinks). Finally, expose this layout to your username - so it is available as a right-mouse click option from your normal Home Layout.