Setup Custom Searches / Reports / Layouts
Launching from Profile Manager
Custom Searches, Reports, and Layouts all have visibility rules associated which allows for further control of visibility on that particular search/report/layout. These can all easily be launched from Profile Manager:
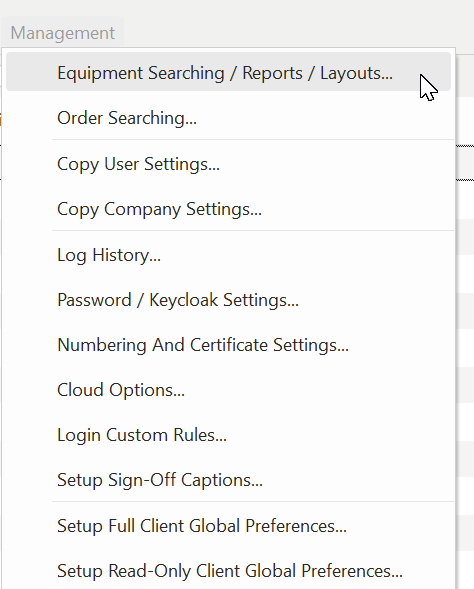
Profile Manager...Management...Equipment Searching / Reports/ Layouts

Profile Manager - Setup Equipment Searching / Reports/ Layouts
Setting the Visibility of Custom Content
Reports and layouts are first created from PrintBuilder or LayoutBuilder. Once the report/layout is created, it can be mapped as visible for specific users/profiles/companies. Once it is visible, users will see the report/layout as an option in the relevant main screen menus. The simplest way to control the visibility of a report/layout is to use the 'Visibility/Usage' section of PrintBuilder/LayoutBuilder:
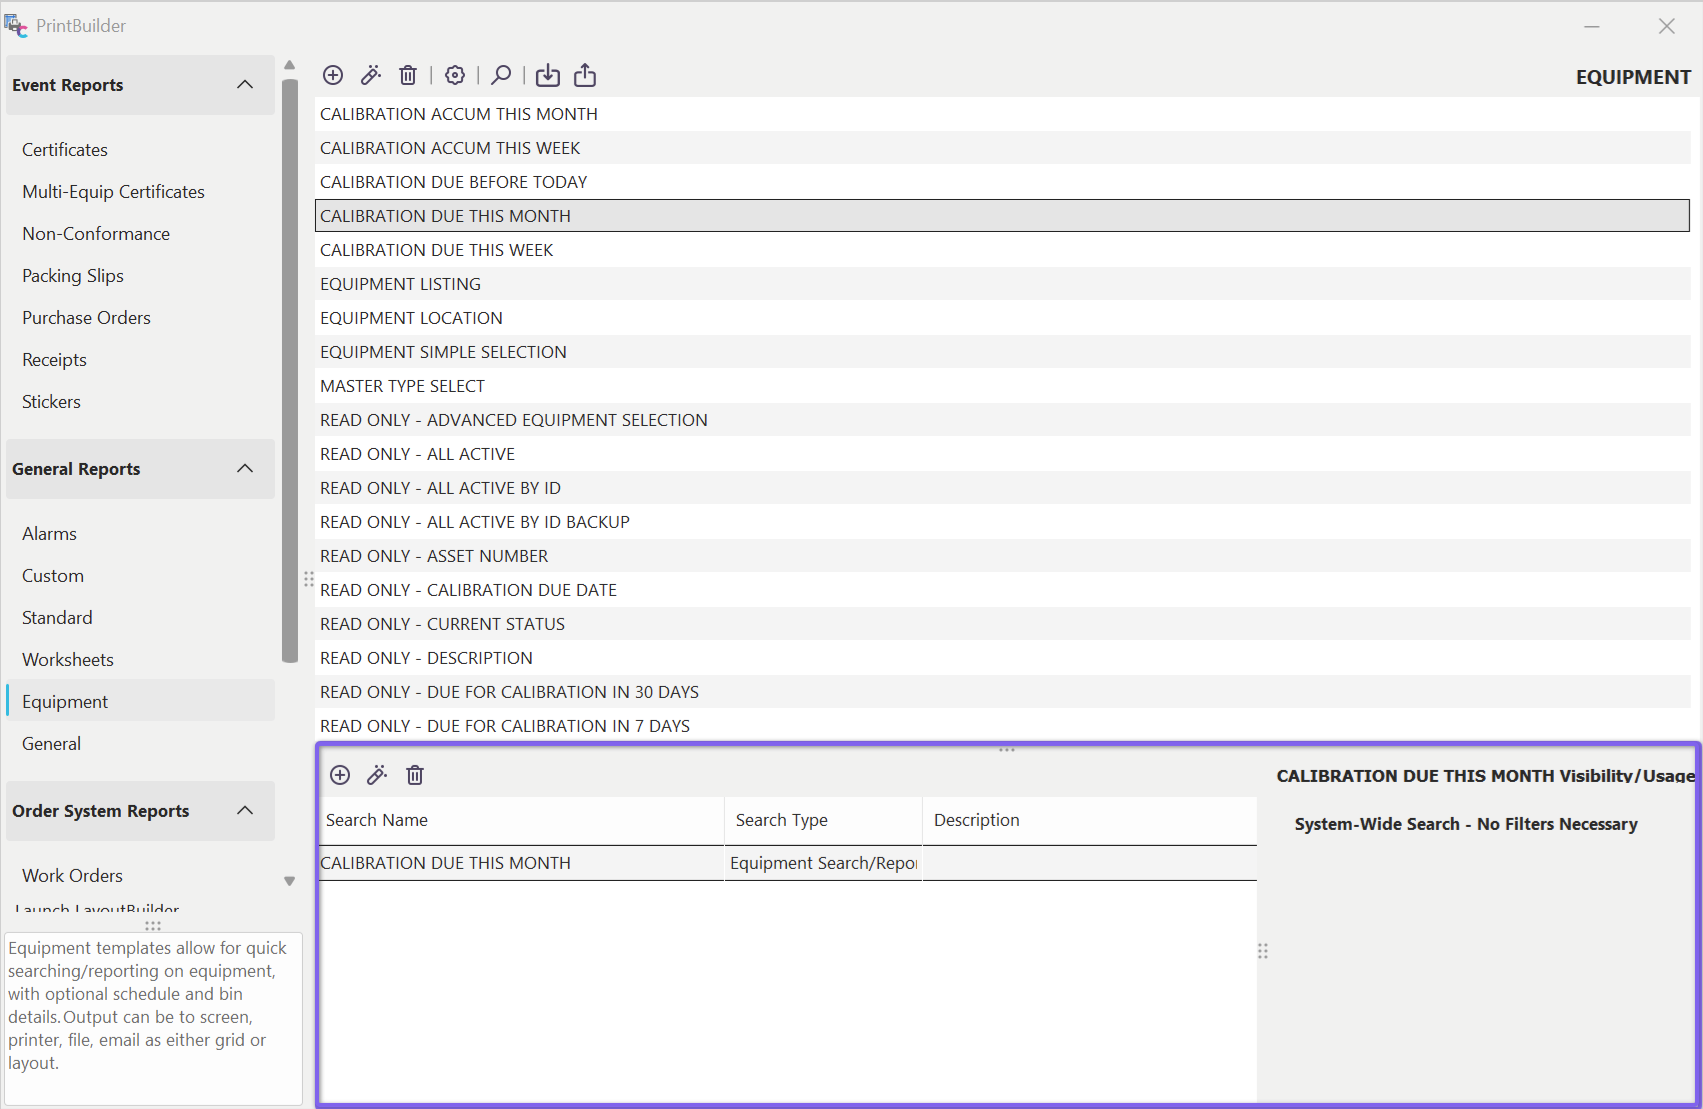
PrintBuilder/LayoutBuilder Visibility/Usage
This grid displays the visibility rules for the selected report/layout above. One or more visibility rules might be set up for the current report/layout. Keep in mind that these visibility rules are simply a filtered version of the same rules seen in the 'Setup Custom Search By's / Reports' dialog available from the button above the top grid:
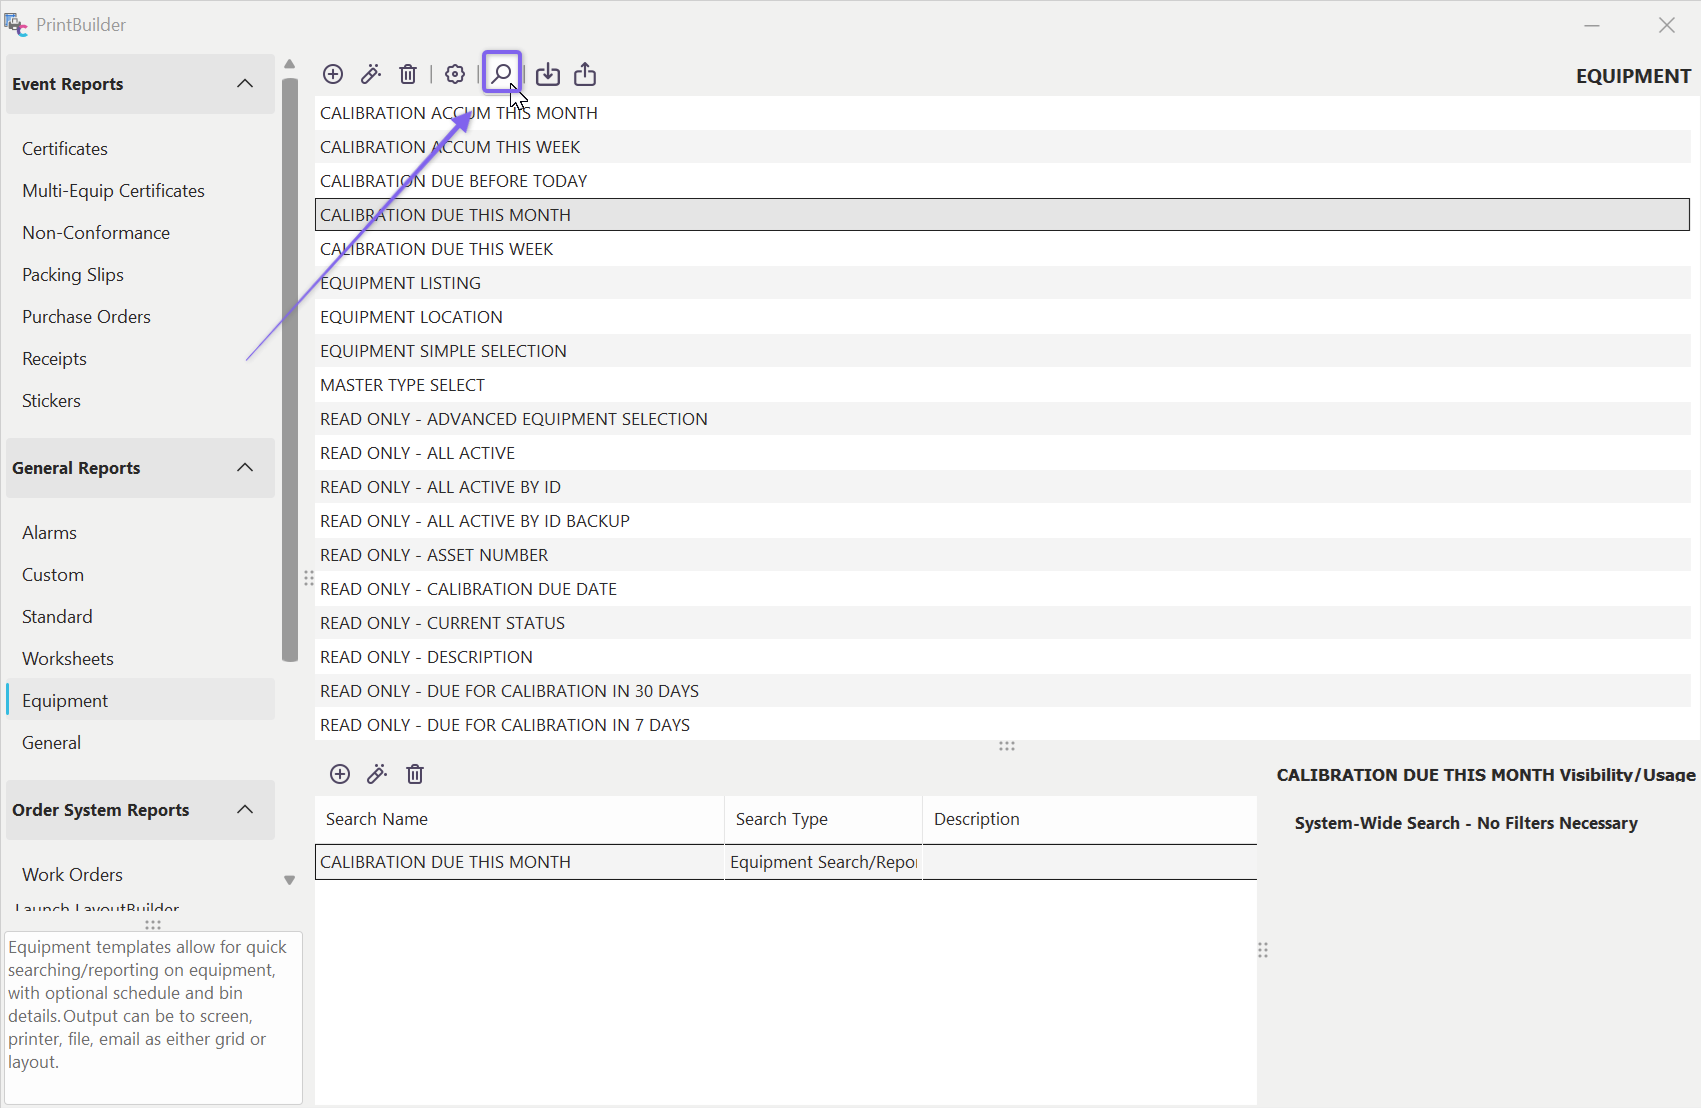
Un-filtered Listing of All Searching / Reports / Layouts Visibility Rules
When the unfiltered list is shown (the dialog), you see all the visibility rules for reports (as designed in PrintBuilder), layouts (as designed in LayoutBuilder), and simple custom searches (designed simply from within this dialog). Note: This same unfiltered listing of visibility rules for all layouts/reports/searches can also be called from Profile Manager...Management...Equipment Searching/Reports/Layouts (as listed above).
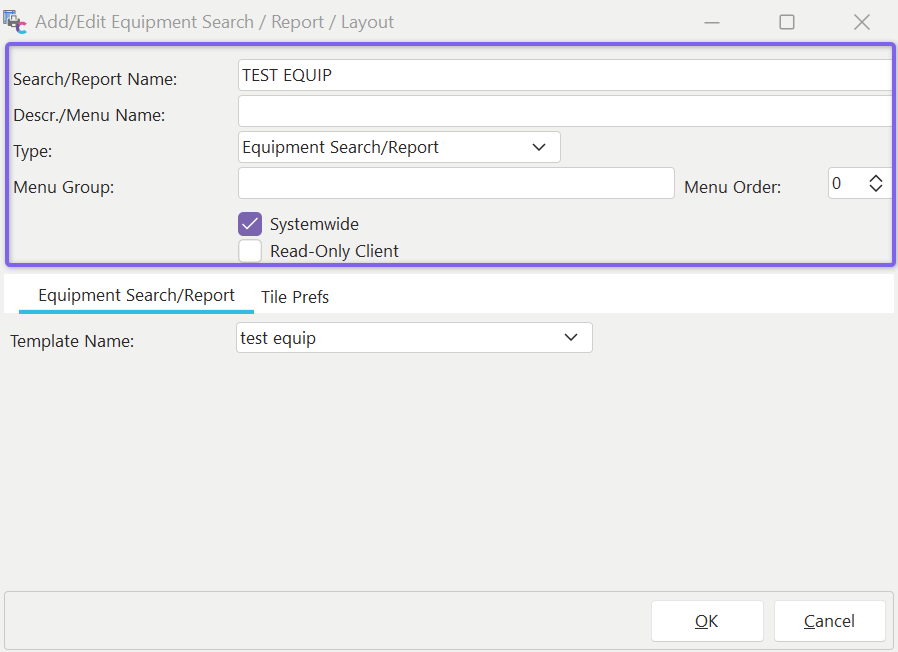
Each visibility rule contains various options depending upon the 'Type,' but specific options are consistent across all:
Search / Report / Layout Visibility Rule - Basic Fields
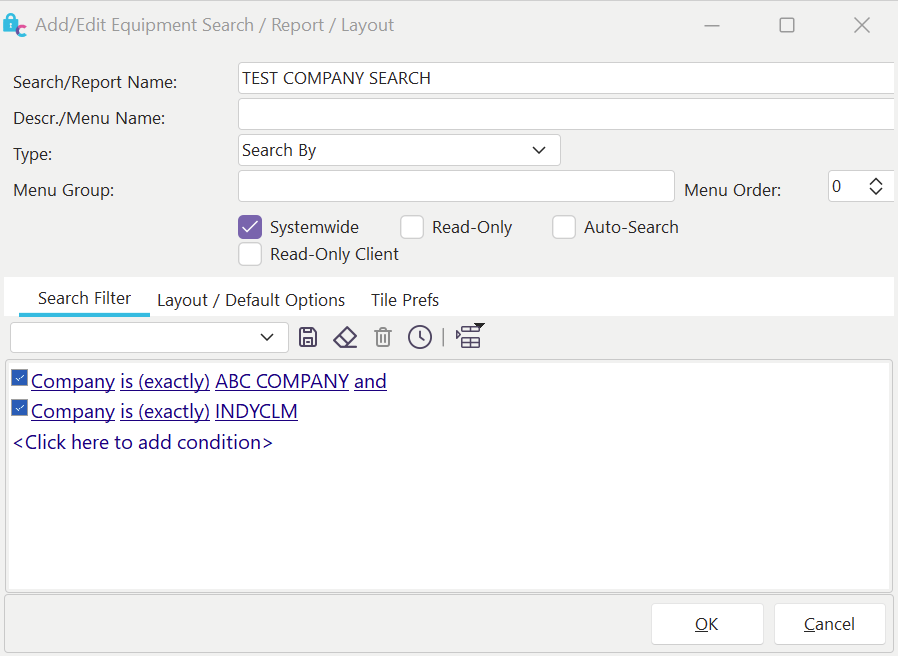
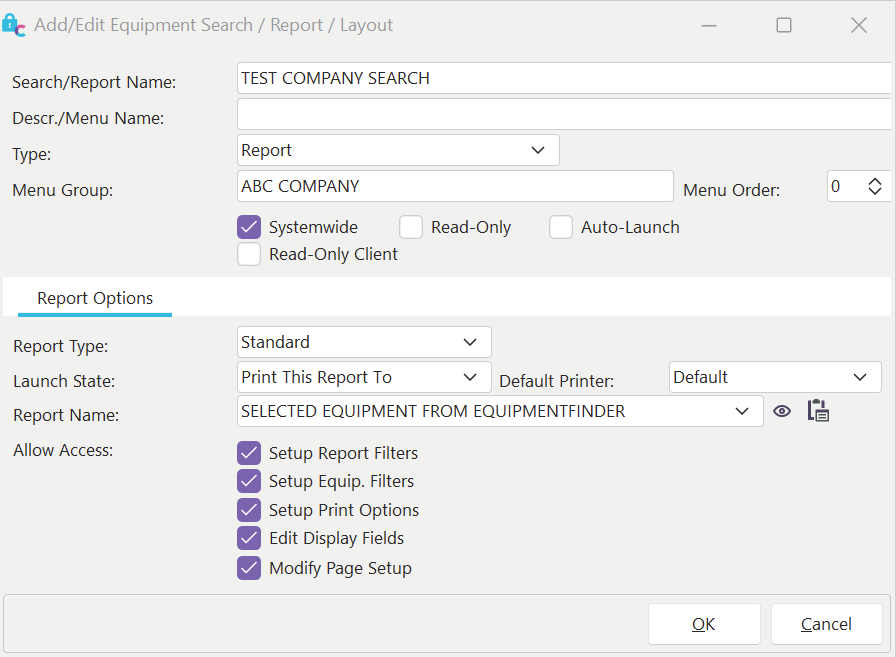
·Search Report Name - The name of the visibility rule. This name must be unique across all other rules.
·Descr./Menu Name - The name of the report/layout/search that should appear in any menu options.
·Type - The type of visibility rule. There are 12 options:
| 1. Search By - a simple equipment filter box search. The filter is set up from the 'Search Filter' tab, and the option event launching and Equipment Layout preview is set up on the 'Layout / Default Options' tab. Note: These searches can also be called from a Home View. To create a hyperlink that points to the search, use 'SEARCHBY=NAMEHERE' (replace 'NAMEHERE' with the 'Search/Report Name.' To create a hyperlink displaying a count of how many assets match the search filter, use merge text in the format: '!ADDSEARCHBYCOUNT=NAMEHERE!'. These searches are available in the main screen header's 'Search/Report' menu.
2. Report - a link to launch a STANDARD or CUSTOM report created in PrintBuilder. The 'Search Filter' tab sets up the equipment search filter if a STANDARD report is launched. Important: this filter will be used instead of the default one when creating the STANDARD report. Additional options are available on the 'Report Options' tab. If the link is to a 'STANDARD' report, these reports are available in the 'Search/Report' menu in the main screen header...Legacy Reports. Any CUSTOM reports mapped using this option are available from the main 'Search/Report' menu on the main screen.
3. Both (Search By / Report) - combines a 'Search By' and 'Report' type. In versions before 9x, a menu option was created on the old main screen's 'Search By' and 'Reports' menus. Note: In versions 9x and above, these types of searches are better accomplished using the 'Equipment Search/Report,' which combines report and quick search capability. Any links from prior versions will be available in the 'Search/Report' menu in the main screen header...Legacy Reports.
4. Equipment View Layout - maps the availability of an Equipment layout as set up in LayoutBuilder. Users can switch between available layouts with a right-mouse click within the current Equipment View.
5. Home Layout - maps the availability of a Home layout as set up in LayoutBuilder. Users can switch between available layouts with a right-mouse click within the current Home View.
6. Template View Layout - maps the availability of a Template Layout as set up in LayoutBuilder within the Template Editor. Users can switch between available layouts with a right-mouse click within the Template Editor layout.
7. Out Inventory Template - maps the availability of an Out Inventory search/report as set up in PrintBuilder. These are seen on the Search/Report menu in the main screen header.
8. Template Tree - maps an available equipment filter for use with the Template Tree tab on the main screen. Equipment Filters are available from a drop-down above the template tree grid.
9. Task Layout - maps the availability of a Task Layout from the Task Editor utility (Preventive Maintenance version only)
10 Equipment Search/Report - maps the availability of an Equipment search/report as set up in PrintBuilder. These are seen on the Search/Report menu in the main screen header.
11 Order Layout - maps the availability of an Order System Layout as set up in LayoutBuilder. Users can switch between available layouts with a right-mouse click within the current Order Layout.
12 General Search/Report - maps the availability of a General search/report as set up in PrintBuilder. These are seen on the Search/Report menu in the main screen header.
·Menu Group - an optional menu grouping for the menu item.
·Menu Order - an optional menu order for the menu item. Note**:** Menu groups are drawn based upon this Menu Order also. So as an example, say you had 30 menu items to set up in 3 menu groups. If you wanted 10 items to appear in the top menu group, order then 10,11,12,13, etc. If items 10-20 should appear in the second menu group, then give them a men's order of 20, 21, 22, etc.
·System-Wide - whether the menu item is displayed for all users. If this checkbox is NOT checked, then the menu item will only be available based upon specific users/profiles/companies as setup to the right of the menu link:
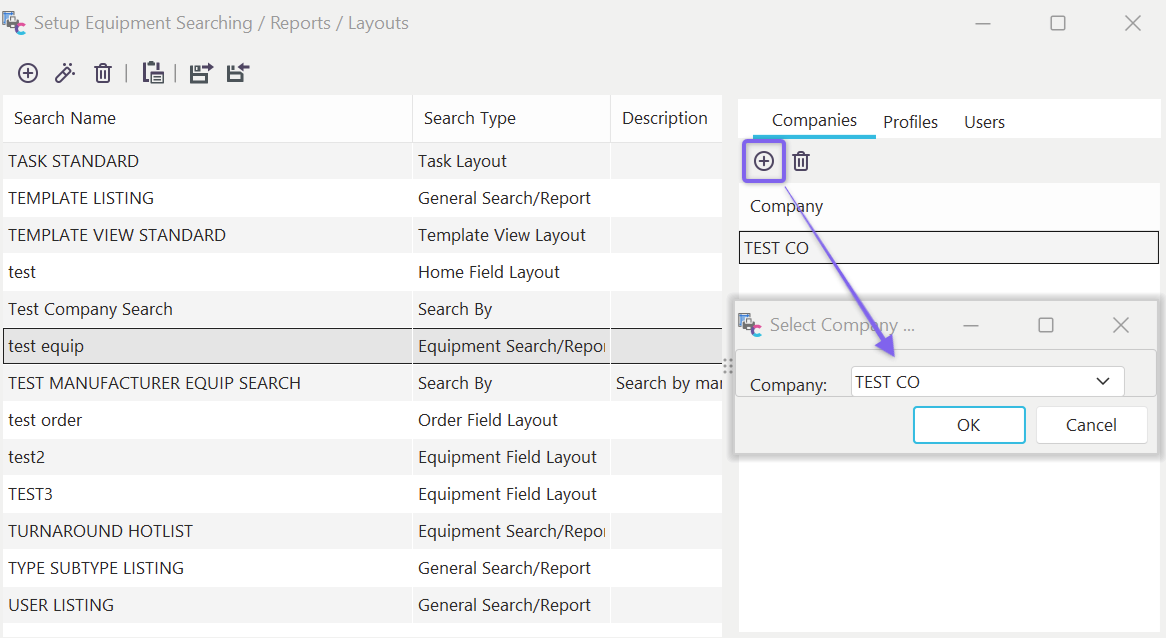
Company/Profile/User Exceptions - for Menu Links that are NOT System-Wide
Menu links mapped to specific Profiles or Users are drawn upon login based on the current login scenario. Menu links mapped to specific Companies are drawn/re-drawn when the Company changes for the asset currently visible in the Equipment View.
Search-By Options
Custom Search By / Report Setup Screen
Read-Only
If this option is checked, then the custom search by / report filter box cannot be modified when the search by / report is run.
Auto-Search
If this option is checked, the custom search by will automatically execute its filter (after the custom search by menu item is checked), saving you the step of pressing the 'Execute' button.
Search Filter (Tab)
This search filter will be used when displaying a custom Search By or running a report.
Layout / Default Options
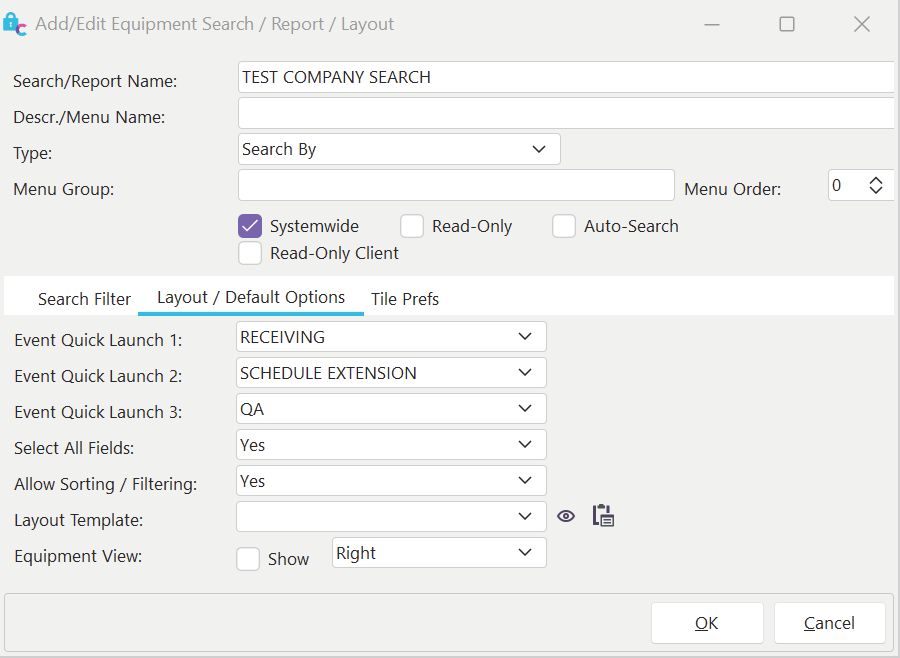
Layout / Default Options - for Search By dialogs
Event Quick Launch 1-3: use these 3 drop downs to specify up to 3 events that are most typically appropriate for assets that match this filter. This allows users to quickly launch these events from buttons automatically drawn on the bottom-left of the search-by dialog:
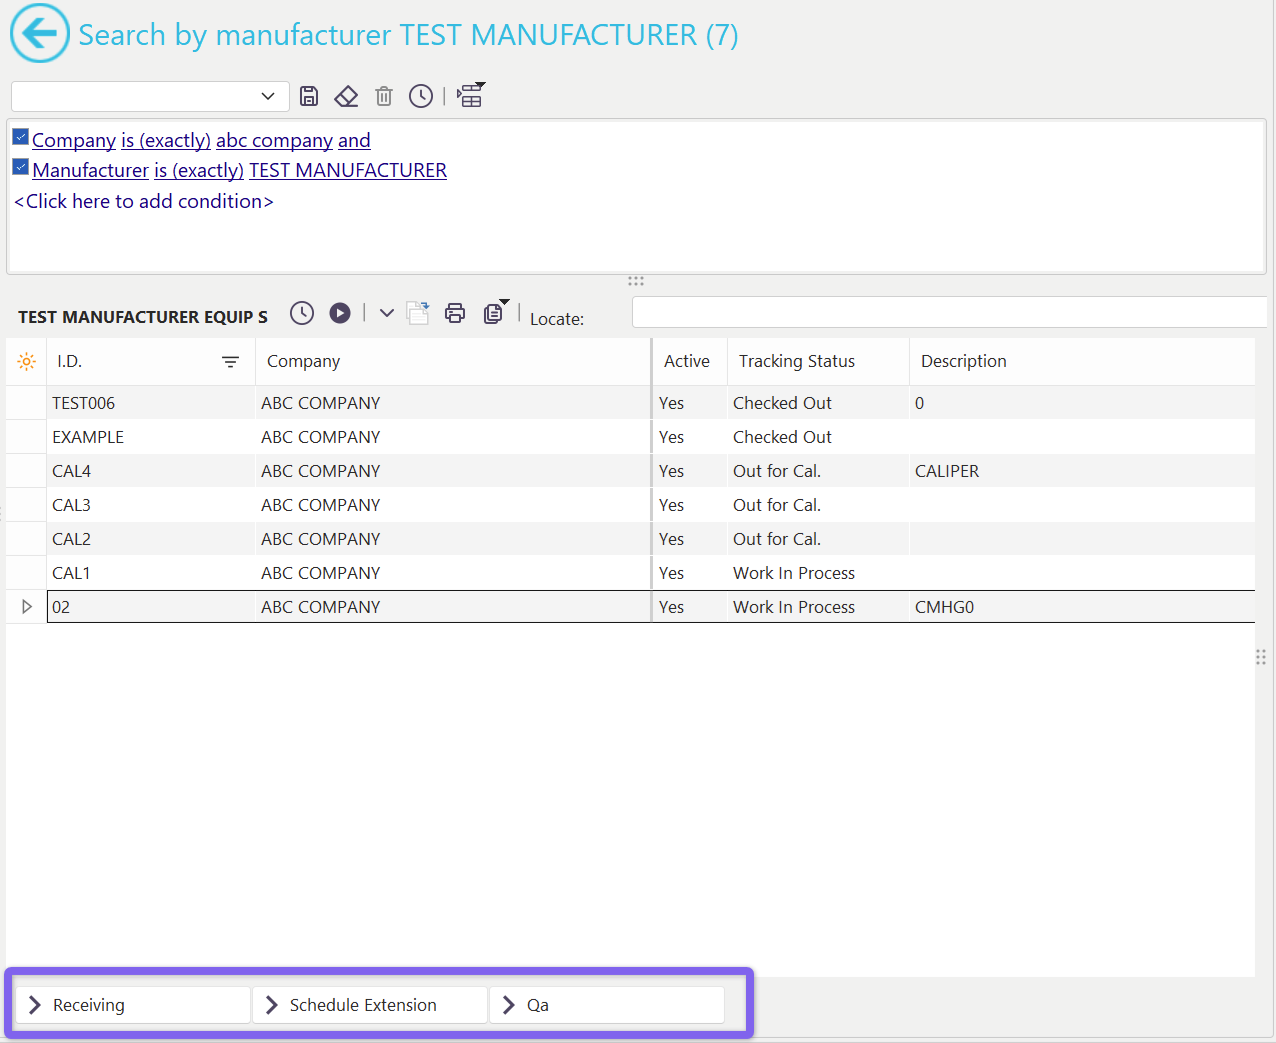
Event Quick-Launch Buttons
Select All Fields
The equipment grid can be populated with a listing of all fields or only the most common ones. Turning this option off (select NO) has the advantage of slightly faster searches, especially when large #'s of records are being returned. But choosing Yes has the advantage of including all fields for potential display in the grid. Use the 'Edit Grid Layouts / Captions' button to modify the fields visible in the grid by default. Important: if you turn on the 'Show Equipment View' option, you just select the 'Select All Fields' option.
Allow Sorting / Filtering
This option places the grid in a mode such that all records are loaded into memory when the data is updated from the filter. So, if your filter returns 2000 records, all 2000 are read into memory. This allows the grid to handle non-standard sorting and filtering operations if desired. If you know you will not need to modify the sort order or do filtering 'on the fly,' then this option can be turned off, slightly speeding up the data load.
Layout Template
This option is related to the 'Equipment View' option below. If 'Equipment View' is shown, then this template type will be used for the Equipment View. The options correspond to the Equipment Layouts setup in LayoutBuilder...Equipment Layouts.
Equipment View
If you want an Equipment View shown along with the grid (the template selected above), turn on the 'Show' checkbox. There are 3 possible default positions for the Equipment View:
·Right - Equipment View is shown to the right of the equipment grid.
·Bottom - Equipment View is shown below the equipment grid.
·Window - Equipment View is shown in a floating window.
Report Options
If this is a 'Reports' Type, then the 'Auto Search' option is hidden, and a 'Report Options' tab becomes visible:
Report Options Tab - Add Custom Search By / Report
Report Type
Whether this report is a PrintBuilder STANDARD template type or a PrintBuilder CUSTOM template type.
Launch State
The options listed will vary depending on Report Type:
For the CUSTOM template type, you can use 'Directly to Printer' or 'Directly to Screen.' This means the selected report can be automatically previewed on screen or sent to the printer specified in 'Default Printer' below. Or, if you would like for the report to automatically be created to file (after being prompted for a file destination), select one of the 4 different file types: 'Directly to File-PDF,' 'Directly to File-Excel XLS,' 'Directly to File-JPEG,' 'Directly to File-RTF,' 'Directly to File-Excel XLSX,' 'Directly to File-Excel XLS-Data Only,' or 'Directly to File-Excel XLSX-Data Only.' If exporting to Excel, the 'Data Only' options will only export the data records, not any header/footer/title formatting from the report design.
You can select from 8 potential STANDARD report wizard steps for the STANDARD template type. The selected wizard step will appear first when the report is launched. The steps are listed generally in order of how they will appear in the STANDARD reports wizard, although some steps are inappropriate for some reports. For instance, if you continually change your margins before each report prints, you might want to launch on the 'Modify Page Setup' wizard step. Or, if you're going to tweak the equipment filter for the report before running, then launch to the 'Setup Equipment Filters' tab.
Default Printer
Select the default printer for this report. The print job will be set up for this printer upon the report's launch. This printer can be overwritten, however, by using the 'Page Setup' options in both STANDARD and CUSTOM template reports.
Report Name
You specify the exact STANDARD or CUSTOM PrintBuilder template you will execute. You can edit this template type by pressing the 'Edit Report' button to the right of the drop-down. To launch PrintBuilder without immediately editing a template, press the second button to the right of the drop-down, 'Launch PrintBuilder.' If you add a brand new template while in PrintBuilder (and still have this setup screen in Profile Manager open), you can right-mouse click within the drop-down and select 'Reload Reports...'. This will repopulate your drop-down list with any new templates recently created in PrintBuilder.
Allow Access
If you selected a STANDARD template type report, you could specify which report wizard steps users can edit. Note **:**If an option is unselected, users can still see that wizard step, but they will be disabled from modifying any settings.
Equipment View Layout / Home View Layout / Template View Layout Options
When either 'Equipment View Layout,' 'Home View Layout,' or 'Template View Layout' is selected as the Type, you will see the tab below:
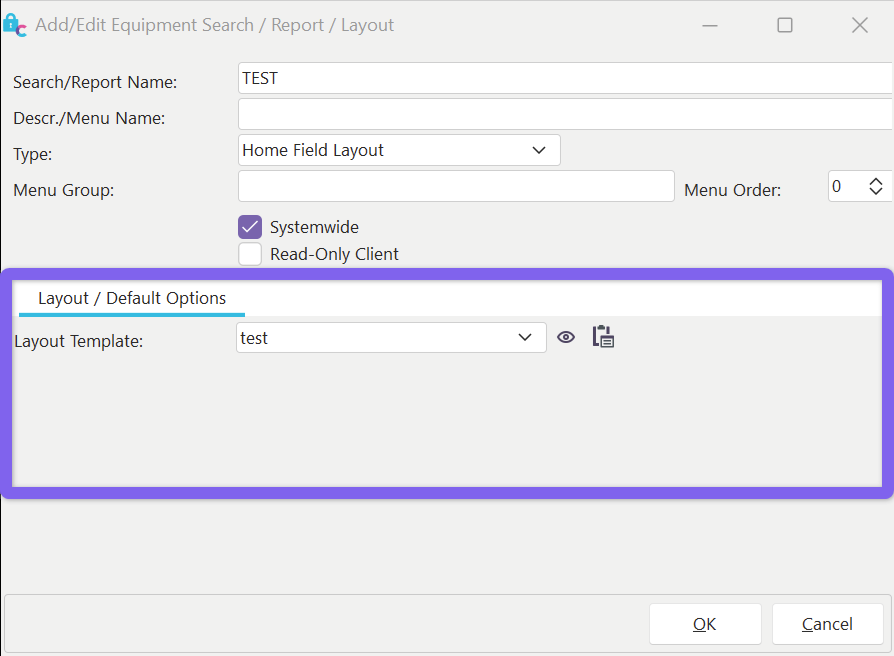
Layout / Default Options
Layout Template: use this field to select the Layout template you want to make visible. Note **:**You are not selecting the ONLY template type that can be visible, but one potential layout. To set up the visibility of multiple layouts, use the 'Add/Edit Equipment Search / Report / Layout' screen once per layout.
![]() Edit Layout - use this button to edit the selected layout quickly. This is equivalent to launching the layout from LayoutBuilder.
Edit Layout - use this button to edit the selected layout quickly. This is equivalent to launching the layout from LayoutBuilder.
![]() Launch - use this button to launch LayoutBuilder (LayoutBuilder can be launched from PrintBuilder through a link in the lower-left). Brand new layouts can be created there without having to exit this screen. Upon return, right-mouse click in the 'Layout Template' drop-down box and select 'Reload Layouts.' This will reload the layouts available in the drop-down.
Launch - use this button to launch LayoutBuilder (LayoutBuilder can be launched from PrintBuilder through a link in the lower-left). Brand new layouts can be created there without having to exit this screen. Upon return, right-mouse click in the 'Layout Template' drop-down box and select 'Reload Layouts.' This will reload the layouts available in the drop-down.
Out Inventory Options
When 'Out Inventory Template' is selected for the 'Type' the tab below is shown:
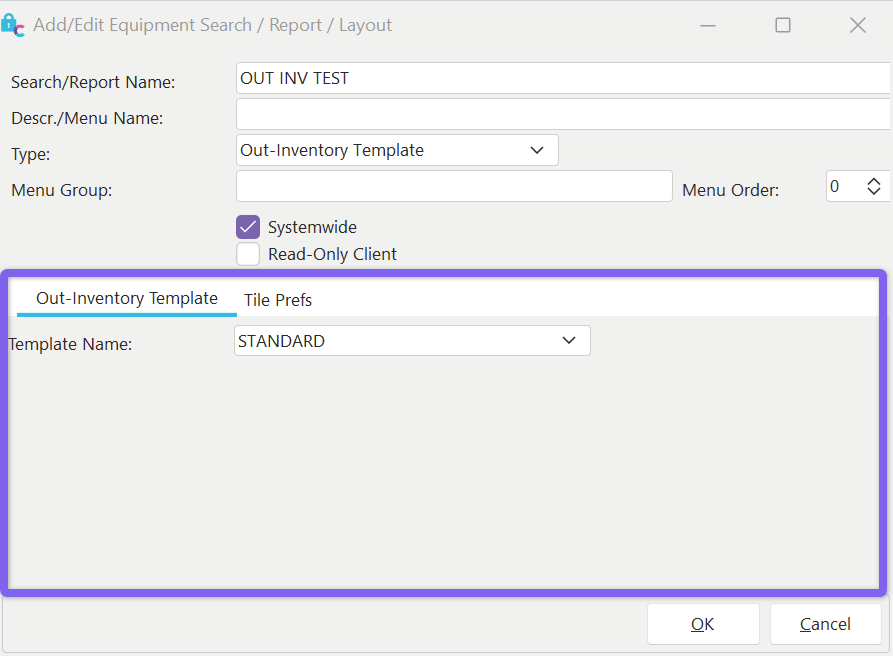
Out-Inventory Template
Template Name - select the name of the Out Inventory template that you would like to make visible. Out Inventory, templates are created/edited through PrintBuilder...Tooling Reports...Out Inventory. |