RS-232 Module
![]() The IndySoft RS-232 Interface is provided to interface with RS-232 gage connections. Once a profile has been created for the gage, hook up the gage to the correct port, press the 'Connect With Gage' button (if not connected), and choose whether you would like the measurement to be sent to As Found or As Left, and then operate the gage as normal. The gage measurement will be sent to the selected test point. Several buttons are available on the RS-232 Interface:
The IndySoft RS-232 Interface is provided to interface with RS-232 gage connections. Once a profile has been created for the gage, hook up the gage to the correct port, press the 'Connect With Gage' button (if not connected), and choose whether you would like the measurement to be sent to As Found or As Left, and then operate the gage as normal. The gage measurement will be sent to the selected test point. Several buttons are available on the RS-232 Interface:

RS-232 Interface
Add New RS-232 Gage Profile
![]() Press this button to set up a new RS-232 gage profile. A 2-step wizard will appear:
Press this button to set up a new RS-232 gage profile. A 2-step wizard will appear:
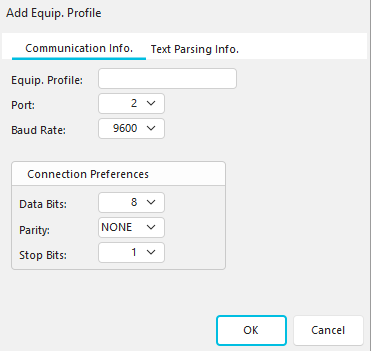
RS-232 Add Equip. Profile - Step 1
Step 1 - Gage Connection Information
During this step, choose a unique name for the new Equipment Profile, the port that gage will be plugged into, and the baud rate. In addition, select the Data Bits, Parity, and Stop Bits for the port connection. For more information on which settings are appropriate for your gage, see the documentation for your RS-232 gage. Click 'OK' if finished or the Text Parsing Info. tab.

RS-232 Add Equip. Profile - Step 2
Step 2 - Text Parser Information
Sometimes, gages will send extra characters that are unnecessary for your purposes. For instance, the gage might send the Serial Number of the gage + the measurement + the Gage I.D.
If you are only interested in receiving the measurement, you can set up this profile to parse the complete string that is received and only accept a particular portion:
Start at Char. #:
If you want to parse the characters sent, designate here which character should be first accepted. For instance, choose Start at Char if a four-character Serial Number always precedes the measurement. # = 5.
Length:
How many characters beyond the Start at Char. # character that you want IndySoft to read.
Termination Character:
Each gage uses a specific termination character (a decimal value) to indicate to the port when the measurement has been completely sent. The IndySoft default is '13' (most common), but you must double-check your gage's documentation to confirm this.
Ignore Minus:
Occasionally, the characters sent from a gage will include (or often start) with a minus sign. One example might be a torque gage. Checking this option would ignore any minus characters sent and import the measurement as an absolute value.
Press ' OK ' when you have completed the setup to close the wizard.
Delete Current RS-232 Gage Profile
![]() This button will permanently delete the current RS-232 Gage Profile. A confirmation dialog will appear before deleting. Warning: This operation cannot be undone.
This button will permanently delete the current RS-232 Gage Profile. A confirmation dialog will appear before deleting. Warning: This operation cannot be undone.

RS-232 Delete Profile
Select an RS-232 Gage Profile
Using this drop-down, select the profile that matches the RS-232 Gage that you are using. To connect to the gage, press 'Connect with Equip.'

Edit Current RS-232 Gage Profile
![]() This button will launch a 2-step wizard where the settings for the current RS-232 gage profile can be modified. The wizard's functionality is the same as the Add New RS-232 Gage Profile described above.
This button will launch a 2-step wizard where the settings for the current RS-232 gage profile can be modified. The wizard's functionality is the same as the Add New RS-232 Gage Profile described above.
Send Result To
Before sending an RS-232 measurement to IndySoft, select the correct setting from among the 'Send Result To' radio buttons. The radio box on the current test point will send the measurement to the chosen field.
![]() If connected, this button will send the carriage return/line feed to the device.
If connected, this button will send the carriage return/line feed to the device.
The RS-232 module can also be fully accessed from the Windows System Tray. The System Tray is the right section of the Windows Start Menu bar (located at the bottom of the Windows desktop). When you place the mouse over the RS-232 System Tray icon, the name of the currently selected RS-232 Gage Profile will appear. When the gage is connected, the caliper icon will appear as usual.

A red circle with a diagonal line will appear over the caliper icon (as shown above) when disconnected. In addition, all of the operations of the RS-232 Interface can be accessed by right mouse-clicking on the caliper icon in the System Tray. The RS-232 Interface form will disappear completely into the System Tray after minimization. Upon exit, your selection of 'As Found Reading' or 'As Left Reading' (radio box) will be retained for subsequent module use. |