Parts and Operations Module
![]() Note: the topic below only applies to the Tool Management version of IndySoft.
Note: the topic below only applies to the Tool Management version of IndySoft.
The Parts/Operations module creates part/operation records that can be recalled from IndySoft events to select assets appropriate to the desired operation quickly. Each part/operation can be set up with unlimited equipment requirements. These equipment requirements can reference exact IDs, Serial Numbers, crib/bin, manufacturer/model number, type/sub-type, drawing number, or equipment filter. General instruction lines (no equipment requirement) can also be created.
The layout of the part/operations module is extremely customizable. Customizing the interface takes place in 2 ways:
·Layout Types - see Add/Edit Layout Types section below
·Detail Types - see Add/Edit Detail Types section below
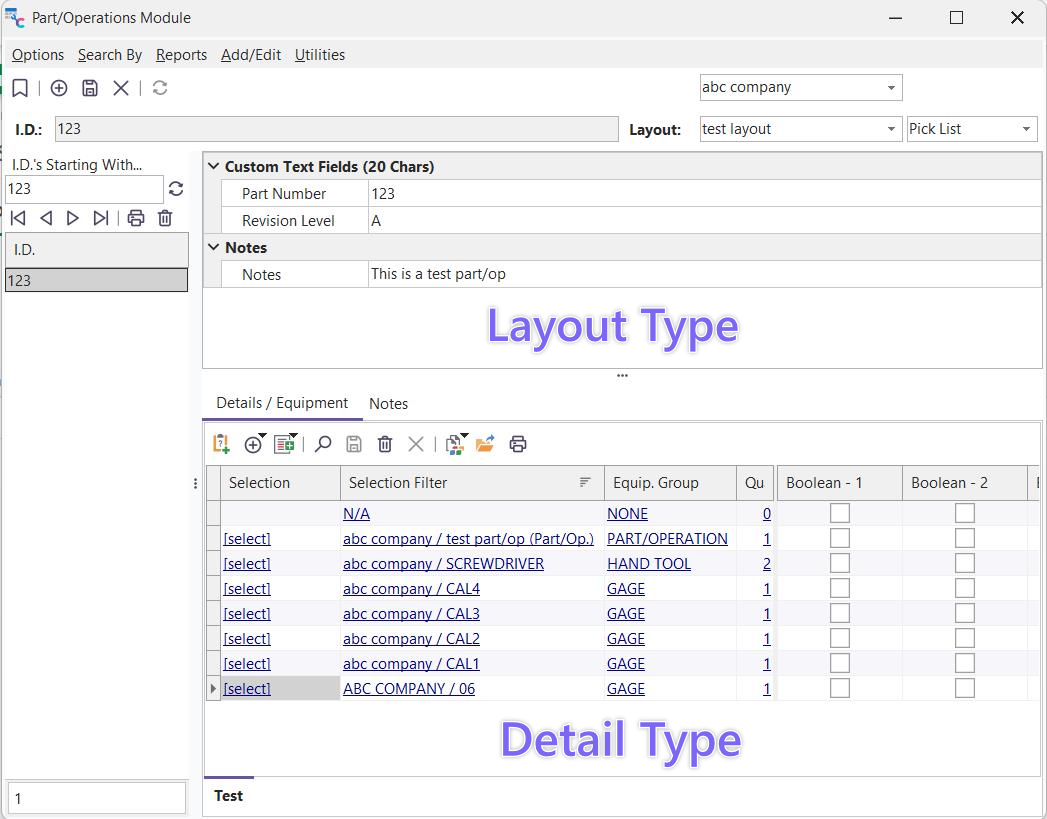
Part/Operations Module - Layout Types and Detail Types
General Interface - Parts/Operations Module
Use the 'Search By' menu to quickly select a part/operation for review or edit. Alternately, the 'ID's Starting With...' grid on the left of the main screen can be used for quickly reviewing a listing of similar parts/operations. This grid shows a group of parts/operations that all begin with the same characters - type these search characters into the edit box above the grid and press 'Enter.' Double-click on a part/operation within the grid to locate it on the main screen.
Once a part/operation is selected onscreen, layout fields can be modified directly onscreen. Press the 'Save' button in the header to save your changes. Upon each change, you will be prompted for an updated Revision #, and the Revision Date will also automatically be updated (if the Options...Prompt for Rev. Letter On Each Save option is enabled). All parts/operations records must be unique by company + ID. Each part/operation also references a layout. This layout determines the fields visible/editable on the top half of the form. Field captions and field security and drop-down lists can also be customized.
Each layout type (in Add/Edit...Part/Operation Layout Types) allows associating one or more Detail Types. These are visible/editable on the bottom half of the screen. If multiple Detail Types are shown, then each will use a sub-tab visible on the bottom. All fields visible in each Detail grid can be controlled in the Add/Edit...Part/Operation Detail Types wizard. Field captions and field security and drop-down lists can also be customized. Each detail record can correspond to either an equipment requirement or a general instruction (or both). Dozens of fields are available to display many types (text, numeric, date, time, etc.) - so just about any instruction can be supported. If the detail line requires equipment, the 'Selection' field will display a '[select]' hyperlink to recall all current assets that map the selection filter quickly.
Other functions can be called from the header bar above the Details grid(s), allowing for the quick creation of detail lines, cloning operations, print, etc.
When the part/operation selection dialog appears within an IndySoft event, you will note that it has a similar 'look' to the main Part/Operations dialog. The most notable difference is that within an event, the matching equipment can be expanded to display as an embedded grid - specific to each equipment requirement in the Detail grid. The user can select the appropriate asset to fulfill that requirement from these choices. Selected equipment is shown in a grid on the left-hand side of the dialog:
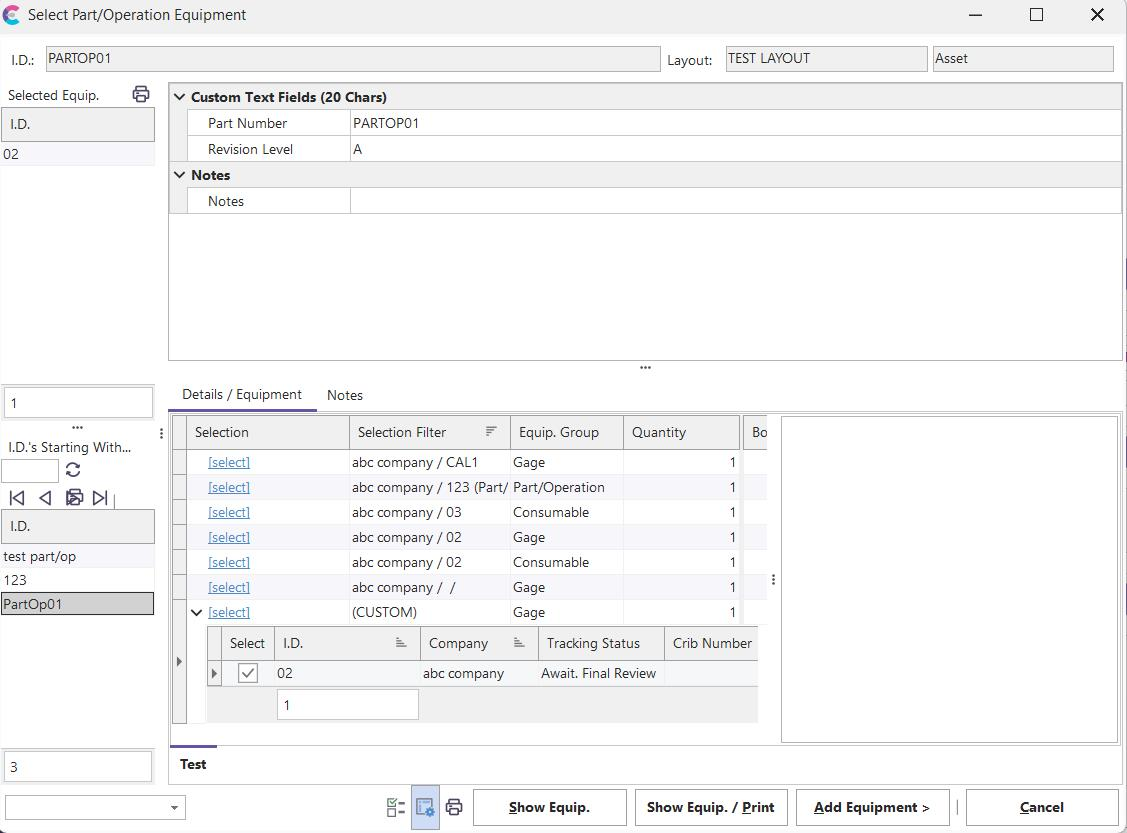
Select Part/Operation Dialog - As Called From Within IndySoft Event
Back to the setup module...the interface for the main Part/Operations screen is divided into five sections:
1. Menu Options - see Menu Options section below for more details
2. Header Options - see the Header Options section below for more details
3. ID Search Group - see ID Search Group section below for more details
4. Layout Fields - See the Layout Fields section below for more details
5. Detail Fields / Notes - See the Detail Fields / Notes section below for more details

Part/Operations Module - Main Sections
Menu Options
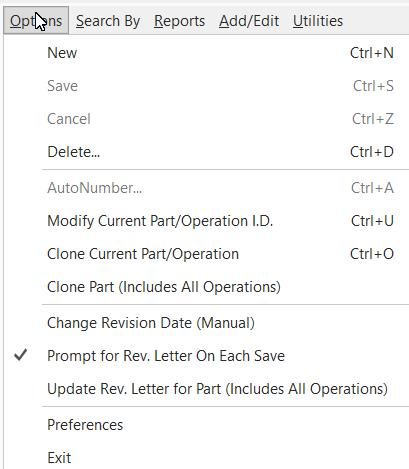
Options...New
Create a new part/operation record. This operation can also be performed from the header.
Options...Save
Save changes to the current part/operation header and part/operation details. This operation can also be performed from the header.
Options...Cancel
Cancels all modifications to the current part/operation header and part/operation details. This operation can also be performed from the header.
Options...Delete
After a confirmation, permanently deletes the current part/operation.
Options...AutoNumber
This option is only available part brand-new parts/operations - this will display the Auto-Numbering dialog. After selecting an Auto-Numbering type, a new number will be generated and used for the part/operation ID. A right-mouse click option on the ID field can also launch this operation.
Options...Modify Current Part/Operation ID.
Change the ID for the current part/operation. A right-mouse click option on the ID field can also launch this operation.

Modify Part/Operation ID.
Options...Clone Current Part/Operation
Clones the current part/operation to a new part/operation with a new ID. The new ID is input in a 'Clone Part/Operation ID' dialog:
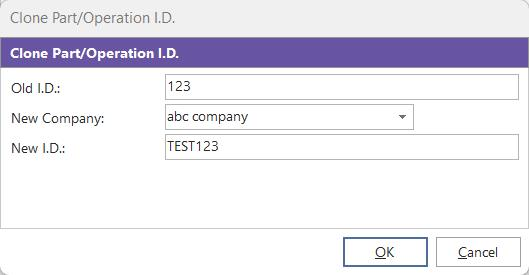
Clone Part/Operation ID
Options...Clone Part (Including All Operations)
Clones not only the current part/operation (as done with Options...Clone Current Part/Operation) but also clones all parts/operations that have a matching 'Part Number' value of the current part/operation.
Options...Change Revision Date (Manual)
Prompts for an updated Revision Date and Revision Level.
Options...Prompt For Rev. Letter On Each Save
Toggles functionality that will automatically prompt for a new Rev. Letter each time a part/operation is saved.
Options...Update Rev. Letter For Part (Includes All Operations)
Prompts for an updated Revision Level - not only for the current part/operation but also for all part/operations that match the 'Part Number' value of the current part/operation.
Options...Preferences...Default Layout
When new parts/operations are created, this layout will be used for the initial value. Note: This value is simply a convenience, saved per user name - this is not a guarantee this layout will be available for all companies - so the layout type should always be re-confirmed before saving.
Options...Preferences...Set Current Part/Oper. As Default For PrintBuilder
This option will save the current part/operation for PrintBuilder when designing Part/Operation reports. This is similar to the right-mouse click operation available from the History grid...Use Event When Designing In PrintBuilder.
Options...Exit
Closes the Part/Operation module.
Search By... ID.
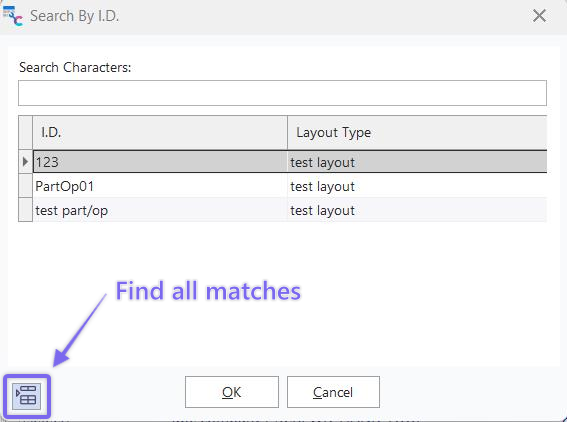
Launches a search dialog for locating a part/operation. One part/operation can be selected, or a group can be located simultaneously. Use the 'Find All Part Matches' button in the lower left to toggle the selection of all the records in the preview grid or simply the selected part/operation. Searches are specific to the company on the part/operations main screen.
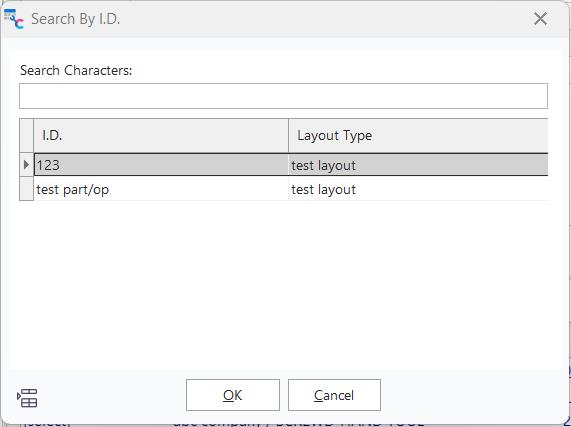
Part/Operations Module...Search By ID.
Search By...Layout Type
Similar to the interface in the Search By... ID dialog, the search is performed by Layout Type. Only one part/operation can be selected. Searches are specific to the company on the part/operations main screen.
Search By...Equipment Where Used
Displays a dialog for recalling all parts/operations with certain equipment requirements.
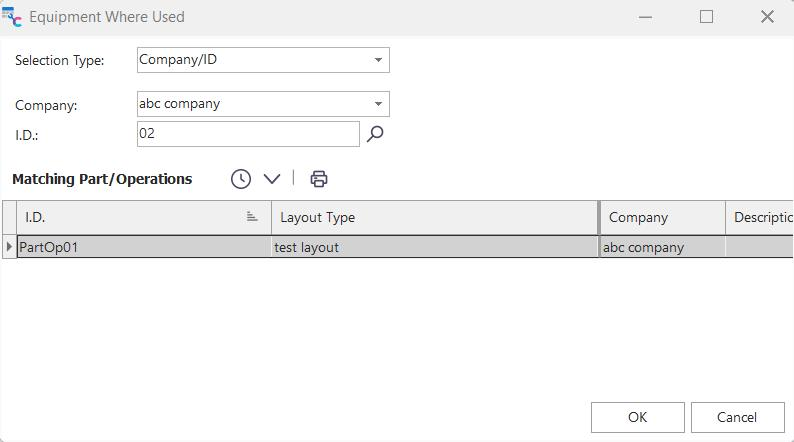
Equipment Where Used
Equipment requirements can only be searched based on the type. Select the type of equipment requirement - like 'Company/Man./Model #' in the above example then input the search parameters. Any parts/operations that match these requirements will be returned as defined in the Part/Operations details grid(s). Double-click on a record in the grid to locate it on the main part/operations screen.
Search By... ID. (Across All Companies)
Similar to the interface in the Search By... ID dialog, the search is performed across all companies, not simply the company currently selected on the Part/Operations main screen.
Search By...Part/Operation Finder
Displays a search interface for locating one or more parts/operations based on a search filter. This interface is similar to EquipmentFinder on the IndySoft main screen, but part/operation records are returned.
Reports...Part/Operation
Launches the creation of a Part/Operation report as designed in PrintBuilder...Tooling Reports...Parts/Operations. A dialog will be launched to select the template type and output (screen, printer, email, etc.)
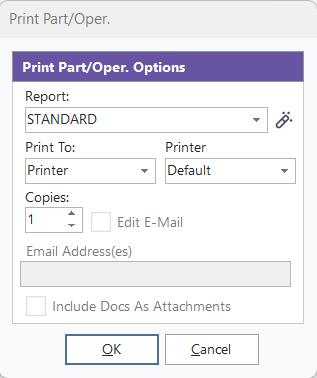
Print Part/Oper.
Reports...Part/Operations Inspector
Launches a preview dialog for the part/operations layout control - exactly as currently seen on the main screen. Use this print preview dialog to control margins, title, etc., before sending to a printer, if desired.
Reports...Part/Operation Details
Launches a preview dialog for the part/operations detail grid - exactly as currently seen on the main screen. Use this print preview dialog to control margins, title, etc., before sending to a printer, if desired.
Add/Edit...Part/Operation Layout Types
Use this wizard to add/edit a layout type. Layout types allow for the customization of header fields for parts/operations. See Parts And Operations Module - Add/Edit Layout Types for more details.
Add/Edit...Part/Operation Detail Types
Use this wizard to add/edit a detail type. Detail types allow for the customization of detail grids associated with layout types. Detail grids are shown on the bottom half of the main parts/operations form -one detail grid on each sub-tab. Detail grids control all equipment requirements and instructions.
Utilities...Automatic Numbering Setup
Use this dialog to modify automatic numbering schemes that might be referenced when auto-numbering parts/operations. This auto-numbering dialog is equivalent to the Auto-Numbering dialog from the IndySoft main screen (same auto-numbering schemes).
Header Options

Part/Operations Module...Header Options
![]() Bookmark
Bookmark
Bookmarks the current part/operation for quick recall. To return to the bookmarked part/operation later, press this toggled button again.
![]() New Part/Operation
New Part/Operation
Creates a new part/operation. Equivalent to Options...New.
![]() Save Part/Operation
Save Part/Operation
Saves changes to the current part/operation. This includes saving any changes to header fields (top half of the main form) and saving the current record in the details grid if it has been edited. If enabled, you will be auto-prompted to input a revision level. Equivalent to Options...Save.
![]() Cancel Part/Operation Modifications
Cancel Part/Operation Modifications
Cancels any changes to current part/operation header fields or the current record in the details grid if it has been edited. Equivalent to Options...Cancel.
![]() Refresh Part/Operation Information
Refresh Part/Operation Information
Reloads the current/part operation from the database
![]() Company
Company
All parts/operations are saved specific to a company in the database - make the selection here.
 Tracking Status
The tracking status of the current part/operation will be displayed to the right of the company. Note that a tracking status will only be shown if the Part/Operation type is 'Asset' (not 'Pick List' or 'None')
![]() ID.
ID.
This ID is the unique identifier for the part/operation within the selected company. Fifty characters are allowed. Note: An additional uniqueness constraint could be set up on the associated Layout Type for the current part/operation. See Add/Edit...Part/Operation Layout Types.
![]() Layout
Layout
Each part/operation is associated with a layout set up in Add/Edit...Part/Operation Layout Types. This layout controls the visible layout fields and the associated detail types. This functionality allows the parts/operations module to track parts with various levels of complexity and usage. So parts might require a large # of fields, others could be simpler, etc.
![]() Type
Type
Each part/operation has a type designation of 'Asset,' 'Pick List,' or 'None.' 'Asset' part/operations are typically checked out during IndySoft events as a unit so that they will have either a 'Checked Out' or 'Checked In' status as appropriate.
ID. Search Group
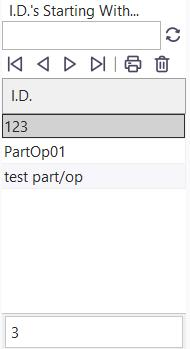
Part/Operation ID. Search Group
Use this section to quickly review parts/operations that begin with the same characters in their ID. Input the common characters into the edit box above the grid and press 'Enter.' The matching parts/operations will be shown in the grid below—Double-click on a part/operation to pull it up on the main screen. Or, the navigation buttons above the grid can be used to move through the parts/operations in the grid.
![]() Print Selected Part/Ops
Print Selected Part/Ops
This operation is equivalent to selecting the menu option of Reports...Part/Operation. A print job will be created for all part/operation records selected in the grid below.
![]() Delete Selected Part/Ops
Delete Selected Part/Ops
This operation is equivalent to selecting the menu option of Options...Delete. Each part/operation selected in the grid below will be permanently deleted.
![]() Important: the initial search characters in the 'IDs Starting With...' edit box can also be conveniently input through the Search By... ID dialog. If the 'Find All Matches' toggle in the lower-left of the dialog is used then the search characters input in the dialog will be duplicated in the 'IDs Starting With...' search group.
Important: the initial search characters in the 'IDs Starting With...' edit box can also be conveniently input through the Search By... ID dialog. If the 'Find All Matches' toggle in the lower-left of the dialog is used then the search characters input in the dialog will be duplicated in the 'IDs Starting With...' search group.
Search By... ID...Final All Matches Toggle
Layout Fields
Layout fields are viewed/edited from the top half of the parts/operations dialog. The Parts And Operations Module controls the number/type of fields- Add/Edit Layout Types wizard - depending on the current Layout Type. All changes can be saved/canceled with buttons above the layout or through menu options. Note that layout types also have field-specific options for custom drop-down lists and field security for requiring certain fields and/or automatically adding items to drop-down lists. Finally, layout types might require uniqueness among a combination of fields. This uniqueness constraint will be checked before each save of the layout fields.
Detail Fields / Notes
Detail Fields and Notes are viewed/edited from the bottom half of the operations dialog. The number of detail grids is determined in the Parts And Operations Module - Add/Edit Layout Types wizard for the current layout type. The configuration of each Detail Type controls visible fields and custom captions and is controlled by the Parts And Operations Module - Add/Edit Detail Types wizard. Changes are saved when the user scrolls off a grid row or when the overall part/operation is saved. Note that detail types also have field-specific options for custom drop-down lists and field security for requiring certain fields and/or automatically adding items to drop-down lists. Finally, detail types might require uniqueness among a combination of fields. This uniqueness constraint will be checked before each save of the detail fields.
In addition to custom field editing, detail records can contain equipment requirements or be simply description lines (no equipment requirement). The header above the grid allows for several options:
![]()
Part/Operation Detail Types - Header Options
![]() Add Detail Item - No Equipment Requirement
Add Detail Item - No Equipment Requirement
This option will create a new record in the details grid without an equipment requirement. The new line will immediately appear in the grid. Note that the new line might not necessarily be on the 'bottom' - depending upon the current sort selected in the grid. Edit the grid directly to modify field values on the new detail record.
![]() Add Equipment Requirement
Add Equipment Requirement
This option will create a new record in the details grid with an equipment requirement. The new line will appear in the grid only after inputting the equipment requirement. Note that the new line might not necessarily be on the 'bottom' - depending upon the current sort selected in the grid. Edit the grid directly to modify any additional field values on the new detail record. To input/edit the equipment requirement - first, select the type of equipment from the drop-down:
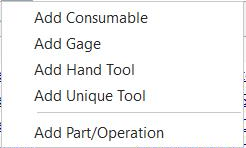
Equipment Requirement Types
If the Hand Tool or Consumable type is selected, the user will want to modify the 'Quantity' field in the final details grid before posting (if appropriate). There are seven types of equipment requirements - each type has a different set of options:
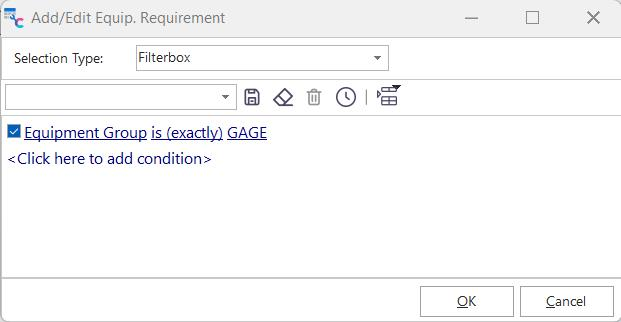
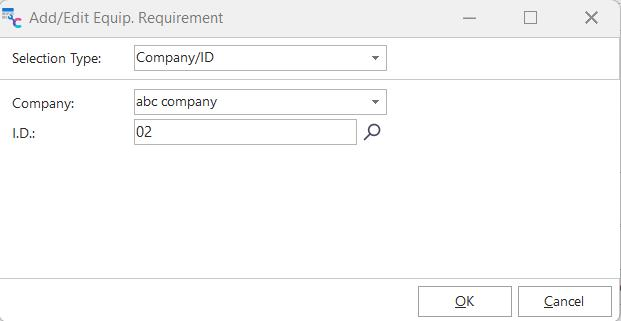
Add/Edit Equip. Requirement - 2 Examples - Filterbox & Company/ID
·Filterbox - this equipment requirement is the most general; input the equipment filter through the supplied filter box. This filter box has the same functionality as other equipment filter boxes.
·Company/ID - this equipment requirement is specific to a Company and ID combination.
·Company/SN - this equipment requirement is specific to a Company and Serial Number combination.
·Company/Man/Model # - this equipment requirement is specific to a combination of Company and Manufacturer/Model Number.
·Company/Type/Subtype - this equipment requirement is specific to a Company and Type/SubType combination.
·Company/Crib/Bin - this equipment requirement is specific to a Company and Crib/Bin combination.
·Company/Drawing # - this equipment requirement is specific to a Company and Drawing Number combination.
Note that this is typical for all equipment requirement types besides 'Company/ID', where the requirement might match multiple assets in the IndySoft database. So it is not until the IndySoft 'check out' type event is performed that the user will view the equipment currently matching the requirement (and also appropriate for any selection rules in the event and stored at the current location) and select the best asset to fulfill the requirement.
![]() Add Equipment Requirements From EquipmentFinder
Add Equipment Requirements From EquipmentFinder
This option is much like the 'Add Equipment Requirement' described above, but multiple assets can be added at once from the EquipmentFinder interface. Each ID will be added as its requirement record of the 'Company/ID' type.
![]() View Part/Detail Requirement
View Part/Detail Requirement
This will recall the 'Add/Edit Equip—requirement dialog for review or modification.
![]() Save Highlighted Detail Item
Save Highlighted Detail Item
Saves the current detail record if any fields have been modified.
![]() Cancel Detail Modifications
Cancel Detail Modifications
Cancels any detail grid field modifications.
![]() Delete Selected Detail Records
Delete Selected Detail Records
Deletes one or more detailed records after a confirmation.
![]() Copy/Paste/Insert Row To/From Clipboard
Copy/Paste/Insert Row To/From Clipboard
Detail records can be copied to the Windows clipboard and pasted to the same or other part/operation. Three options are available:
·Copy Selected Row to Clipboard - copies the current detail record and all its field values to the Windows clipboard. Using this option will cause the next two menu items to enable.
·Paste Clipboard Row Over Selected Row - paste the record already copied to the clipboard (from Copy menu option above) in place of the current row.
·Insert Clipboard Row As New Row - inserts the record already copied to the clipboard (from Copy menu option above) as a new detail record.![]() Load All From Another Part/Operation
Load All From Another Part/Operation
Detail records can be quickly cloned using this option from another part/operation. First, select the Part/Operation where you would like to copy 'from' - using the Search By ID dialog, then confirm if you would like to merge these items over existing items or clear the existing items before cloning.
![]() Print Details Grid
Print Details Grid
This option prints a preview of the current detail grid - much like the Add/Edit...Part/Operation Detail Types menu option.
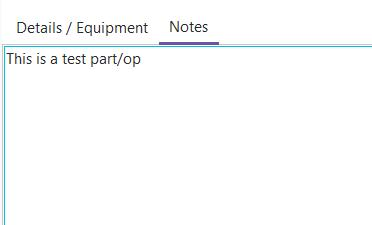
Notes Tab
Use this 2nd tab on the bottom of the Part/Operations dialog to add any miscellaneous notes about the current part/operation. Note that the font can be toggled on/off from a proportional font with a right-mouse click. Non-proportional fonts are helpful if you need characters in multiple lines to line up easily.
 |
|