IndySoft Secure Server
IndySoft Secure Server allows for secure SFTP file communication, typically used with the IndySoft Tech Sync Module. The IndySoft Secure Server Setup utility is used to modify any server-specific settings, start/stop services, and add/edit user and server keys. The Secure Server runs on one server with a database connection to the IndySoft db. Login to the IndySoft Secure Server requires a 'System Administrator' profile.
To secure all file communication, a combination of key files must be in place on both the server and the user workstation. This is the purpose of the Server Key and User Keys tabs. Typically, a single server key is created on the server; then, this public key is passed along to all client workstations that perform tech sync operations. Similarly, all client workstations create a unique user key and pass this public key along to the server for import on the User Keys tab. IndySoft Secure Server handles the creation of public and private key combinations for each. Combining these unique keys is used to verify all connections and encrypt all data sent/received. Rest assured that only approved users can upload/download any files to the IndySoft Secure Server.
Secure Server - Overview
Initial Installation/Setup Steps
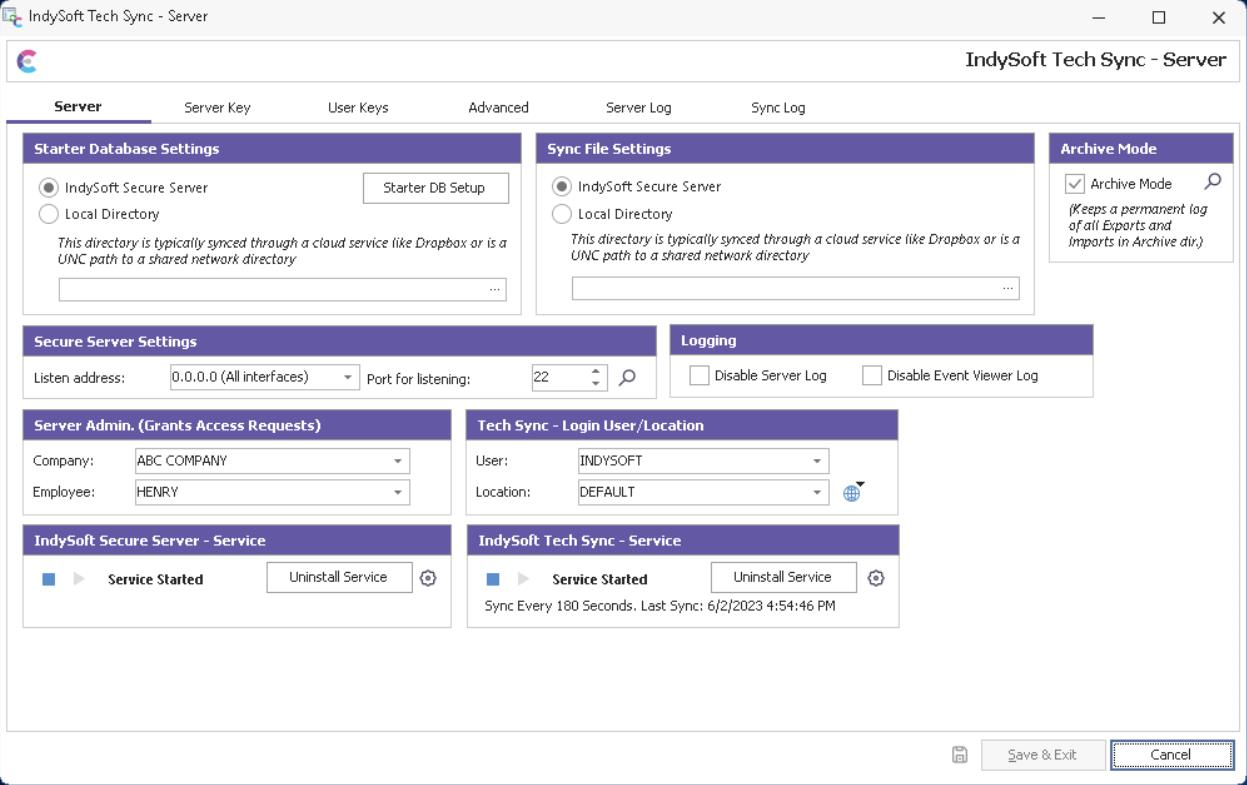
Setting up the server should only take a few minutes:
·Select a server with sufficient file space to hold all tech sync files sent from outside technicians or created by the IndySoft Tech Sync Service. These are typically small files (often 40k, etc.), but some can be larger (documents, procedures, etc.). Sync files can be manually cleaned up / deleted if they are no longer needed - but it is best to start with sufficient space. All SFTP files will be maintained in a single directory in Windows.
·The IndySoft Secure Server is an SFTP server that will need an open port. Make sure a port is open in your firewall (or other software/hardware) to allow for communication.
·From the Server tab, set the address and port. See the Server tab for more details.
·From the Server tab, select an admin. An employee from the Multi-User database (Server Admin. group box). This Admin. will receive emails from any user requesting access to upload files using IndySoft Tech Sync automatically. This Admin. will be tasked with running the IndySoft Secure Server and adding user keys to fulfill these requests.
·From the Server tab, select a Tech Sync User/Location. This is the username and user location to log in to the IndySoft Tech Sync Service. This user/location is important because it holds the Tech Sync settings (which file types are uploaded/downloaded by the Tech Sync service) and also any email settings that might be required. Use the View/Edit User Location Settings button to modify settings.
·Install the IndySoft Secure Service. See the Server tab for more details.
·Add a server key. See the Server Key tab for more details.
·Start the IndySoft Secure Server service from the Server tab.
·Install the IndySoft Tech Sync Service from the Server tab.
·Start the IndySoft Tech Sync service.
IndySoft Secure Server - Daily Use
After the initial setup, the IndySoft Secure Server Service will automatically run from Service Manager in Windows. The Administrator must only return to the IndySoft Secure Server setup screen to add new user keys or review logs.
Note that all files created by the IndySoft Tech Sync Service are stored in a central directory on the server. Similarly, any files uploaded from remote tech sync users will reside in this directory. Sub-directories can be created (sub-directory names can be specified in each client's Tech Sync Connection Settings dialog), but typically all files reside in the root directory. To view these files, press the 'View Files' icon on the Server tab:

Secure Server - View Files
If you ever need to review the server's status, use the Server Log tab.
To review all pending uploads, all Tech Sync file operations, and all files received, use the Client Log tab. This log will continually re-populate. |