Custom Search By's
![]() |
| ![]() | Note: In Version 14, these custom search/reports are now accessible from the new Reports TabCustom Search By's allow for customizable search filters. Administrators set up these search-by dialogs through Profile Manager --> Management --> Setup Custom Searches / Reports / Layouts (or a parallel option in PrintBuilder). The Administrator also sets up the visibility of these custom searches through this same interface. So only certain users, companies, or profiles (or a combination) might see a custom search by as an option on their 'Search By/Report' header menu.
| Note: In Version 14, these custom search/reports are now accessible from the new Reports TabCustom Search By's allow for customizable search filters. Administrators set up these search-by dialogs through Profile Manager --> Management --> Setup Custom Searches / Reports / Layouts (or a parallel option in PrintBuilder). The Administrator also sets up the visibility of these custom searches through this same interface. So only certain users, companies, or profiles (or a combination) might see a custom search by as an option on their 'Search By/Report' header menu.
Locating Custom Search By's
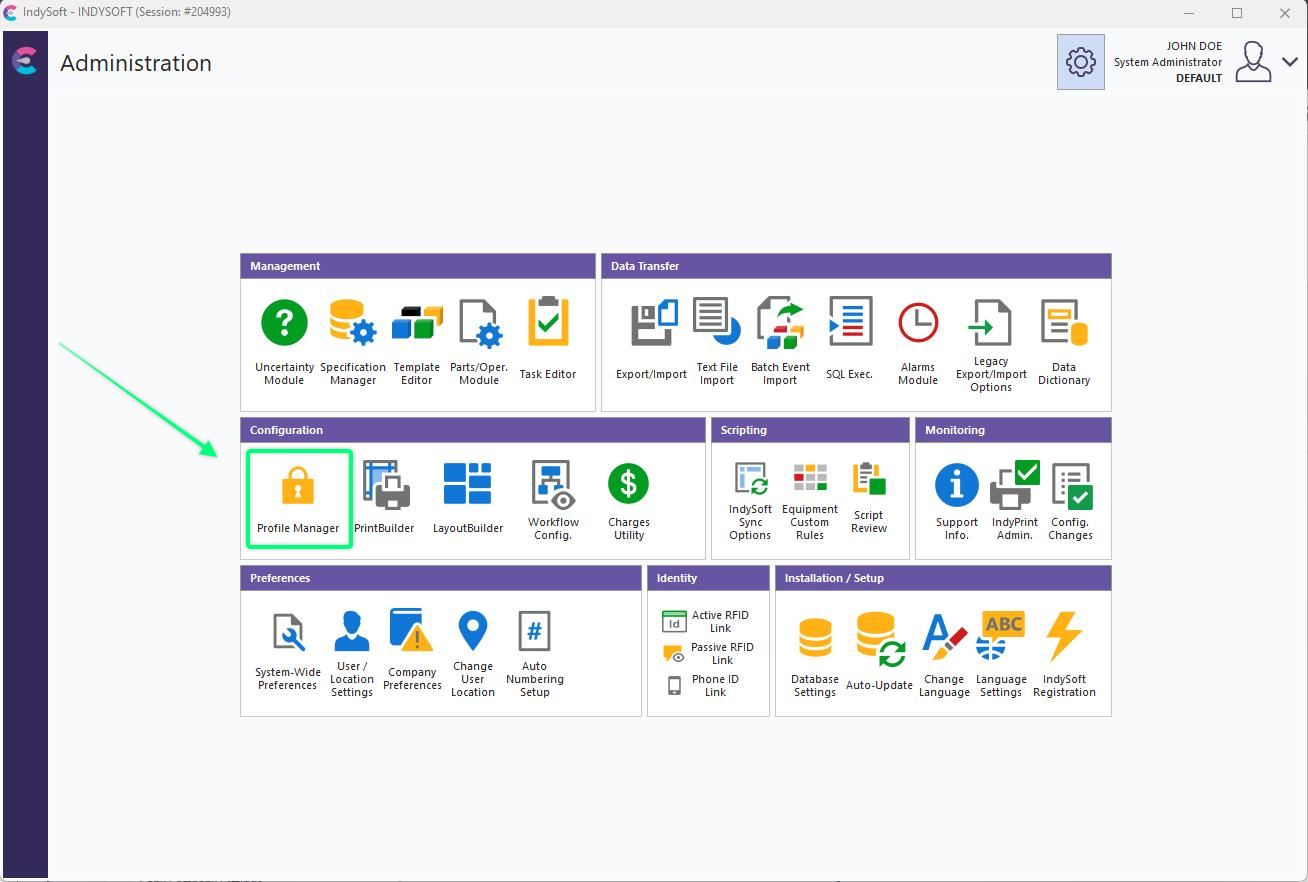
Locate 'Profile Manager' in Admin Panel
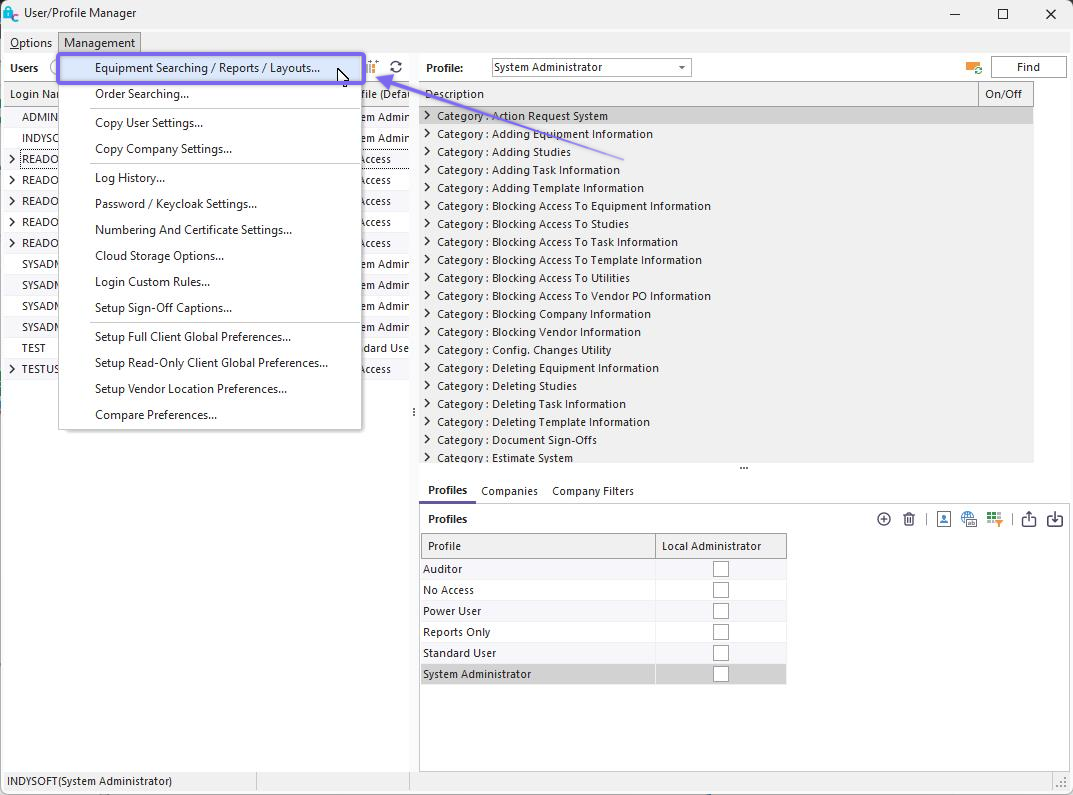
Locate 'Equipment Searching / Reports / Layouts ' under Management
Adding Custom Search By
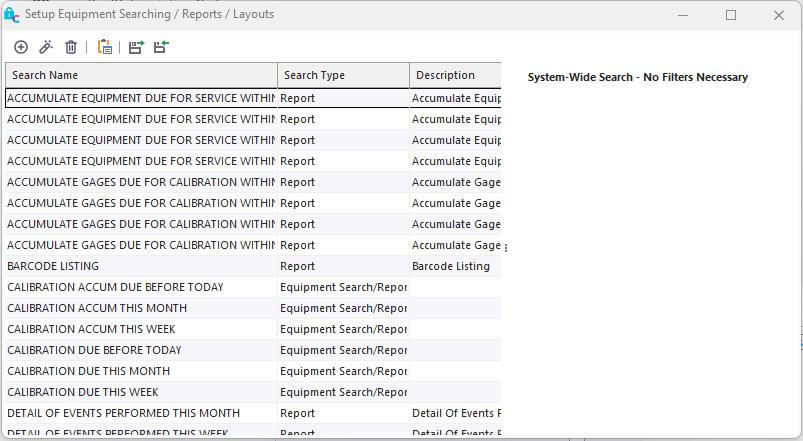
Custom Search By Dialog
Buttons / icons:
![]()
(left to right)
1. Add Custom Search By
2. Edit Custom Search By
3. Remove Custom Search By
4. Launch PrintBuilder
5. Export Searches / Reports / Layouts
6. Import Searches / Reports / Layouts
Once you click the 'Add Custom Search By' button in the dialog above, the following screen will appear:
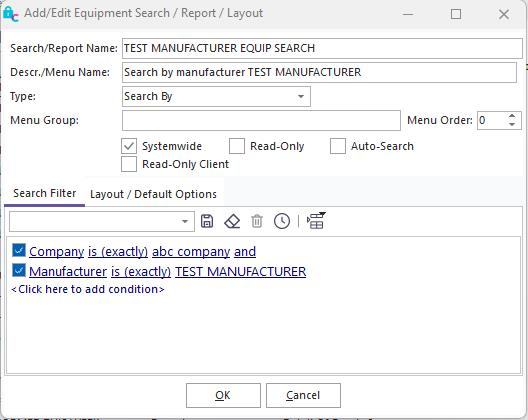
Add Custom Search By Dialog
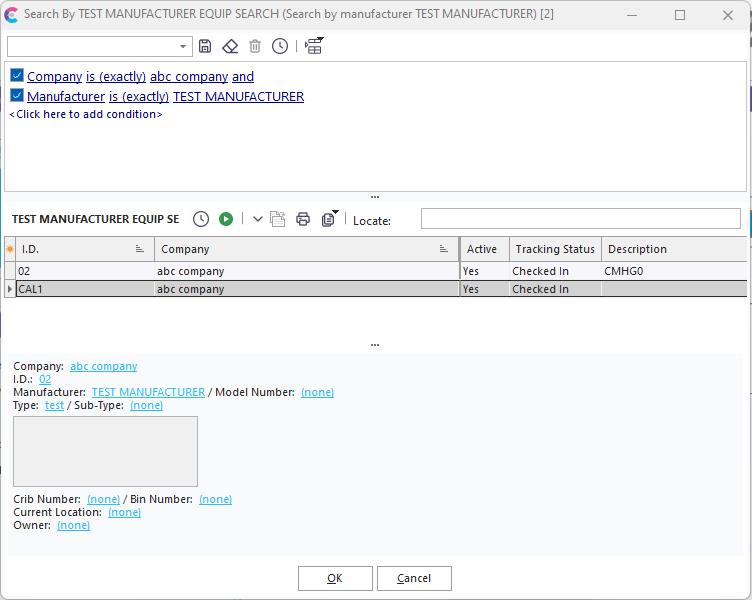
You will add/edit all the information associated with your desired custom search filter here. In this example, we created a custom search for ABC Company, which only shows equipment manufactured by Test Instruments. You can click the ![]() (Test Equipment Selection) icon to check how many search results would be returned. Once satisfied with your custom search, click OK to save it.
(Test Equipment Selection) icon to check how many search results would be returned. Once satisfied with your custom search, click OK to save it.
Note: these custom search by's can also be launched directly from the Home Tab in the Dashboard Main Screen. And more specifically, these custom search by's are often launched from within an embedded flowchart in the Home View. See Flowcharts (Editor) for more details.
Custom Search By Results
The first thing you want to do once completing your custom search by is head back to the IndySoft main home page and 'Reload All Settings'. This is done by right-clicking on the logo in the top-left-hand corner of the screen.
You can also use the keyboard shortcut: Shift+Ctrl+Alt+F5
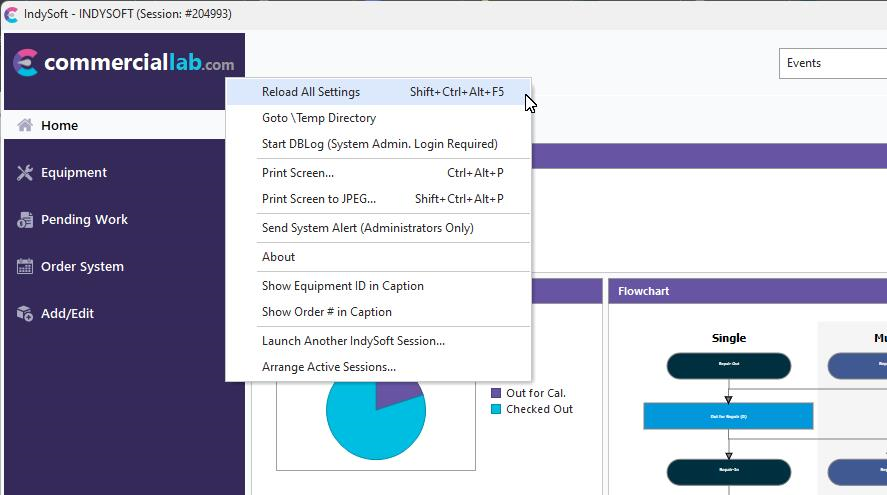
Main Dash - Reload All Settings
Now that the page is refreshed, click on 'Search/Reports' along the top header, and your custom search by filter should appear at the bottom of the list. To open your equipment search results, click on your search by here.

Finding Custom Search By
The general interface is shown below:
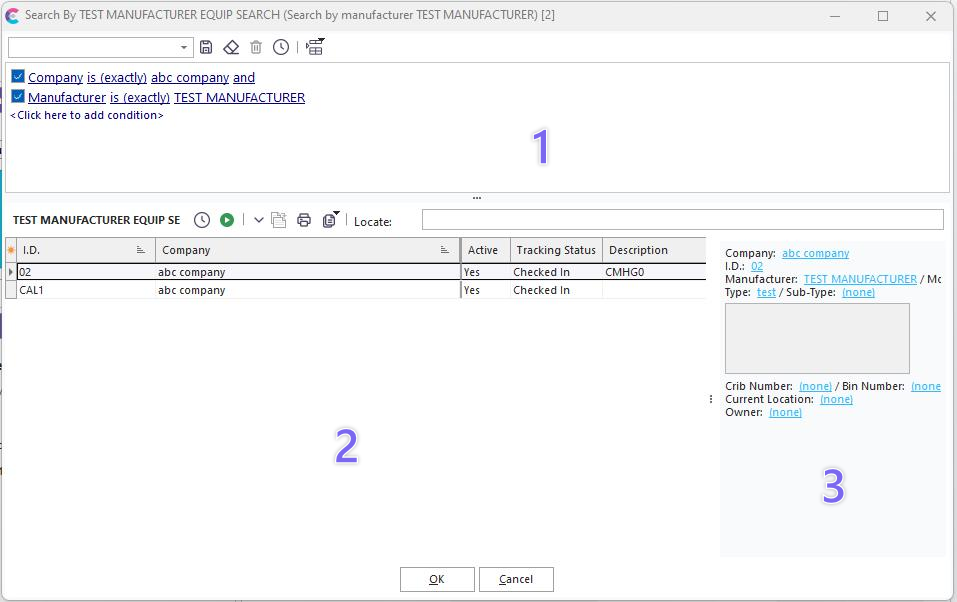
Example - Custom Search By
There are three main sections to the form - numbered in the above example:
1) Equipment View
2) Equipment Results
3) Equipment View Preview
Equipment Filter
This filter will be used when returning results into the grid. This filter is typically pre-populated from the setup of the custom search-by in Profile Manager. If the 'Read Only' option in Profile Manager (for this custom search by) is unchecked, then the user can modify this filter before returning records into the grid. See Filterboxes for more details. Once the user is satisfied with the search criteria, they can press two options below:
![]() Test Equipment Selection - use this button to test how many records would be returned based on the search criteria. A dialog will display the count.
Test Equipment Selection - use this button to test how many records would be returned based on the search criteria. A dialog will display the count.
![]() Select Matching Equipment - use this button to return all matching assets into the grid on the bottom (bottom-left). Note that after the equipment is returned, a count is displayed in the caption bar of the form for reference.
Select Matching Equipment - use this button to return all matching assets into the grid on the bottom (bottom-left). Note that after the equipment is returned, a count is displayed in the caption bar of the form for reference.
Equipment Results
Equipment Results - this grid displays all the matching assets for the filter above. This grid might be pre-populated upon entry, depending on the setup of the custom search by. Scroll through this grid to select an asset—Double-click on an asset in this grid to open it in the equipment view.
You will notice several right-mouse-click options in the grid:
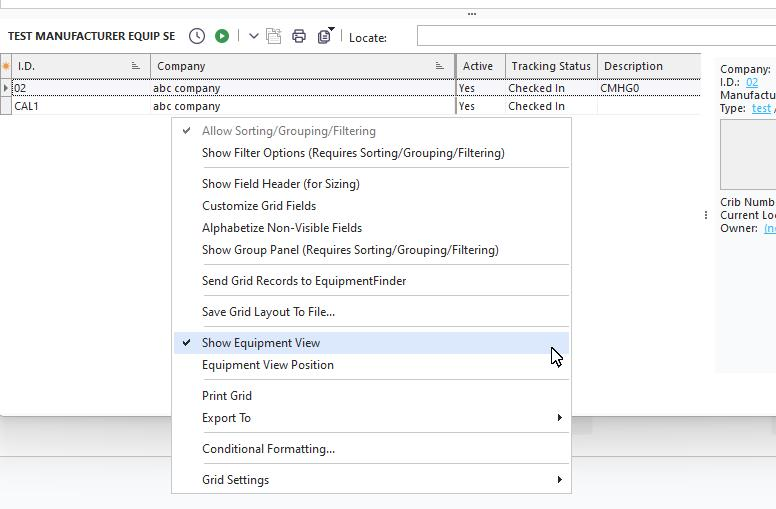
Right-Mouse Click Options - Equipment Results
The options above can also be accessed from the ![]() Grid Options button in the middle panel.
Grid Options button in the middle panel.
Allow Sorting/Grouping/Filtering - turning on this option will force all records to be loaded into memory each time a search is executed. For example, if your result set includes 2,500 assets, you might only be able to see the top 25 in the grid at any time (depending on the height of your form). When this option is unchecked, IndySoft can save time by not loading the remaining items into memory until needed. But you if require more advanced options like sorting/grouping/filtering, then this option must be enabled.
Show Filter Options - when enabled, you will see a filter option for each field in the grid header. You can click on this option to set up a quick filter for each field - multiple filters can be used together. A reminder of the current filter will be shown at the bottom of the grid. Click the 'X' on the filter reminder to cancel the current filter.
Show Field Header (for Sizing) - you will note that there are two groups of fields. The 'left-most' columns are part of a 'fixed' band that always hugs the grid's left side and are always visible regardless of horizontal scrolling through the remaining columns. The 'right-most' columns are 'non-fixed' and can be freely scrolled. Enabling this option will show these two band titles to see the division easily.
Customize Grid Fields - see Customize Fields for more details.
Show Group Panel (Requires Sorting/Grouping/Filtering) - see Show Group Panel for more details.
Save Grid to an Excel File - see Save Grid To An Excel File for more details.
Save Grid to an HTML File
Send Grid Records to EquipmentFinder - this option will send a copy of all the selected records in the grid to the 'Selected Equip.' bottom grid in EquipmentFinder. EquipmentFinder will be immediately launched. This option is helpful when you want to continue selecting assets using this alternative interface.
Save Grid Layout To File - use this option to save the current grid layout settings to an external file. The settings will be automatically saved to an ini in the current IndySoft program directory, with a name specific to the custom search by name. This INI file can then be copied to other IndySoft workstations to duplicate the look/feel of the results grid exactly. Note: this is a legacy option - you can achieve the same results through database settings in the design of the Custom Search By in Profile Manager (See 'Edit Grid Layout / Captions' button in Setup Custom Searches / Reports / Layouts topic).
Show Equipment View - turn on this option to see an Equipment View preview, as described in the section below. The Equipment View position depends on the 'Equipment View Position' option.
Equipment View Position - this option determines the location of the Equipment View, if enabled above. Three options are available: Right, Bottom, and Window. Examples of all three are shown below:
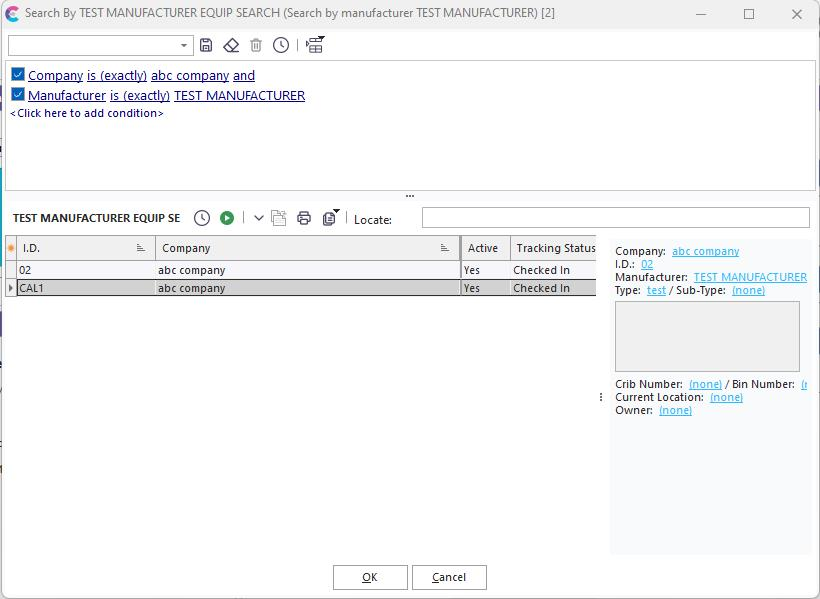
Example - Equipment View Position Right
Example - Equipment View Position Bottom
Note: when the 'Bottom' option is selected, it might be necessary to adjust the resizer panel that separates the Equipment Results and the Equipment View so the Equipment Results come back into view.
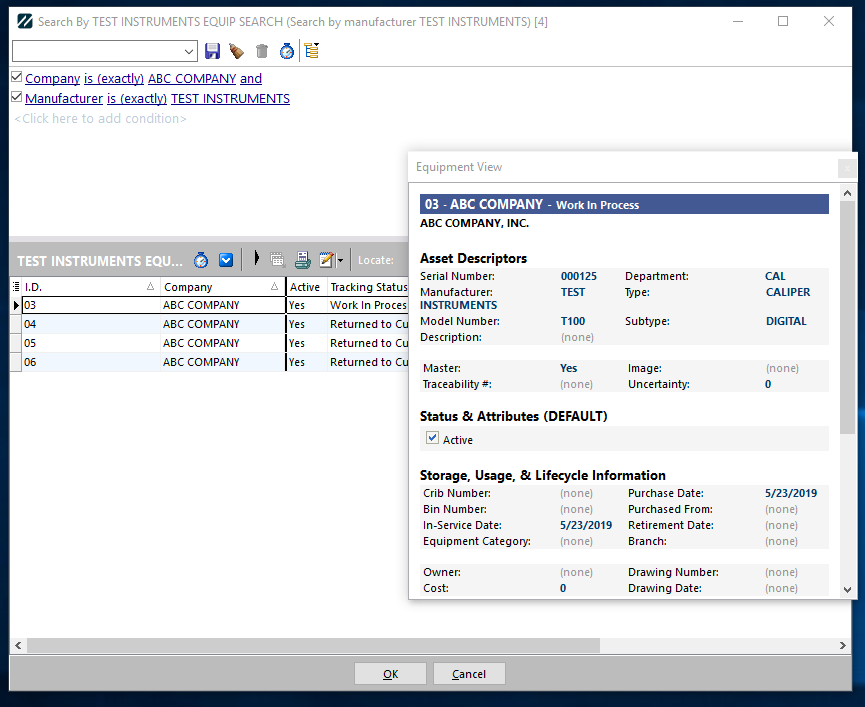
Example - Equipment View Position Window
In the 'Window' position, the Equipment View is shown in a separate window. This window can be resized and repositioned if needed.
Equipment View Preview
As discussed above, this Equipment View Preview shows an Equipment View Layout (as selected in the Setup Custom Searches / Reports / Layouts options) for a quick asset review. This view is very similar (or can be identical) to the Equipment Layout shown on the Dashboard Main Screen's Equipment View tab. Note that this Equipment View is only read-only - no hyperlinks can be used from this view, even if the 'behind-the-scenes' Equipment Layout is set up with hyperlinks. You might want to use LayoutBuilder to design an Equipment Layout that looks good in a smaller area - as will likely be available through this interface.
Other Options - Middle Panel
There are several other options available from the 'middle' panel that is below the Equipment Filter and above the Equipment Results/Preview:
![]()
![]() Test Equipment Selection - use this button to test how many records would be returned based on the search criteria. A dialog will display the count.
Test Equipment Selection - use this button to test how many records would be returned based on the search criteria. A dialog will display the count.
![]() Select Matching Equipment - use this button to return all matching assets into the grid on the bottom (bottom-left). Note that after the equipment is returned, a count is displayed in the caption bar of the form for reference.
Select Matching Equipment - use this button to return all matching assets into the grid on the bottom (bottom-left). Note that after the equipment is returned, a count is displayed in the caption bar of the form for reference.
![]() Launch Event - this button displays a submenu listing all events available to the current user. This event listing is equivalent to the listing available on the Dashboard main screen's Events header menu. The selected event will be immediately launched, and any selected record(s) will be automatically added to the event (assuming the event is set up to allow equipment and/or multi-equipment selection).
Launch Event - this button displays a submenu listing all events available to the current user. This event listing is equivalent to the listing available on the Dashboard main screen's Events header menu. The selected event will be immediately launched, and any selected record(s) will be automatically added to the event (assuming the event is set up to allow equipment and/or multi-equipment selection).
![]() Select All Fields - this option has two modes, down and up. Toggling this option means a complete set of equipment fields is selected into the results grid. This gives a complete listing of fields available for display (depending upon Customize Fields option described above) but can require a larger result set to be communicated across the network. Note: This option must be selected ON to use Equipment View layouts within the dialog. Toggling this option up (off) returns only the most common equipment fields - which can speed up the retrieval of the records but limits your review options.
Select All Fields - this option has two modes, down and up. Toggling this option means a complete set of equipment fields is selected into the results grid. This gives a complete listing of fields available for display (depending upon Customize Fields option described above) but can require a larger result set to be communicated across the network. Note: This option must be selected ON to use Equipment View layouts within the dialog. Toggling this option up (off) returns only the most common equipment fields - which can speed up the retrieval of the records but limits your review options.
![]() Print Equipment List - this option launches a Print Preview of the current grid results. See Print Grid (Preview) for more details.
Print Equipment List - this option launches a Print Preview of the current grid results. See Print Grid (Preview) for more details.
![]() Grid Options - this shows the same right-mouse click options available in the Equipment Results grid - discussed earlier in this topic. |
Grid Options - this shows the same right-mouse click options available in the Equipment Results grid - discussed earlier in this topic. |