Calc Tab - Events
The Calc Tab allows you to add Object Pascal code to a report. If you have not had prior experience with Object Pascal or are not comfortable with programming, IndySoft may be able to assist in your report efforts through our IndySoft Services. Contact IndySoft Sales to discuss a quote for any reporting requirements you feel are beyond your experience level. Be aware that some of the Standard Templates shipped with the product include code in the Calc Tab that can be broken as you work on customizing them to make your certificates, invoices, etc.
Three views in the Calc Tab can be accessed from either the View menu or by right-clicking in the red region shown below: Variables, Events, and Module. The Variables view is used to work with variables that have been defined in a band. The Events view is used to edit events, such as what should be done before an object in the report is drawn. The Module view is used to get an overview of everything customized in the report. These are discussed in more detail below.
IndySoft Report Designer - Calc Tab
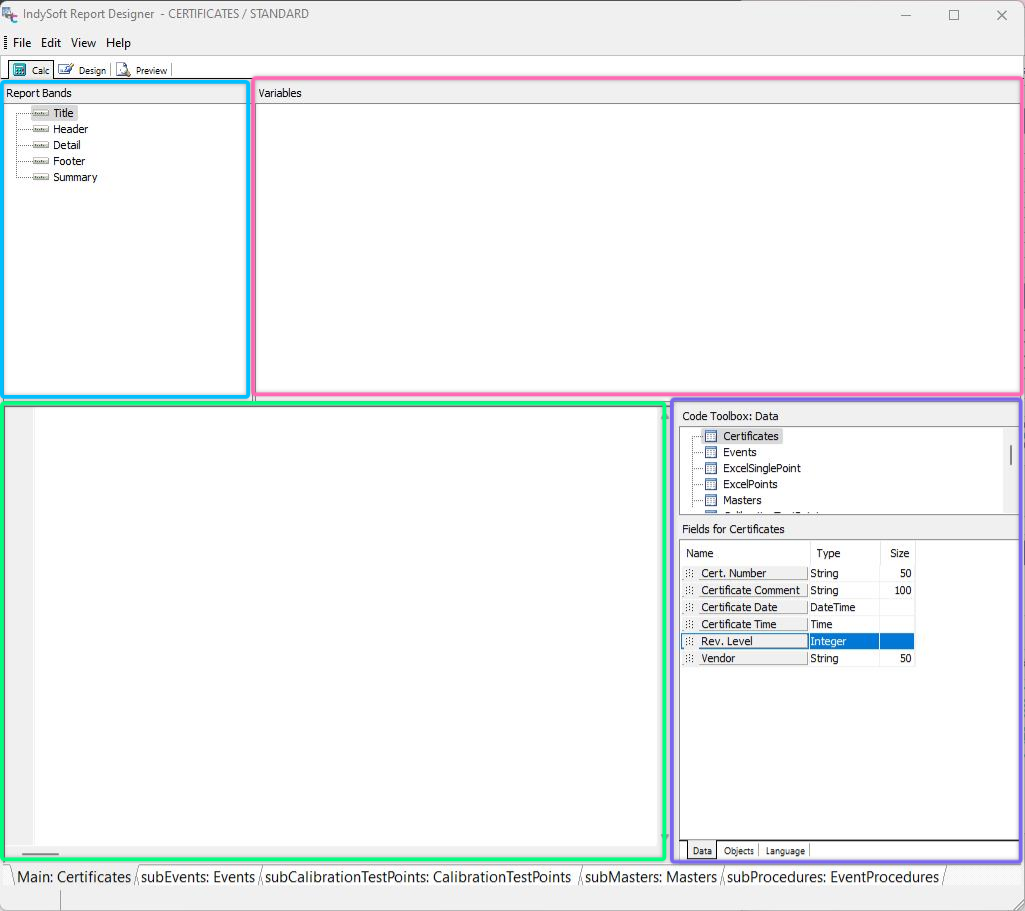
You will see four panels when you first click on the Calc Tab. The exact title of each panel will vary slightly depending on which View you are in.
The upper left corner is labeled Report Bands/Report Objects/Module View, depending on whether you are in Variables, Events, or Module View. This gives you a tree listing the relevant items for the given view. If you right-click here, you can switch between views.
The upper right corner is labeled Variables or Events in those views or unlabeled in the Module view. This region gives you a list of the available items that can be edited. Right-clicking on an item gives you five options. New allows you to add code, the same as selecting an item and clicking in the code window. Compile lets you check the code to see if the computer understands it. Save lets you save your code changes but does not save the report. Revert undoes all changes back to the last time you chose to save. Delete removes all code for the item.
The lower left corner is the code window. This is where you can type Object Pascal code to create more flexibility in your reports. If View: Messages is checked, there will be a small window underneath it that indicates if there are any errors in the code. Right-clicking on the code window gives you five options. New allows you to add code, the same as selecting an item and clicking in the code window. Compile lets you check the code to see if the computer understands it. Save lets you save your code changes but does not save the report. Revert undoes all changes back to the last time you chose to save. Delete removes all code for the item.
The lower right corner contains the Code Toolbox (if View: Toolbox is checked). This allows you to access additional information about the Data Pipelines, objects, and language. You can drag-and-drop elements from the Toolbox to the code window to easily build code.
Finally, these views depend on the currently selected (Sub)Report.
Code Toolbox
The Code Toolbox has three tabs: Data, Objects, and Language. Each allows you to easily locate items to drag and drop into the code window.
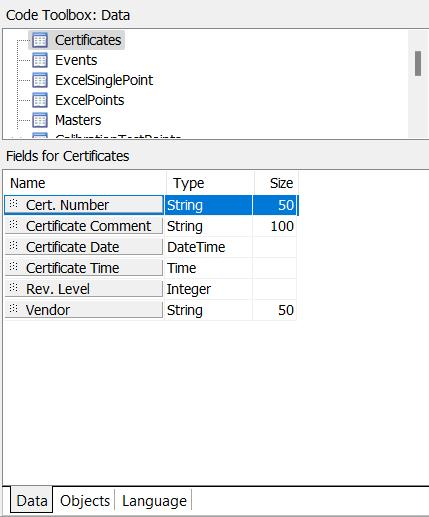
Code Toolbox - Data Tab
The Data Tab lets you view all the Data Pipelines and their fields. If you need to use a particular field in your code, drag and drop it into the code window to use it. The variable type and size are also listed if you need that information for your code.
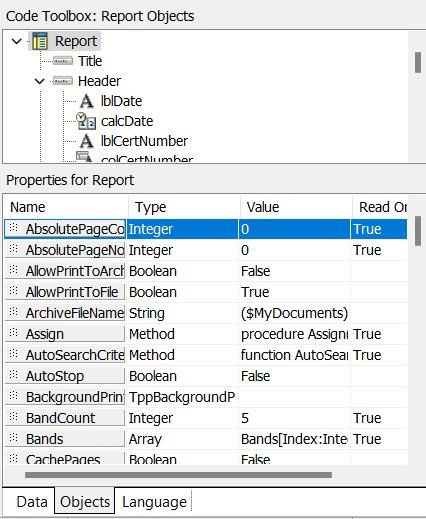
Code Toolbox - Objects Tab
The Objects Tab lists every Band and object in the current (Sub)Report tab. Each property is listed, along with its Type, Value, and Read status. You can drag and drop any property into the code window to use it.
The Language Tab is covered in a separate topic here.
Tree Legend
Five possible marks can be displayed in front of each item when viewing the tree view of the items in a view.
![]() No marking indicates that this item, and its branches, have no code.
No marking indicates that this item, and its branches, have no code.
![]() A hollow green triangle indicates that this item has no code but that at least one of its branches does. All branches that have code have code that was understood by the computer.
A hollow green triangle indicates that this item has no code but that at least one of its branches does. All branches that have code have code that was understood by the computer.
![]() A solid green triangle indicates that this item has code, and the computer understood it.
A solid green triangle indicates that this item has code, and the computer understood it.
![]() A hollow red triangle indicates that this item has no code but that at least one of its branches does. At least one of those branches has code that was not understood by the computer.
A hollow red triangle indicates that this item has no code but that at least one of its branches does. At least one of those branches has code that was not understood by the computer.
![]() A solid red triangle indicates that this item has code, but the computer did not understand it.
A solid red triangle indicates that this item has code, but the computer did not understand it.
To find the problem with an issue not understood by the computer, click on the item with the faulty code, and find the Event/Variable marked ![]() in the right-hand panel. You can then edit the code to fix it. If View: Messages is checked, you will see a window indicating the problem under the code window. Once you fix it and click outside the code window, the mark should change to
in the right-hand panel. You can then edit the code to fix it. If View: Messages is checked, you will see a window indicating the problem under the code window. Once you fix it and click outside the code window, the mark should change to ![]() . Items marked
. Items marked ![]() have no code at the moment. Note: you can comment out a section of code by typing { at the beginning and } at the end of the code. This will fix some errors but may cause other problems.
have no code at the moment. Note: you can comment out a section of code by typing { at the beginning and } at the end of the code. This will fix some errors but may cause other problems.
The Code Explorer
The Code Explorer is contained in the Calc workspace's upper left and right panes. The left pane contains a tree view use this to navigate your report's code. The right pane contains a list view it will display a variety of items depending on what is selected in the tree view. By right-clicking on the tree, you can display a context menu that allows you to control the behavior of the Code Explorer.
The Code Explorer - Variables View
Variables View
This view allows you to assign values or expressions to any variables you place in a form using the Variable tool on the Label Toolbar. Simply click on the band the variable is located, then on the variable, and then in the code window. 'Value: =' will appear in the code window, and the variable's icon will turn red. If there are no problems, clicking on a different tree branch/variable will turn green. If something isn't understood, it will stay red.

The Code Explorer - Events View
Events View
This view allows you to define what happens for every available event for every object in the report. What events are available will vary for different types of objects. Be aware that some objects have code defined for some events by default. When working with an existing Report, it is possible to accidentally break existing code by deleting an object referred to by another object's code. This view is good for viewing all report objects and their events.
The Code Explorer - Module View
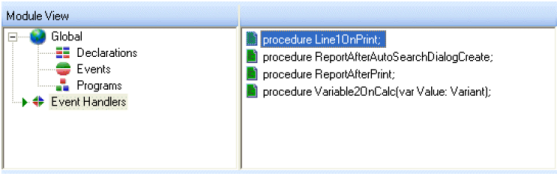
Module View
The Module view of the Code Explorer is displayed by right-clicking the left pane and selecting Module from the context menu. The Module view looks somewhat different from the other views. It allows you to define global variables, constants, events, and programs and view every Event Handler customized in the Events View. This can be a handy way to find code with errors when you have many SubReports and objects in your report.
This view displays items that are visible to all event handlers of the report:
Declarations These are variables and constants that are globally visible throughout the report.
Events These are, in essence, the report's events. OnCreate and OnDestroy are good places for initialization and finalization code, such as creating and freeing objects and initializing variables.
Programs These are procedures and functions globally visible throughout the report and can be called from any event handler.
Event Handlers These are all event handlers implemented in the report. |