Add/Edit...Employee...Employees
![]() Version 13.1 || Revamped interface for Add/Edit Employee Dialog - now displays in new tabbed structure
Version 13.1 || Revamped interface for Add/Edit Employee Dialog - now displays in new tabbed structure
- Review the tabs below for more information
| |Overview | Add/Edit...Adding Employees to a Company
Employees appear throughout IndySoft. They can be associated with Events, created as Users, and their signatures can appear on Certificates. Because Employees are the people who work in a company, records of Employees can be stored in IndySoft. Ensure that every employee is entered into IndySoft. First, it is necessary for a person to be an Employee before being made a User in the Profile Manager. Second, even if an Employee is not a User in IndySoft, it may be necessary to document that an Employee has done something with a piece of Equipment (you can select another Employee when performing an Event). Third, if you are using IndySoft to keep track of various physical assets, why wouldn't you want to keep track of human assets, too? Finally, if you use 'Companies' to keep track of your customers, you can enter a customer contact as an Employee for that Company. This allows you to use IndySoft to store all your contact information. For more information, see Employee vs. User.
Adding/Managing Employees
To add to or manage the Employee list, in the IndySoft header, click the Add/Edit dashboard option and select Employee...Employees List from the dropdown menu.
The initial screen displays the employees the selected company has in IndySoft. You can see various description fields are viewable by scrolling to the right.
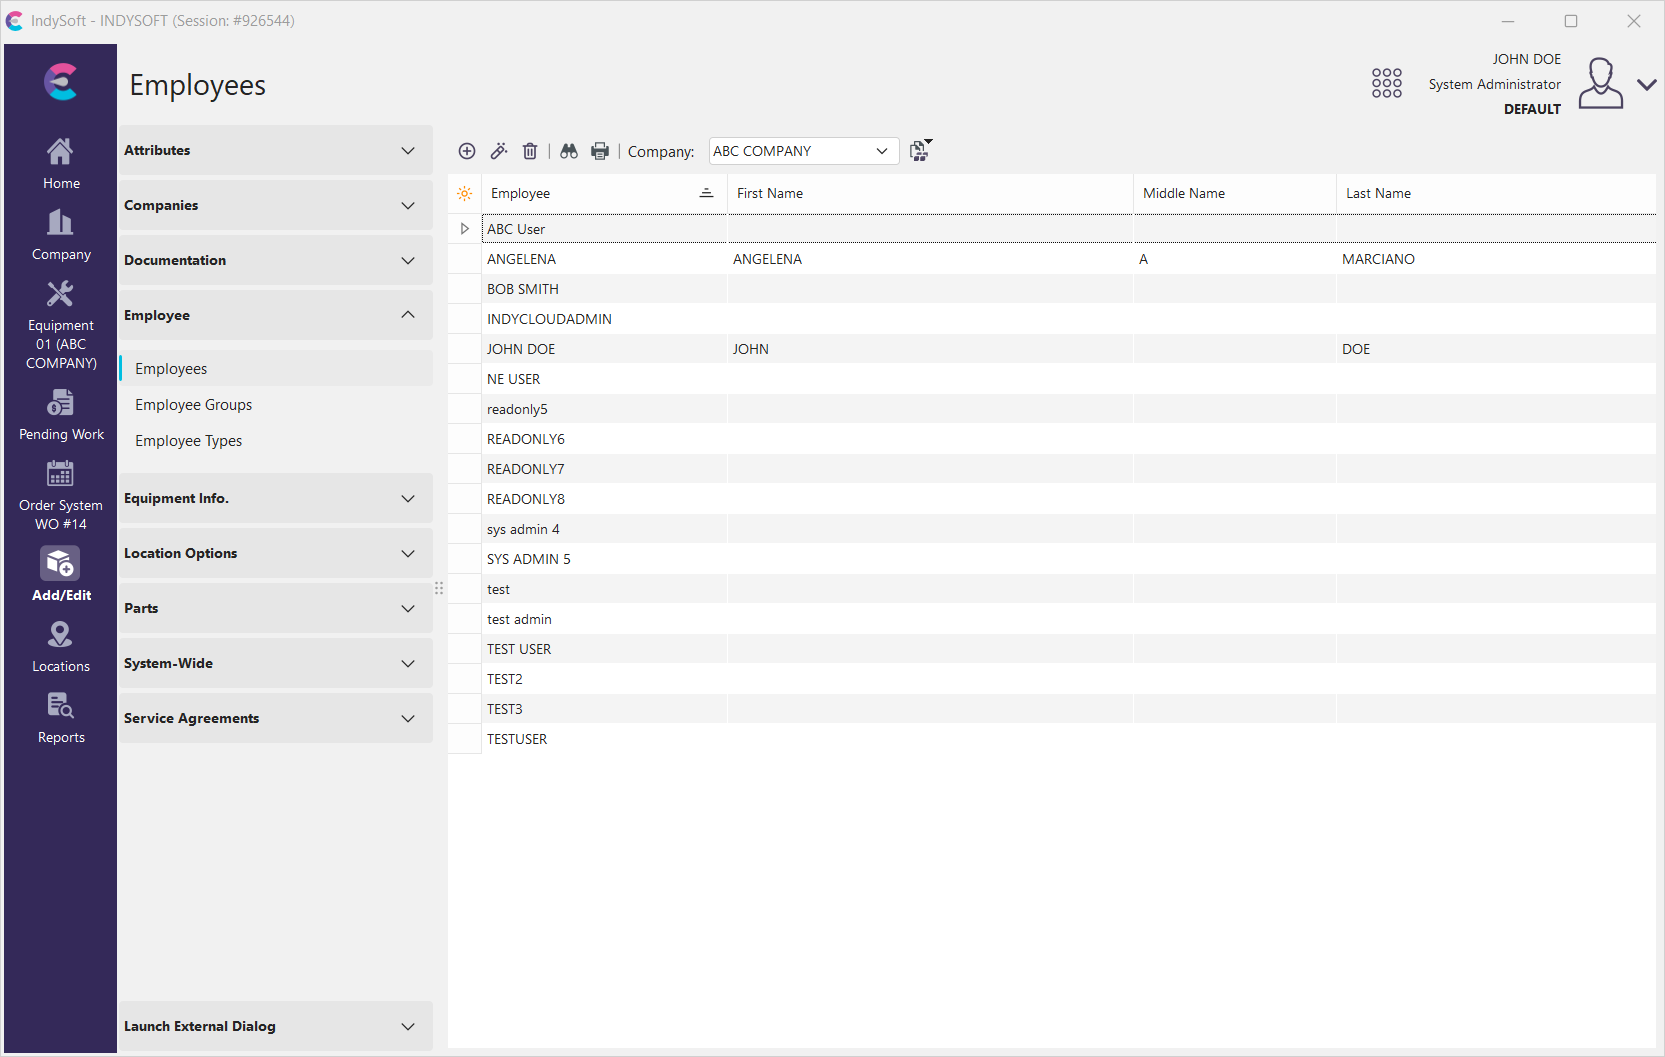
Add/Edit Employees Search Dialog
The grid above lists all employees for the selected company. The dialog box can be further customized, such as filtering and changing description fields by going here.
As you can see from the above grid, there are already employees listed for ABC Company. To view or manage the employee details, click the 'plus' icon to expand the details for that Employee (sorted by first name). Scroll to the right to see more information. In this dialog box, you can double-click the employee name to launch the Employee Wizard (or click the view item icon when the Employee is highlighted). You can also delete, search, or print the grid.
Add/Edit Employee
Using the above dialog as an example, ensure you add employees to the correct company. Click the 'New' button ![]() to add a new employee to that selected company. The Add/Edit Employee dialog will now launch.
to add a new employee to that selected company. The Add/Edit Employee dialog will now launch.
See following tabs for more information.
| General Information | General Information
These fields allow you to enter the Employee's personal information, upload their electronic signature, and upload a personal image.
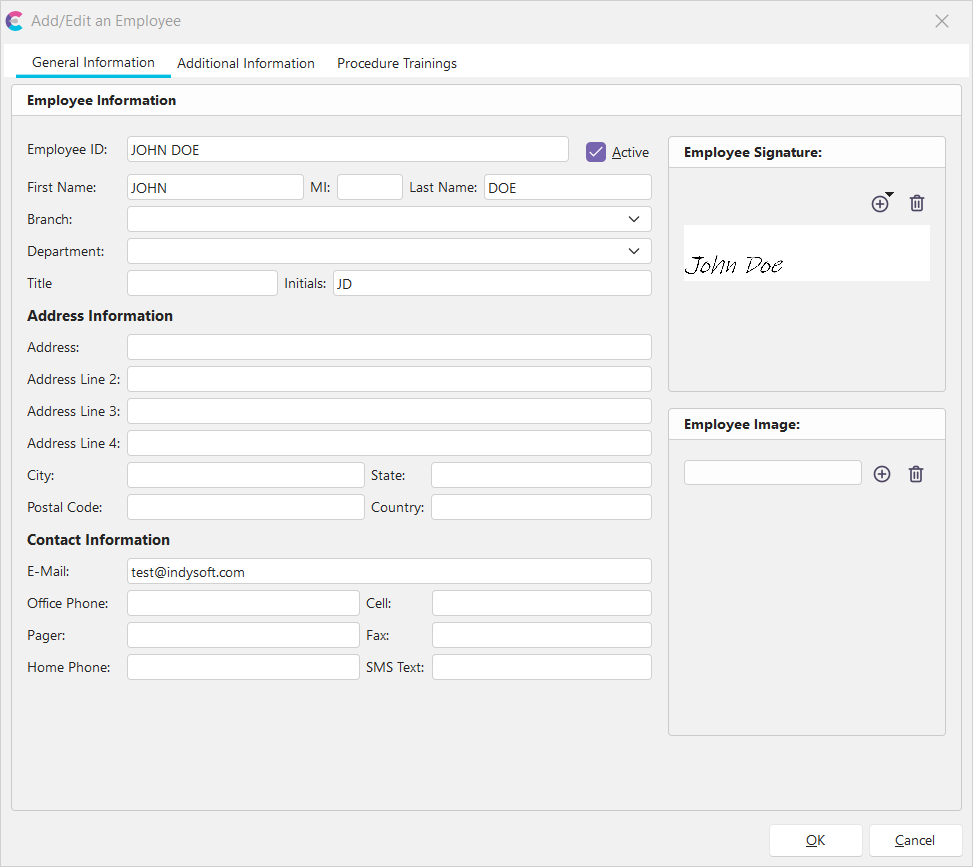
Add/Edit Employee - General Information
Employee Information
| Employee ID | Unique ID dedicated to this employee. Shows in employee dropdown lists. Can contain spaces.
| Active | Checking the 'Active' checkbox at the top right of the screen to show this Employee as current and active. Unchecking this box will not delete the Employee, but will remove them from the current active list of employees.First Name | The Employee's first name.Middle Initial | The Employee's middle initial.Last Name | The Employee's last name.Branch | The branch in which this employee works/belongs.Department | This is the Department the Employee works in. By assigning your employees a Department, you can later send out messages, emails, reports, and alerts to Employees within the Department. The dropdown list is populated from the 'Add/Edit...Department' List.Title | The current title of the Employee.Initials | The initials of the Employee. |
Employee Signature
To create a new employee signature, click the 'New' icon and attach the Employee's electronic signature file that you have stored in your database.
Employee Image
To upload an image of an employee, click the 'New' icon and attach the file of the Employee's picture that you have stored in your database.
Address Information
| Address | Main address of the Employee
| Address Line 2 | Additional address info (if needed)Address Line 3 | Additional address info (if needed)Address Line 4 | Additional address info (if needed)City | Address city of the EmployeeState | Address state of the EmployeePostal Code | Postal Code of the addressCountry | The country associated with the address |
Contact Information
Email | The email associated with the Employee. Can be used with emailing across the software.
| Office Phone | Office phone number of the EmployeeCell | Cell phone number of the EmployeePager | Pager number of the EmployeeFax | Fax number of the EmployeeHome Phone | Home Phone number of the EmployeeSMS Text | SMS Text phone number of the Employee |Additional Information | Additional Information
This step will allow you to add more specific information regarding this Employee.
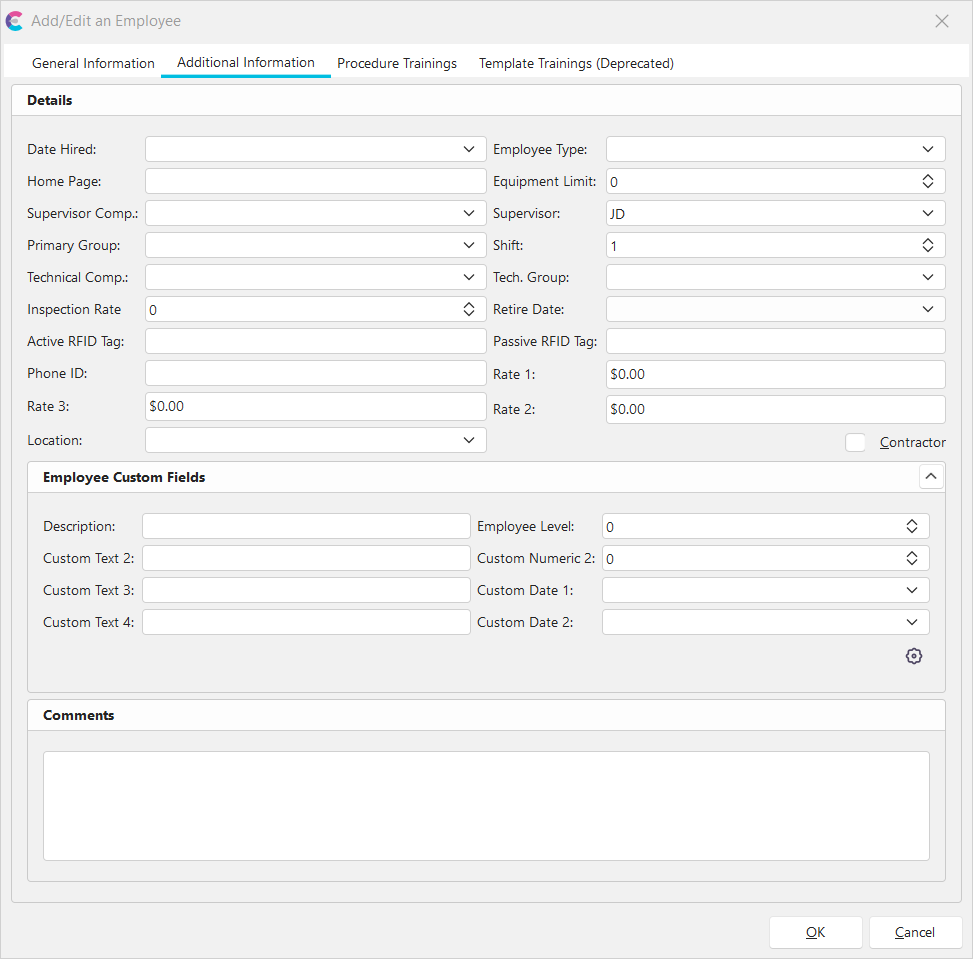
Add/Edit Employee - Additional Information
Details
| Date Hired | The date the Employee was officially hired.
| Employee Type | Classifies the Employee as a Temp/Full/Part/Seasonal/Contract/Short-Term. You can create a dropdown list for this field by going here.Home Page | Employee's home page.Equipment Limit | This field is used primarily for reference. Often, a company will have a rule like 'Each employee is only allowed to have 50 tools checked out at any one time, etc.' Here is where it would specify a numeric limit of 50.Supervisor Company | The company that contains the Supervisor.
A business may call each branch a different Company if the Corporation has many branches. For Example: The Regional Manager is located at the Dallas, TX branch, but the employees he oversees are located in the Charlotte, NC branch and are stored within the Charlotte, NC Company in the database. So, it's entirely possible that the Employee's manager is not within the same company as they are in.Supervisor | The Supervisor this Employee reports to.Primary Group | The main Employee Group to which the Employee belongs.Shift | Designates the shift the Employee is hired to work.Technical Company | Technical Company that contains the Technical Group.Technical Group | The Technical Group may have employees from their own company or other companies.Inspection Rate | For future use. (May be activated through the use of Custom Rules).Retire Date | Employee's official retire date (will be grayed out if the Employee is 'Active').Active RFID Tag | For future use.Passive RFID Tag | Relates back to IndyGo. For more details, see [IndyGo docs]Phone ID | For future use.Rate 1 | For future use.Rate 2 | For future use.Rate 3 | For future use.Location | The physical location where the Employee works. The dropdown list is populated from the 'Add/Edit...Locations' List.Contractor | This checkbox controls whether this employee is a contractor or not |
Employee Custom Fields
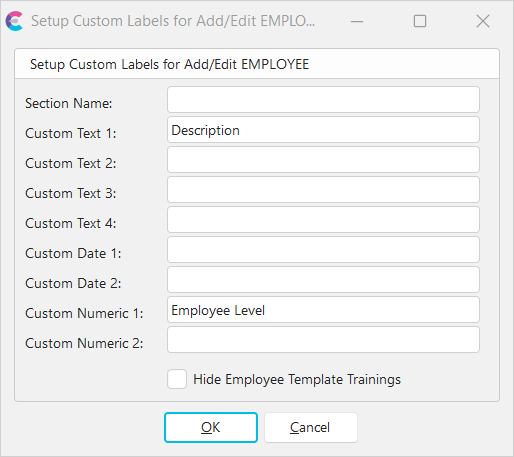
IndySoft provides you with additional custom fields to utilize for employees if desired. You can set up custom labels for this section using the cogwheel icon.
- Custom Text 1-4 (string, 50 char limit)
- Custom Date 1-2 (date/time)
- Custom Numeric 1-2 (float)
![]() Setup Custom Labels for Add/Edit Employee
Setup Custom Labels for Add/Edit Employee
Setup Custom Labels for Add/Edit Employee
![]() 13.1 || A new option to 'Hide Employee Template Trainings' - If checked, the template trainings tab will be hidden from display in the Add/Edit Employee dialog. This can be beneficial to avoid confusion if you do not plan on using template trainings.
13.1 || A new option to 'Hide Employee Template Trainings' - If checked, the template trainings tab will be hidden from display in the Add/Edit Employee dialog. This can be beneficial to avoid confusion if you do not plan on using template trainings.
Comments
An open text box to add comments about this Employee.Procedure Trainings | Procedure Trainings
This tab tracks the training this Employee has completed on specific procedures. Employee Procedure Training provides a methodology for Administrators and Lab Managers to be able to limit technicians to only be able to use the Calibration or Maintenance Procedures on which they have been trained.
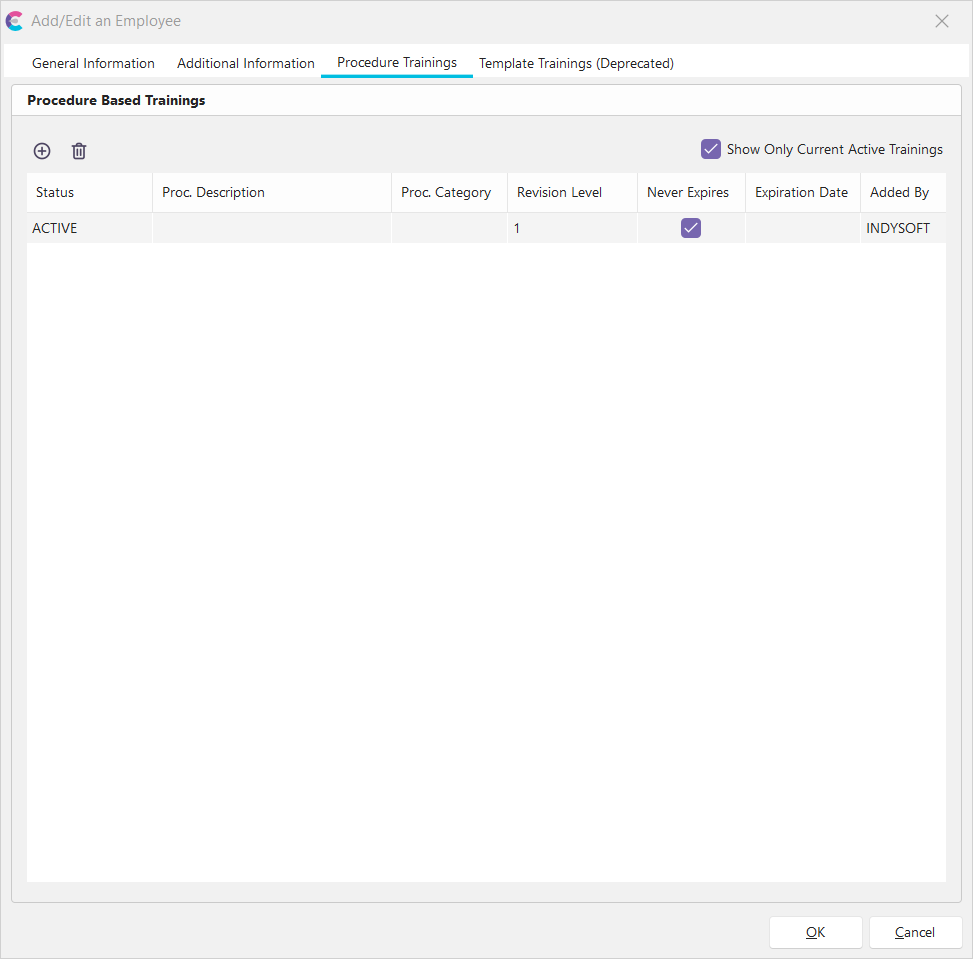
Add/Edit Employee - Procedure Trainings
An Administrator can quickly generate procedure trainings for the employee record selected in the Add/Edit dialog. This grid will display any existing, active procedure trainings for the currently viewed employee record. Unchecking the “Show Only Current Active Trainings” will show all current andformer trainings associated with the employee (regardless of the state of the procedure, procedure revision, and training). If that option is checked, which it will always be by default, the viewer will be able to only see Trainings which have:
- A status of “Active”
- A revision which is marked as the current revision
- Relates to a Procedure that is marked as “Active”
Adding a new training is quick and easy. Press the Plus Button
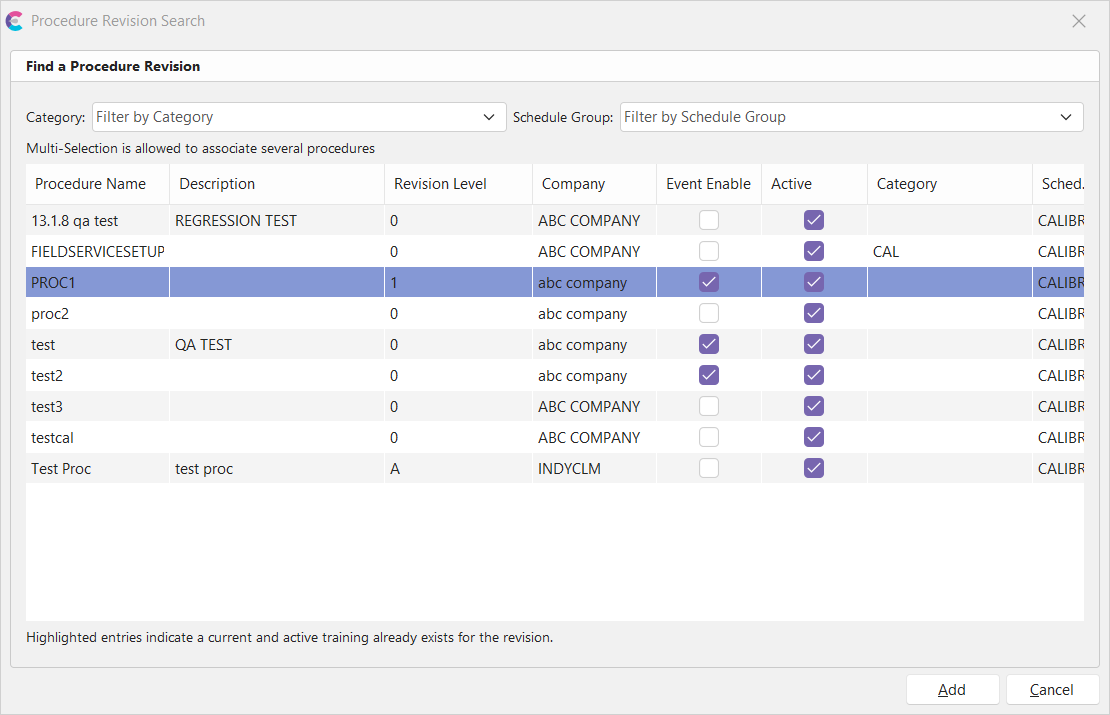
Add Employee Proc. Training - Procedure Revision Search
The admin can filter by procedure Category or Associated Schedule Group. This grid also allows for a multi-selection of procedures to associate (hold CTRL).
Upon pressing "Add", the associations will automatically be created with appropriate expirations (if any). If the user chooses a procedure that already has an association, the admin will be asked if they would like to Archive any existing trainings.

Archive Existing Trainings Prompt
If yes, then the existing training will be updated to the " ARCHIVED " status. If no, then the existing training will not be overwritten -- Only trainings that did not previously exist will be added. If canceled, then no changes will be made. Admins can also right-click from the main view and Archive any currently active employee trainings.
Note: Employee Procedure Associations do not have any security items in 13.1 and can only be created, edited, or deleted by system administrators.
You can compile and track the classes, training, and certifications this Employee has completed here. This section has been deprecated in version 13.1, meaning it is no longer being developed; no further improvements or alterations will be made to the template training functionality.

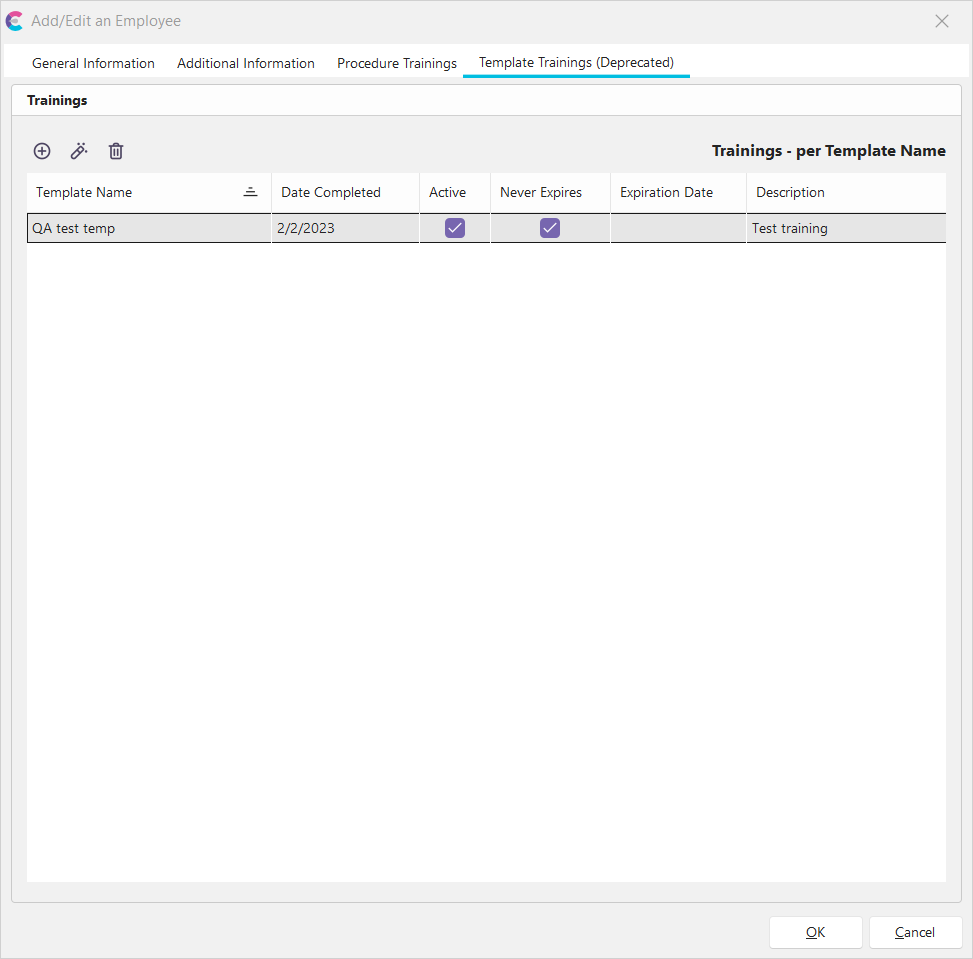
Add/Edit Employee - Template Trainings
![]() To create a new Training Type, click 'New.'
To create a new Training Type, click 'New.'
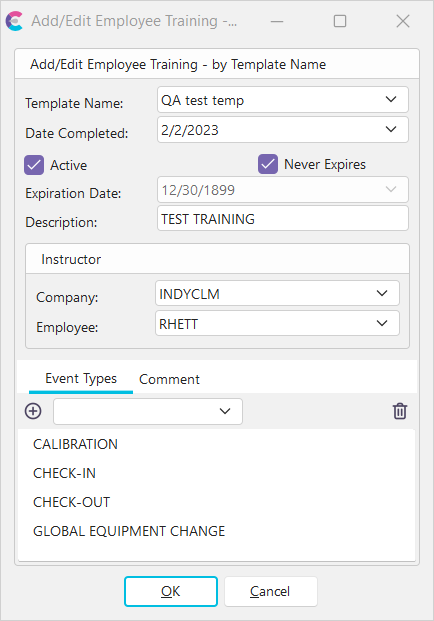
Add/Edit Employee Training - By Template Name
Fill out the fields here, checking whether the certificate or training is active (valid) and if and when it expires.
Template Name
Name of the Certification or Training
Date Completed
Date the accreditation was received
Active
Checking the 'Active' checkbox will show this Employee as current. Unchecking this box will not delete the training.
Never Expires
Checking the 'Never Expires' checkbox will block the expiration date field and keep the training active.
Expiration Date
This field will be inaccessible if the 'Never Expires' checkbox is checked. You would designate the Expiration date of the training/certification in this field.
Description
Short Description of the Training/Class/Certification
Instructor
In many cases, instruction will come from a current employee. In this case, you can choose the Company the Instructor is in and who the Instructor is.
Company
The Company to which the Instructor belongs
Employee
The employee name of the Instructor
Event Types
The last section in the above dialog box refers to the Events associated with this type of training/certification.
For example, if this Employee calibrates a specific instrument requiring a training certification to perform calibration, then you'd tie a 'Calibration' event to this certification. This can be achieved through Custom Scripting in Workflow Configuration - Custom Rules. More information on the event scripting functions, IsEmployeeTrained and LookupTrainingDate, can be found here.
·In the dropdown box under the Event Tab, select the event to which you want to tie this training template.
·Once it's selected, click the 'New' button ![]() . This will add it to the list. You can add more than one event.
. This will add it to the list. You can add more than one event.
·After you've input all the employees into each Company, click 'Finish.' |
![]() Productivity Tip
Productivity Tip
The Add/Edit Employees dialog box can be filtered and customized differently. See General Interface for more information.
Buttons and Icons are detailed here.