Workflow Configuration - Field Settings
Configuration Wizard - Field Settings (Step 2 of 22)
Configuration Wizard - Step 2 of 22 - Field Settings
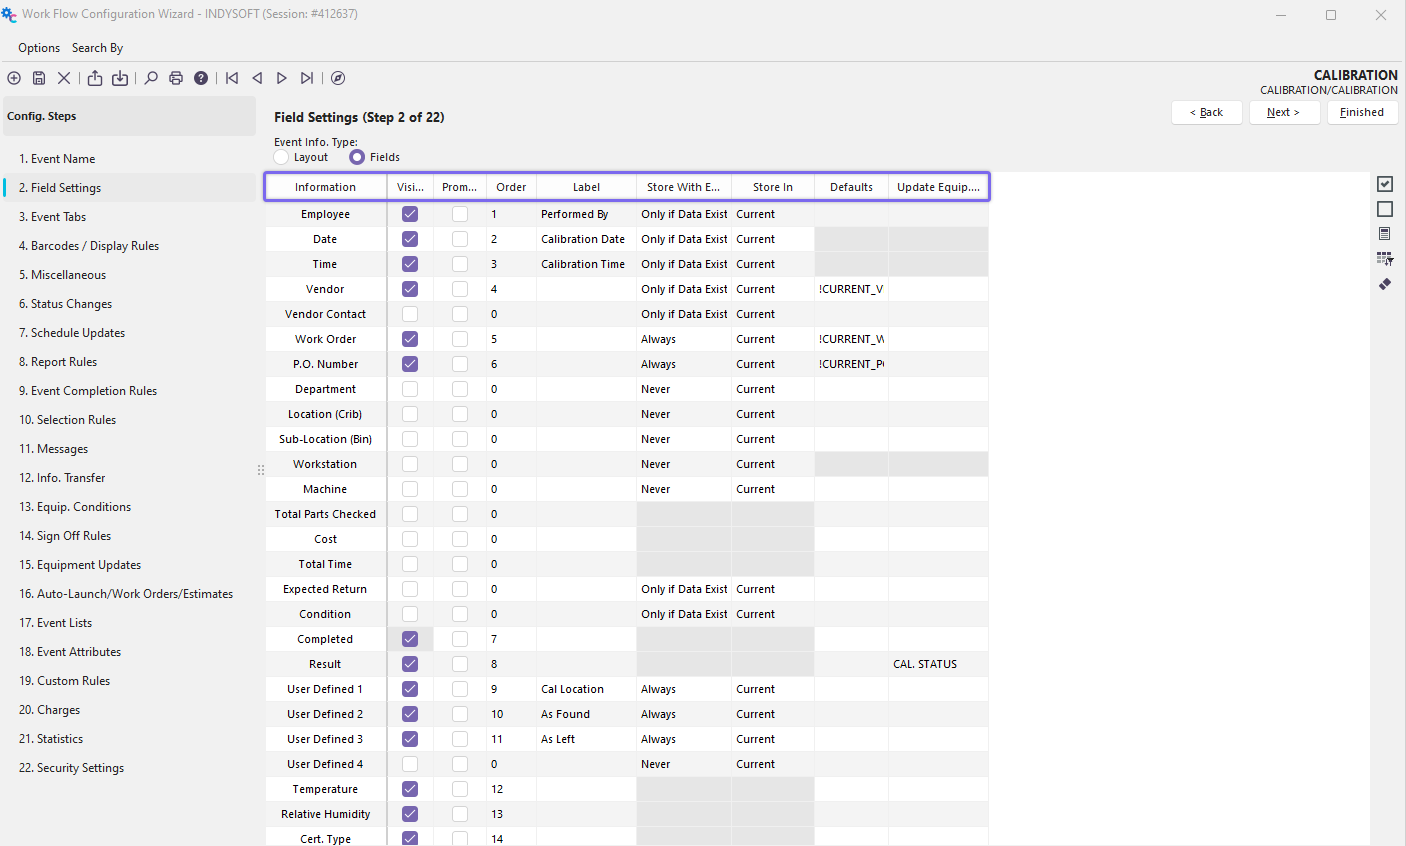
Use this configuration step to select the fields displayed in the 'Event Information' step in the event (assuming the 'Event Information' step is visible on the 'Event Tabs' configuration step).
Event Information Type
The first thing to decide is if the fields will be shown in an Event Layout or the older 'Fields' format (as was used in version 8 and prior, and again in the latest version 13):
![]()
Event Info. Type
If the 'Layout' option is used, the visible fields and all other layouts are controlled by the 'Design Layout' button to the right. Note: Once this layout option is chosen, the 'Visible,' 'Order,' and 'Label' fields on this configuration step are not operative - they only relate to the 'Fields' type. They are retained in the interface only to support the settings that should be used if the 'Re-create Layout Based On Field Settings' button is pressed.
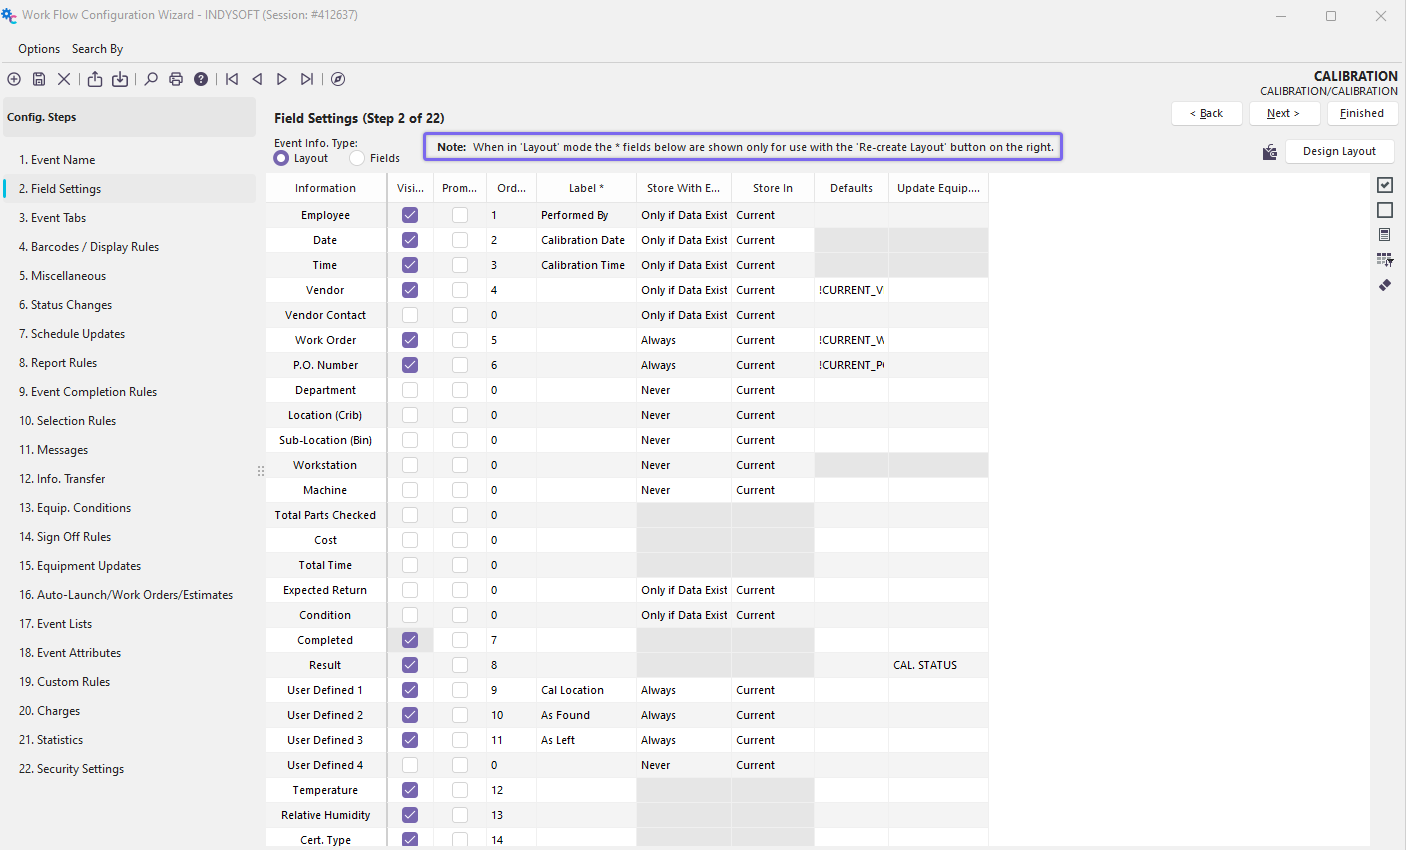
![]() Re-create Layout Based On Field Settings
Re-create Layout Based On Field Settings
Use this option to recreate an event layout based on the Field Settings onscreen. The visible fields will be included in the order specified, with the custom labels noted. This new layout will be previewed as if the user pressed 'Design Layout.' This option is hidden if the 'Fields' mode is checked.
![]()
This button will launch the event layout for editing in the Layout Editor. This option is hidden if the 'Fields' mode is checked. For additional details on editing event layouts, see Event Layouts.
Icons
![]() Mark All Fields Visible
Mark All Fields Visible
![]() Mark All Fields Not Visible
Mark All Fields Not Visible
![]() Re-Number Visible Fields
Re-Number Visible Fields
![]() Clear Options
Clear Options
![]() Reset ALL settings
Reset ALL settings
Fields/Columns
Information Column
This column displays the field name of all information specified during an event.
Visible Column
Check the visible column next to the appropriate field name to make a field appear on an event. If you check a field as visible, set the Order of the field (see further below).
Prompt Column
If you would rather be prompted for each field (instead of a free-form type of data entry), check the Prompt column for fields you want to collect data for. If you check a column as prompt, set the order of the field (see further below).
Order Column
The order column determines the order in which the event fields are displayed. You will be warned when saving the equipment if you accidentally duplicate an order number.
Label Column
The Label Column is used whenever you want a custom field label different from the label in the Information Column.
Store With Equip Column
This column has three different choices, Always/Never/Only If Data Exists. These options refer to if and when the specified event data should be copied to the gage as Status Information. Choosing 'Always' will copy the event data into the appropriate equipment field, even if the field has been left blank. Choosing 'Never' will leave the equipment's status information as-is. A 'Only If Data Exists' option will copy information to the equipment's status fields only if the event information field contains data.
Store In Column
Each gage can have two types of current status fields stored with it. Almost all event information can be stored with the equipment after an event is complete, making it easy to filter equipment by its current and in-transit statuses. There are two different types of statuses: Current Status info and Transit Status info.
When a piece of equipment is involved in a 1-step transaction (a transaction that involves only one event), you will want to rely on the Current Status info to store the current information about the gage. An example of a 1-step transaction is a 'Check-Out' of a piece of equipment to the shop floor. The equipment's status is now 'Checked-Out,' the event will record who checked it out.
If the piece of equipment is involved in a 2-step transaction (a transaction that involves two events), then you will want to rely on the In Transit info for the first event and then the Current Status info for the second event. An example of a 2-step transaction is a 'Transfer To Lab' / 'Receive At Lab.' During the initial 'Transfer to Lab' event, you would move relevant event info data to the equipment's 'In Transit' status because the equipment is going to the lab, but until the lab receives it, then its actual status is unknown. Only when the lab gets the equipment can you assume that the event data is now the 'Current Status' info.
Additionally, there may be some information that you want to store in Both statuses. In that case, select Both for where to store the information.
Defaults Column
The Defaults column can be used to specify default values for event fields. For example, if you wanted the Vendor event field to default to 'GAGES R US,' simply typing this value in the Default column for the Vendor row will default the field to this vendor. By placing a '!' and an equipment field name in this column, you can default the Event field to existing Equipment Information. For example, if you wanted to move the equipment's default department field into the event's department field, you could enter !DEPARTMENT in the Defaults column.
Update Gage Field Column
This column can be used to specify equipment fields to populate with Event information once the event has been completed. For example, to move the event's department field to the equipment department field, you would enter !DEPARTMENT into the Update Gage Field column. |