Design Tab - Menus
The menu bar at the top has five possible options.
![]()
File
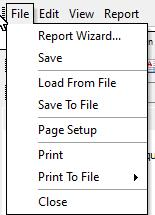
Report Wizard
Use the Report Wizard to create new reports or label templates
Save
This saves the report to the Indy Soft database.
Load From File
This loads a version of the report from a .rtm file.
Save To File
This saves a copy of the report to a .rtm file.
Page Setup
Page Setup allows you to select the printer, paper size, source, layout, and margins. Most of these are standard. However, the layout has several important options. The layout allows you to select multiple columns for organizing information display. You can also set the width and location of each column and how information is organized between the columns.
Print
Prints a copy of the report using the current source data.
Print To File
Allows you to save the report using the current source data in PDF, Excel, RTF, or JPEG format.
Close
Closes Report Designer. You will be prompted to save if you have not saved since you last made a change.
Edit
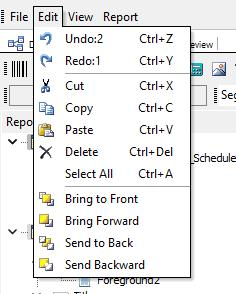
![]() Undo
Undo
Allows you to undo several recent actions. (# of undo's available)
![]() Redo
Redo
To go along with Undo is Redo. Once you have undone something, you can change your mind and redo that step with the Redo button. (# of redo's available)
![]() Cut
Cut
Deletes the selected object while saving a copy to the clipboard.
![]() Copy
Copy
Copies the selected object to the clipboard.
![]() Paste
Paste
Pastes an object from the clipboard.
![]() Delete
Delete
Deletes the selected object.
![]() Select All
Select All
Selects all objects.
![]() Bring to Front
Bring to Front
Moves the selected object in front of all other objects. It may partially or fully cover another object.
![]() Send to Back
Send to Back
Moves the selected object behind all other objects. Another object may partially or fully cover it.
View
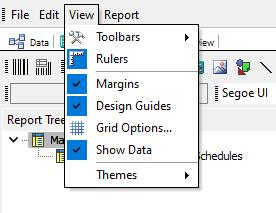
![]() Toolbars
Toolbars
Allows you to show/hide any of the toolbars. They are described in Design Tab - Toolbars.
![]() Rulers
Rulers
Determines whether rulers are visible on the screen's left side and top.
![]() Grid Options...
Grid Options...
This option allows you to turn Snap to Grid on or off, determining the distance in pixels from one snap point to the next for the X (horizontal) and Y (vertical) directions.
Show Data
Determines whether the source data or the Data Pipeline Field is displayed in objects in the Design tab.
Themes
Use this option to adjust the theme of the PrintBuilder Report Designer.
Report
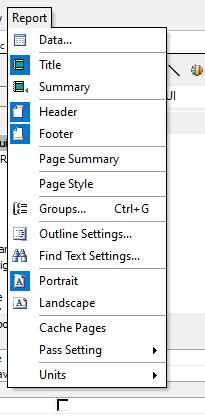
![]() Data...
Data...
Allows you to select the default Data Pipeline for each (Sub)Report. The Data Pipeline will appear initially for Data components in the Edit toolbar.
![]() Title
Title
Determines whether the Title band is included in the current (Sub)Report.
![]() Summary
Summary
Determines whether the Summary band is included in the current (Sub)Report.
![]() Header
Header
Determines whether the Header band is included in the current (Sub)Report.
![]() Footer
Footer
Determines whether the Footer band is included in the current (Sub)Report.
Page Style
Determines whether an additional Page Style Band will be added to provide formatting separately from the Details Band.
![]() Groups...
Groups...
Allows you to group data by a Date Pipeline Field in a details band. For example, if you print the test points for several calibrations, you would want to group the test points by calibration. You wouldn't want them to be mixed.
![]() Outline Settings...
Outline Settings...
Allows you to create an outline of the report displayed on the left side whenever it is displayed on the screen. This can be useful for quickly navigating through a large report.
Find Text Settings...
Allows you to enable text search in your reports and set the default settings for a search. Options are Show All, Case Sensitive, Whole Word, Start Search on First/Current Page, Show the Find Text Toolbar and the Default Find Text String.
![]() Portrait
Portrait
This option sets the paper to a portrait layout.
![]() Landscape
Landscape
This option sets the paper to landscape layout.
Cache Pages
Pass Setting
Determines whether the data is generated with one or two passes. Two Pass is required to print page numbers but may be slightly slower than One Pass.
Units
Determines what unit measurements are made in. You can choose between Screen or Printer Pixels, Inches, Millimeters, or Thousandths of MM.
Menu Options
The following menu options are used in PrintBuilder when the 'right mouse click' feature is activated using certain components.
![]() Bring to Front
Bring to Front
Moves the selected object in front of all other objects. It may partially or fully cover other objects.
![]() Send to Back
Send to Back
Moves the selected object behind all other objects. Other objects may partially or fully cover it.
![]() Auto Size
Auto Size
This feature adjusts the text width to display all the information.
Blank When Zero
This feature will not appear on the report if there is no value in the data field it represents.
Display Format...
This feature allows you to display a value in a certain format (decimals with a dollar sign, for example)
![]() Position...
Position...
This feature pulls up a dialog that allows you to enter numeric values for the location of the Left and Top edges and the Width and Height. These values are also displayed on the bottom edge of the Report Designer window on the right side. Using this tool, you can quickly line up several components. The default step size is one pixel displayed using the current unit.
![]() Reprint on Overflow
Reprint on Overflow
This feature allows information to be continued at the top of the next page Reprint on Subsequent On occasion; labels will identify columns of information. If this is the case, you may wish the labels to appear at the top of each page to help the reader keep track of the data they are looking at. This feature will accomplish that.
Reset Group
Use this feature to choose where reset counting breaks should occur in the report.
Shift With Parent
This feature will instruct a component to move with another designated 'parent' component, normally one set as 'stretchable.'
Suppress Repeated Values
Repeated values in a table unnecessarily can make the report hard to read. This feature suppresses the value so that it only prints once.
Transparent
This feature tells the system to make the field or element transparent. It does not have a background that would block a portion of any other component that may be placed behind it.
![]() Visible
Visible
This feature determines whether the object will be displayed. When modifying a report, it is often a good idea to uncheck this rather than deleting an object if there is code in the Calc Tab that depends on the existing object.
![]() Word Wrap
Word Wrap
Allows a line of text to be split into several lines if wider than the object it is in. |