Layout Editor - General Interface
Most of the functionality in IndySoft (besides events - configured through Workflow Configuration) is launched through either the Home View layout, Equipment View layout, or Template Editor layout. For this reason, controlling the look/feel of the layouts allows you to radically change the functionality available to certain users and emphasize certain fields and operations. The simplest security level is to remove an unwanted option from users so they don't even know to try an operation (that might be blocked through Profile Manager). Or, if your users are accustomed to a particular 'look,' possibly from a legacy system or engrained terminology, then the layouts allow you to mirror this interface as closely as possible. If you can design a nice-looking document in Word, you have all the skills to control IndySoft layouts.
Think of each layout as a document. Some text in the document is dynamically replaced with 'live' text from the database each time the document is replaced (merge items). Some text items and/or images in the document can be configured with hyperlinks that point users to additional functionality. So the final result is a familiar web-like interface, but you don't need to write any HTML.
The Layout Editor is used for modifying Company layouts, Home Layouts, Equipment Layouts, Template Layouts, Task Layouts, Order Layouts, and EMail Layouts. The functionality is the same for all layout types; only the merge options and hyperlinks vary between layouts. The screen has five main sections:
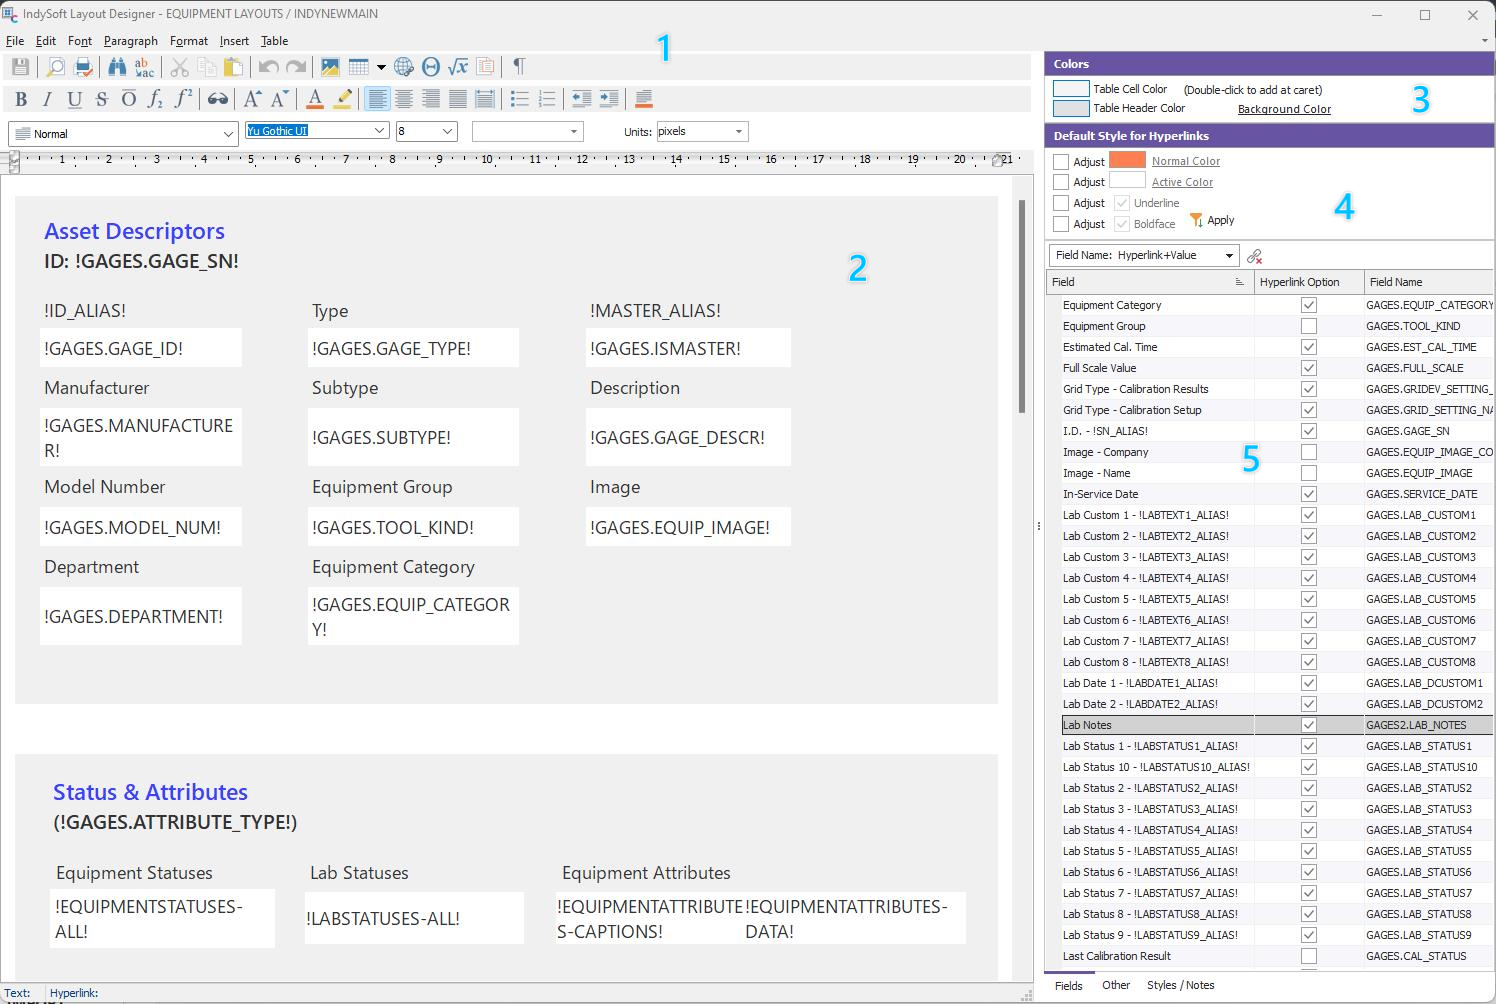
Example - Layout Editor
1. Ribbon Options - access to layout options. See the 'Ribbon Options' section below for more details
2. Rich-Text Layout - the document that represents the layout. The editor is a basic 'rich text file' (rtf) editor - so the functionality should feel very familiar if you have used Microsoft Word, etc. Text is placed in the document, and fonts can be selected for each character, with an unlimited # of font styles, colors, sizes, etc. Each text group is treated as a paragraph with options like justification, spacing, etc. Tables and sub-tables can be used for formatting the document. Images can be embedded into the document at any paragraph position and/or within tables and sub-tables. Text items and images can be set up with hyperlinks pointing to functionality in IndySoft.
3. Table Cell Color - See Table Cell Color
4. Default Style for New Hyperlinks - See Default Style for New Hyperlinks
5. Merge/Hyperlink Options - See Merge/Hyperlink Options
Embedded Layouts
Before diving deep into designing your layouts, remember that IndySoft has a powerful feature in embedded layouts. This concept allows you to merge one layout into another at the position of certain merge text. This might simplify your design of layouts - and standardize key information. Embedded layouts are supported in all layout types except EMail Layouts. To embed a layout, go to the 'Other' tab and select the 'General' merge items...select the layout that you would like to embed. The syntax is:
!EMBED=LAYOUTNAME!
Where LAYOUTNAME equals the layout name you would like to embed at that position, multiple layouts can be embedded within one layout. Still, layouts cannot be embedded more than one layout deep - meaning an embedded layout cannot contain embedded layouts within itself, etc... Take a simple example - say this was a small equipment layout:
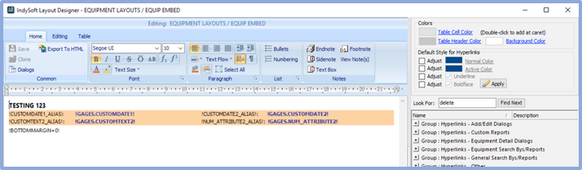
EQUIP EMBED Example - Embedded Layout
Then you chose to embed this in your STANDARD equipment layout, such as:

STANDARD Equipment Layout With An Embedded Layout
Then, when the final equipment layout is drawn, the two layouts are merged:
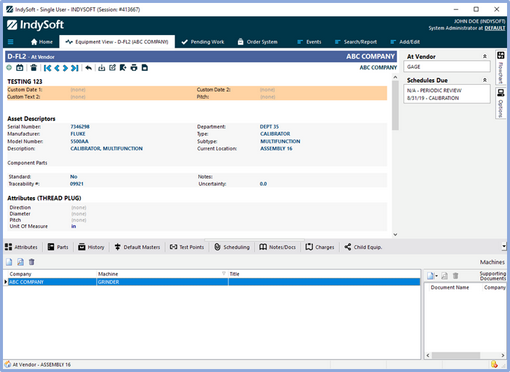
Example - Merged Layouts through Embedding
Finally, in addition to EMBED= syntax, you can also try EMBEDIF= and EMBEDIFNOT=. These two options use Profile Groups, as set up in Profile Manager...
Ribbon Options
The ribbon control is located above the layout and contains links to all the main formatting/editing operations. There are three main tabs, each with four sections:

Layout Editing - Main Tabs
Home - contains four sections:
·Common - See Layout Editor Ribbon...Home...Common
·Font - See Layout Editor Ribbon...Home...Font
·Paragraph - See Layout Editor Ribbon...Home...Paragraph
·List -See Layout Editor Ribbon...Home...List
Editing - contains four sections:
·Object - See Layout Editor Ribbon...Editing...Object
·History - See Layout Editor Ribbon...Editing...History
·Spell-Check - See Layout Editor Ribbon...Editing...Spell-Check
·Editing - See Layout Editor Ribbon...Editing...Editing
Table - contains four sections:
·Insert - See Layout Editor Ribon...Table...Insert
·Delete - See Layout Editor Ribbon...Table...Delete
·Operations - See Layout Editor Ribbon...Table...Operations
·Borders - See Layout Editor Ribbon...Table...Borders
Note: when you move the caret (the position of current input in the layout - the 'flashing cursor') into a paragraph in the layout, various ribbon buttons will enable/disable based on the current paragraph settings. For instance, if the current paragraph is aligned left, you will see the 'Align Left' button toggle to the 'down' position (a blue gradient). You will also note ribbon buttons that toggle to the current state based on text styles, like bold, italic, underline, etc. Also, placing the caret in a table cell will highlight many table-related ribbon buttons with the current state of that table/cell-like cell borders, etc.
![]() Undo Is Your Friend!
Undo Is Your Friend!
Before you get far into modifying layouts...please remember this important tip: use Undo! If you operate with unintended consequences, go to the 'Edit' menu, select 'Undo,' or press 'Ctrl+Z' on your keyboard. Multiple undo steps can be performed.![]() Please see the sections below for more details on this group.
Please see the sections below for more details on this group.
Layout Editor - General Interface
Home
ØCommon Options
ØFont
ØParagraph
ØList
Editing
ØObject
ØHistory
ØSpell-Check
ØEditing
Table
ØInsert
ØDelete
ØOperations
ØBorders
ØTable Cell Color
Hyperlinks
ØDefault Style for New Hyperlinks
ØMerge/Hyperlink Options