Filtering Exported Data
Exported data can be filtered using the 3rd column in the export options grid called 'Selection.' This column has a drop-down edit control for each row; the available values will vary depending on the export group. But for most items, two options are available:
All: select all records in the sub-group
Select: filter the records in this sub-group. If this option is selected, a filter dialog will appear at the time of export for each group that has 'Select' chosen.
The interface for this dialog is shown in the example below (a filter on Event Configuration):
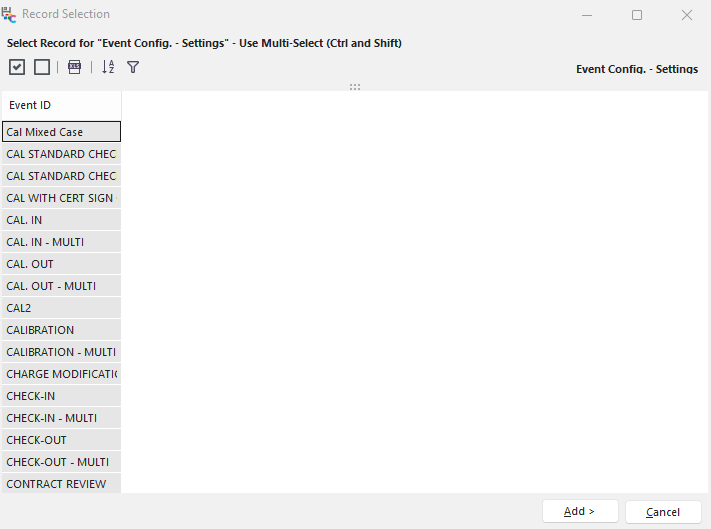
The name of the export group being filtered is shown in the upper-right (Schedule Types') in this example. The number and names of the fields shown in the grid will also vary according to the export group being filtered. Typically only the most important 'unique' fields in the table are shown, not a full listing of available fields, but occasionally important additional fields are also shown. When the dialog first appears, the default mode is to have all the records selected (blue in this example). You can use the keyboard/mouse to deselect or select only the records you want to be included in the export. Only selected records (in blue for the above example) are included. Common Windows shortcuts like Ctrl+Left Mouse Button (multi-select records one by one) and Shift+Left Mouse Button (multi-select all records between 2 records) can be used. Ctrl+Up and Ctrl+Down keyboard keys can also be used. Also, there are two buttons able the grid that allows you to select or deselect all records quickly:

A third button is also available for quickly exporting records to Excel. All records are included in the export to Excel, not simply the selected records.
But by default, the records are shown sorted by the visible fields (natural sort). If you would like to modify the sort further (or reverse the sort, etc.), then press the 'Allow Sorting/Filtering' button:

When this button is toggled down, the columns can be sorted in the header, and each column will also have a per-field filtering option available. Also, Ctrl+F can be input on the keyboard to display a quick 'Find' panel above the grid:

Find Panel - Ctrl+F
![]() Filter Records
Filter Records
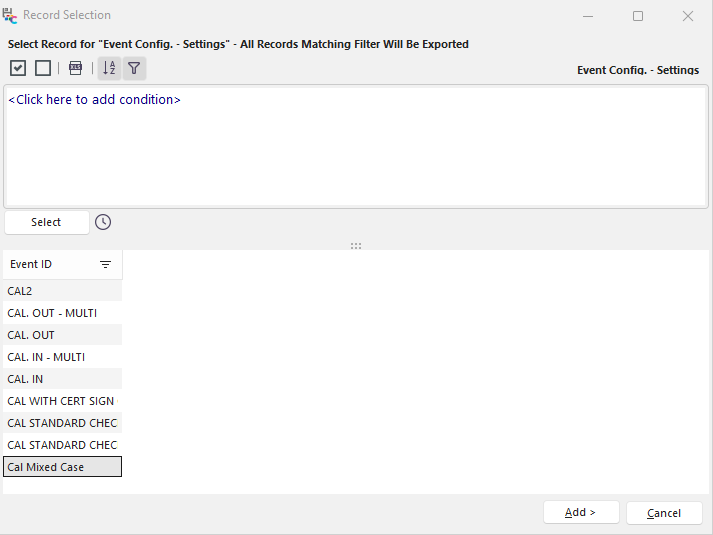
Toggle down the 'Filter Records' button above the grid if you need maximum filtering ability. This will display a filter box that allows for unlimited filtering on all available fields:
Filter Records
Press 'Select' to preview the records that match your selection filter. Remember that the filter, as input, will always be used to select the actual records for export - even if the 'Select' button is not pressed to review the matching records. Also, remember that if this export is later saved using the 'Save Recently Completed Export Settings' after export, the filter (if used) will be saved in the configuration, not the exact records. So the next time you run this same export (if your saved settings are recalled), the filter will be repeated, but at this later date, you might have a different # of records that match the filter. Always review the selected records before proceeding.
When your selection is complete, press 'Add >' to proceed. The next selection dialog (if applicable) will be shown until all subgroup filtering requirements have been met. If you press 'Cancel' on any subgroup record selection dialog, the export will be canceled, and you will be returned to the Export Options step.
Specific Selection Dialogs
Some export groups have specific selection dialogs that provide additional interfaces for filtering. These selection dialogs are typically dialogs that users are familiar with from other uses in IndySoft:
Select EquipmentFinder: this selection/filter dialog is available from the 'Equipment' subgroup of the 'Export Equipment, Events, Action Requests' export group. This dialog is identical to the EquipmentFinder shown on the main screen in IndySoft (and many other locations in the product). Use the options on the top tabs to select your equipment records into the bottom grid, then press 'Add' to proceed. This EquipmentFinder interface is very flexible (allows selection of records one-by-one or from a filter), and records can be removed from the 'Selected Equipment' grid one by one. If a very large # of records is being filtered, the 'Select Equipment Filter Only' selection/filter dialog might be a better choice for quickly selecting the required records.
Select Equipment Filter Only: this selection/filter dialog is available from the 'Equipment' subgroup of the 'Export Equipment, Events, Action Requests' export group. This dialog is identical to the search-by dialog shown for custom search-bys, as set up in Profile Manager or PrintBuilder and available on the IndySoft main screen. This interface includes a filter box (just like the 2nd tab of EquipmentFinder). Still, the selected records are not 'inserted' behind-the-scenes one at a time into the selected equipment grid - they are shown as the result of a 'select' on the database. This has the advantage of quickly populating the records into the bottom grid (for your confirmation). But as a downside, you cannot select the records individually and remove them from the bottom grid to fine-tune your selection. The selection filter on the top of the dialog must be complete to select all the necessary records. This selection method can also slightly speed up the export process in certain instances (if a very large # of records are in play).
Select EventFinder: this selection/filter dialog is available from the 'Events' subgroup of the 'Export Equipment, Events, Action Requests' export group. This dialog is identical to the EventFinder dialog on the IndySoft main screen. Note that if an 'Equipment' sub-group is also included in the export, the Events exported will first be constrained to the Equipment being exported. But any filter selected in EventFinder will also be applied within those matching events. For example, say you want to export all Equipment from 'BCD COMPANY' that was calibrated in the last three months, so select EquipmentFinder for your equipment selection dialog. You use a filter for 'Last Calibration Date.' But when creating the export, you want to include only the CALIBRATION events from the last three months and exclude any other workflow events. Then you would select 'EventFinder' for your 'Events' filter dialog and constrain based on 'Event Date.'
Select EstimateFinder: this selection/filter dialog is available from the 'Estimates' subgroup of the 'Order System' export group. This dialog is identical to the EstimateFinder dialog shown in the IndySoft Order System.
Select OrderFinder: this selection/filter dialog is available from the 'Work Orders' subgroup of the 'Order System' export group. This dialog is identical to the OrderFinder dialog shown in the IndySoft Order System.
Select InvoiceFinder: this selection/filter dialog is available from the 'Invoices' subgroup of the 'Order System' export group. This dialog is identical to the InvoiceFinder dialog shown in the IndySoft Order System. |