Equipment Layout
Once an asset is selected from one of the many search-by dialogs, it is displayed on the Equipment View tab and that tab is selected. The top of the layout contains key information about the asset:

Top of Typical Equipment View
In the above example, CAL1 is the asset ID - the key field that uniquely identifies this asset from within the 'ABC COMPANY' (shown to the left). This field is also a hyperlink that displays the 'Search by ID' dialog. Another simple way to locate an asset within the current company while on the Equipment View tab is to start typing with your keyboard - this will automatically launch the 'Search by ID' dialog with the search characters input.
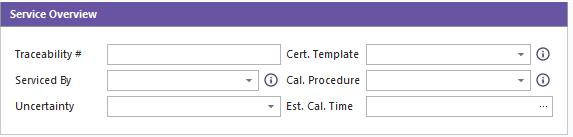
The current tracking status of this asset is visible within the main equipment layout in the Service Overview section. - 'Checked Out' in the example above.
On the far left of the header is the Company that owns the current asset - 'ABC COMPANY' in the above example. Clicking on this text will launch the Advanced Company Search dialog for locating another company and another asset from the new company. Below the company name is a 'full company name' field - blue text on a white background in the above example. The 'ABC COMPANY' company in the above example has a 'full company name' that is also 'ABC COMPANY.' Buttons are seen in the lower left of this section:
![]() New Equipment - Create a new asset in the database. This will launch the dialog below:
New Equipment - Create a new asset in the database. This will launch the dialog below:
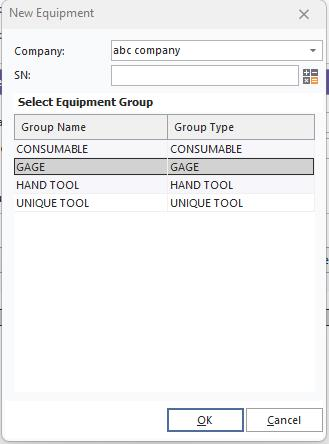
Add New Equipment Dialog
Select the company from the drop-down (the current company will default) and type the name of the new ID. If you would like to create a number from an auto-number scheme, press the 'calculator' button to the right. The 'Equipment Group' has four options; consumable, gage, hand tool, and unique tool. The default group here is the Gage group.
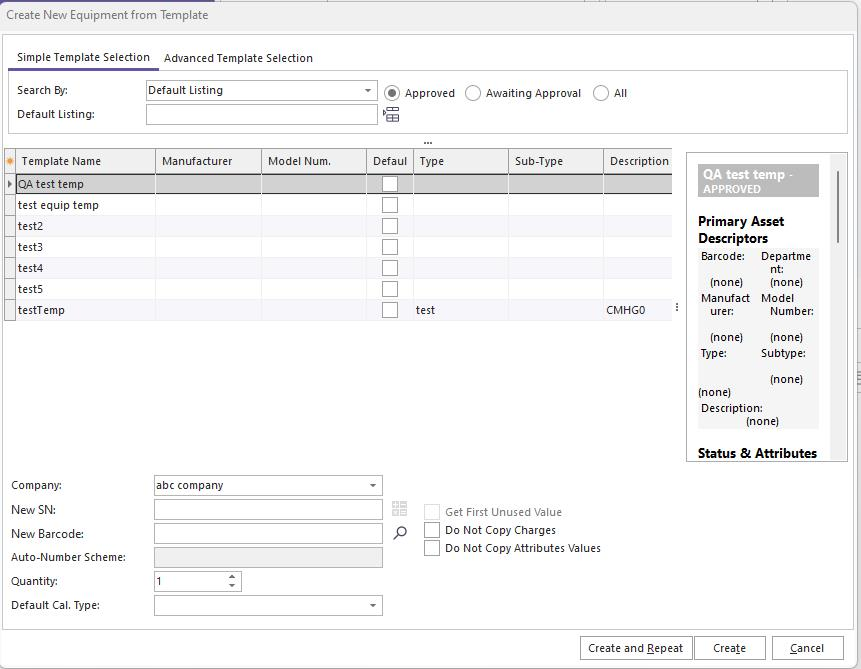
![]() New Equipment From Template - Create a new asset based on a template. See the Template Editor topic for details on creating/editing templates. See the New Equipment From Template topic for more information on this dialog.
New Equipment From Template - Create a new asset based on a template. See the Template Editor topic for details on creating/editing templates. See the New Equipment From Template topic for more information on this dialog.
![]() Delete Current Equipment - this operation will permanently delete the current asset (after confirmation). Appropriate security rights must be in place to perform this operation.
Delete Current Equipment - this operation will permanently delete the current asset (after confirmation). Appropriate security rights must be in place to perform this operation.
![]() Go to First Asset - this button will scroll the Equipment View to the first asset (alphabetically) for the current company.
Go to First Asset - this button will scroll the Equipment View to the first asset (alphabetically) for the current company.
![]() Go to Prior Asset - this button will scroll the Equipment View to the prior asset (alphabetically) for the current company.
Go to Prior Asset - this button will scroll the Equipment View to the prior asset (alphabetically) for the current company.
![]() Go to Next Asset - this button will scroll the Equipment View to the next asset (alphabetically) for the current company.
Go to Next Asset - this button will scroll the Equipment View to the next asset (alphabetically) for the current company.
![]() Go to Last Asset - this button will scroll the Equipment View to the last asset (alphabetically) for the current company.
Go to Last Asset - this button will scroll the Equipment View to the last asset (alphabetically) for the current company.
Equipment Fields (Merge Items)
Like the Home View, you will find certain text items in the document that have been updated/merged to reflect the current field values for the current asset. For instance, if the Equipment View Layout has text in this format:
![]()
Then when the Equipment View is drawn, the '!GAGES.MODEL_NUM!' text is replaced with the actual value for this database field:
![]()
The potential 'merge items' are defined in the Layout Editor for Equipment Layouts. See Equipment Layouts...Equipment Fields for more details. The Layout Editor entirely controls the font sizes, styles, and colors for these equipment fields - so feel free to emphasize fields that are important to your usage. There are a couple of exceptions in terms of field color, however. Fields that are blank in the database will be automatically colored gray:
![]()
This gray color is a default - it can be overwritten in the Equipment Layout. If you would like to add a value for an empty field, click on the word '(none)' in gray. The word '(none)' must be displayed so that there is something to click on. If you prefer a word different than '(none),' this can be modified through a System Wide Variable.
Next, any fields that are permanently linked back to a template are colored (by default) in a maroon color:
![]()
This maroon default color can also be overwritten in the Equipment Layout. Note that when a field is linked to a template, any hyperlinks for editing that field are disabled.
Equipment Field Editing - Hyperlinks
See the Edit Equipment Fields topic for more details on this important topic. But the basics: Equipment fields are modified through hyperlinks in the Equipment Layout. By default, hyperlink fields in the Equipment Layout are blue in color and boldface:
![]()
In the above example, 'CALIPER' is a hyperlink. When hovering over a hyperlink, the cursor will change to a 'hand point.' Upon field editing, you will see an 'Edit Equipment Field' dialog:
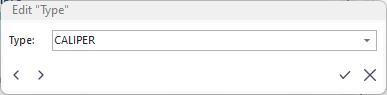
Edit Equipment Field Dialog
The edit box functionality will vary depending on the field type. Note that the 'Edit Equipment Field' dialog will appear in the same relative position as the field in the layout - to make editing as quickly as possible. Text fields might have a drop-down showing relevant choices; date fields will have a date selection box; numeric fields will have a calculator, etc. There are four button options:
![]() Save & Exit - saves the change and closes the edit dialog. This can also be called by pressing Enter/Return on the keyboard.
Save & Exit - saves the change and closes the edit dialog. This can also be called by pressing Enter/Return on the keyboard.
![]() Cancel & Exit - cancels the edit and closes the dialog. This can also be called by pressing Escape on the keyboard.
Cancel & Exit - cancels the edit and closes the dialog. This can also be called by pressing Escape on the keyboard.
![]() Save & Go to Previous Field - saves the change and restarts the dialog to edit the previous field in the Equipment Layout. This can also be called from the 'Shift+Tab' keyboard combination. By 'previous,' we mean the field to the left or above in the Equipment Layout. When the layout is first drawn onscreen, all field hyperlinks are memorized from the upper left of the Equipment Layout through the lower right. This ordering is used while tabbing through the fields in forward/reverse order.
Save & Go to Previous Field - saves the change and restarts the dialog to edit the previous field in the Equipment Layout. This can also be called from the 'Shift+Tab' keyboard combination. By 'previous,' we mean the field to the left or above in the Equipment Layout. When the layout is first drawn onscreen, all field hyperlinks are memorized from the upper left of the Equipment Layout through the lower right. This ordering is used while tabbing through the fields in forward/reverse order.
![]() Save & Go to Next Field - saves the change and restarts the dialog to edit the following field in the Equipment Layout. This can also be called by pressing 'Tab' on your keyboard. By 'next,' we mean the field that occurs to the right or below in the Equipment Layout. When the layout is first drawn onscreen, all field hyperlinks are memorized from the upper left of the Equipment Layout through the lower right. This ordering is used while tabbing through the fields in forward/reverse order.
Save & Go to Next Field - saves the change and restarts the dialog to edit the following field in the Equipment Layout. This can also be called by pressing 'Tab' on your keyboard. By 'next,' we mean the field that occurs to the right or below in the Equipment Layout. When the layout is first drawn onscreen, all field hyperlinks are memorized from the upper left of the Equipment Layout through the lower right. This ordering is used while tabbing through the fields in forward/reverse order.
If you select 'Go to Next Field' while on the last field in the Equipment Layout, you will be looped back to the first field. If you select 'Go to Previous Field' while on the first field in the Equipment Layout, you will be looped back to the last field.
All security validations will be executed before saving any changes in this dialog. So if this field is required because of Profile Manager security, you will be alerted. If the field is a drop-down and text validation is enabled in Profile Manager, you might be prompted to add the value to the list for future use, etc.
Resizing of Equipment Layout
Note that (by default) the Equipment Layout is set up to resize dynamically based on the screen height/width. Fields are placed in tables by relevant groups. Each table has two columns, with 50 percent of the table width used for each column. If a field caption and value cannot be displayed in the cell's width, then the cell's height will be increased to allow for an additional line (word wrap).
Embedded Flowchart in Equipment Layout
It is possible to embed a flowchart inside an equipment layout rather than showing the flowchart to the right of the Equipment Layout. Below is an example:
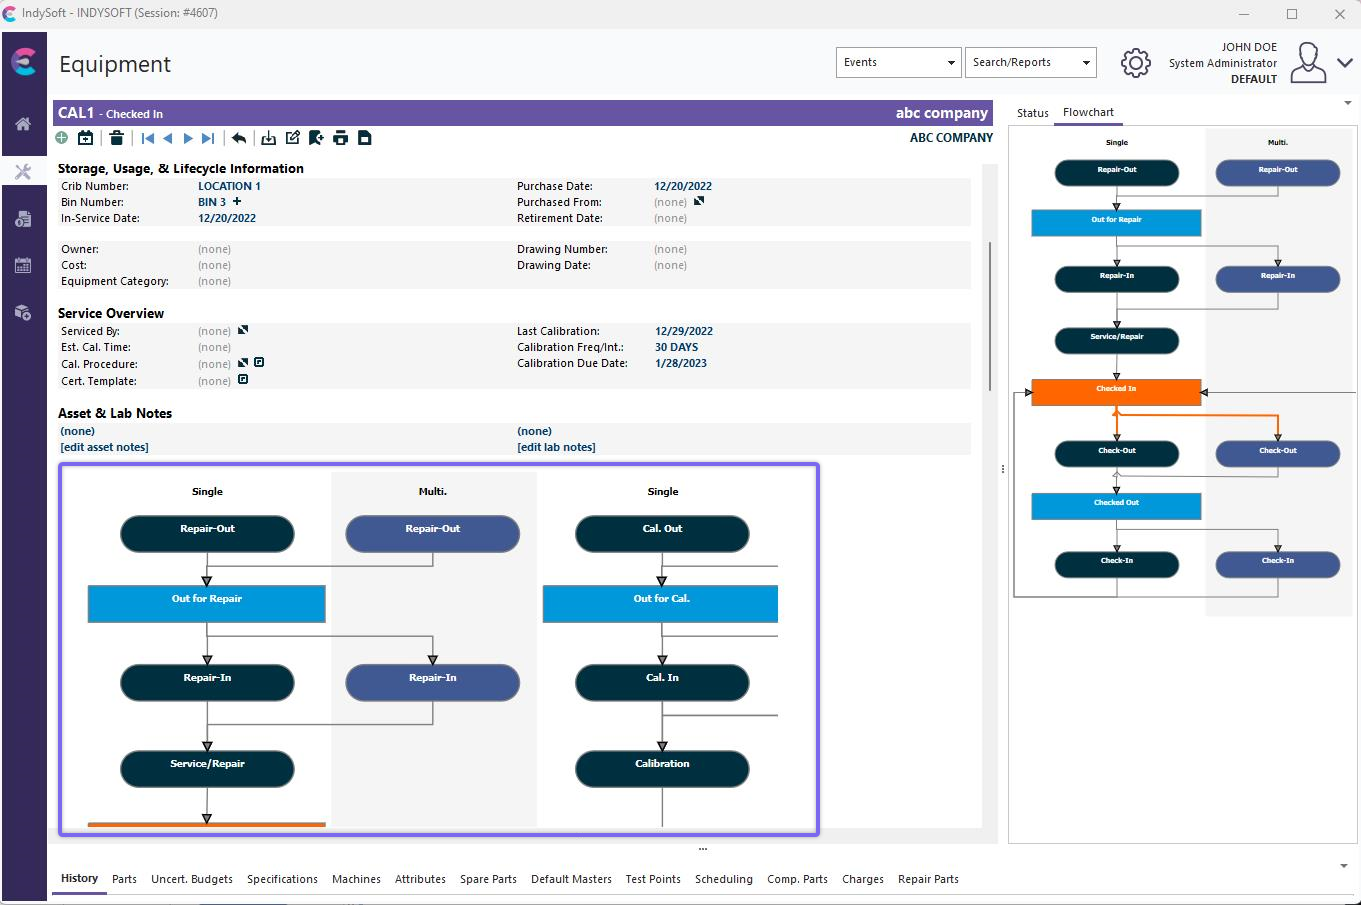
Embedded Flowchart in Equipment View
The functionality of an embedded flowchart is identical to when the flowchart is shown on the right-side panel. See Equipment View Flowchart for more details.
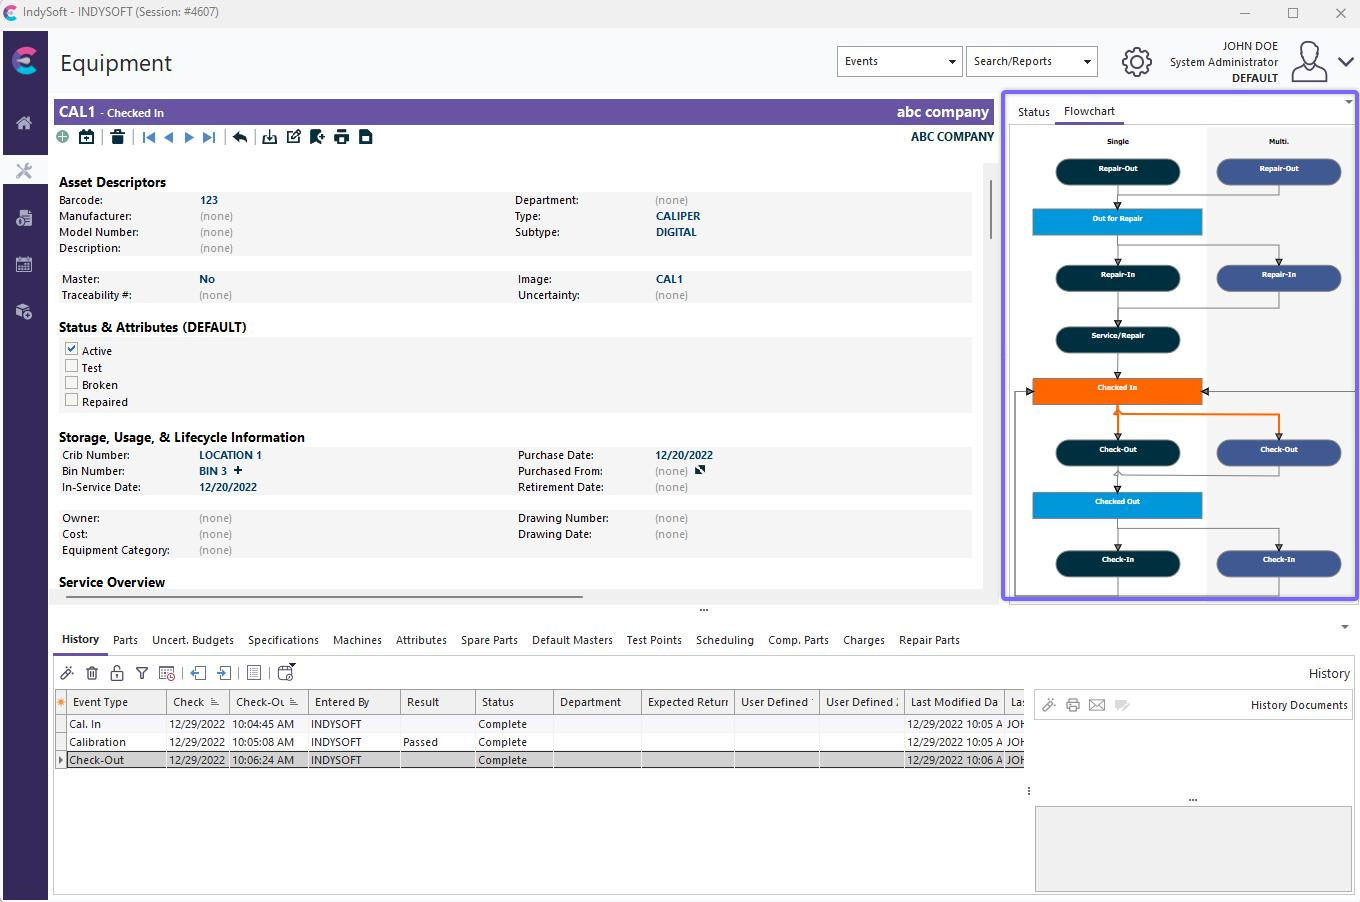
Embedded Flowchart in Side Panel
Launch Equipment Related Operations
Many hyperlinks are provided within the default Equipment View layout for standard equipment-related functions. These functions are always linked to one asset, so they are called from this tab (rather than the Home View). The most common:
·Equip. Company Transfer
·Company Prefs
·Edit Company
·View Company
·Related Estimates
·Related W.O. By Sched. Work
·Related W.O. By Charges
·Related Invoices
·Save As Template
·Change ID
·Cloning Wizard
·PTouch Stickers
·Print Worksheet
Multiple Equipment Views - Right Mouse Click Options
It is possible to have access to multiple Equipment View layouts at once. Visibility rights for Equipment views are set up in Profile Manager (or a parallel screen in PrintBuilder/LayoutBuilder). See Setup Custom Searches / Reports / Layouts for more details. All Equipment Layout options will appear as right-mouse-click options from within the Equipment Layout:
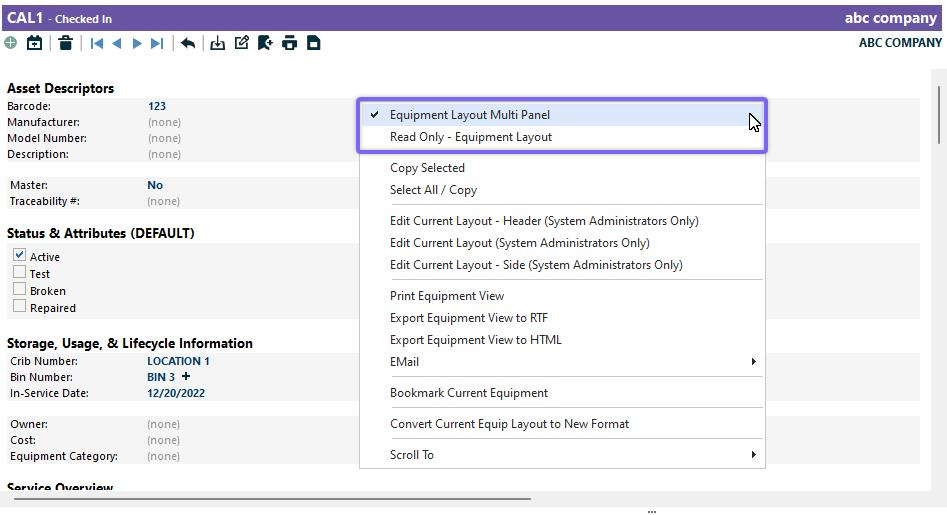
Equipment View Layout Options
The last Equipment View Layout selected before exiting IndySoft will be remembered and recalled upon the next login. This feature is helpful for managers and administrators. If you need to answer a specific IndySoft question from a user with a different default layout, you can quickly right-mouse click and select their layout, then understand their perspective. Or if you need hyperlinks to some uncommon functions but don't normally want to be bothered with the 'clutter,' you can create alternative layouts and right-mouse click when required.
Additional right-mouse click options:
·Copy Selected - copies the selected text to the Windows Clipboard. Note that all font styling is retained, so if you paste it into a rich text editor (like Word), the text will have a similar appearance.
·Select All / Copy - selects all text in the layout and copies to the Windows Clipboard. Note that all font styling and table structure are retained - so if you paste into a rich text editor (like Word), the text will have a similar appearance.
·Print Equipment View - sends the current Equipment View (exactly as currently seen) to the printer. You will be prompted to confirm the printer.
·Export Equipment View to PDF - quick export of the current Equipment View (exactly as currently seen) to a PDF file. You will be prompted for file location and file name. The default file name will be in the format of [COMPANY] - [ID].pdf.
![]() Productivity Tip
Productivity Tip
If you already have an Equipment View similar to a printed report, PDF, or email that you can imagine needing routinely from IndySoft...
Rather than spending the time to create a PrintBuilder report that mimics your Equipment View, consider cloning the Equipment Layout to a new layout. Then modify the layout to look more like a report (remove obvious buttons and hyperlinks). Finally, expose this layout to your username - so it is available as a right-mouse click option from your normal Equipment Layout.·EMail - creates a PDF of the Equipment View (just like the above option) but also launches an email and attaches the PDF to this email. The email is previewed (if possible) before being sent. There are six options for sending email:
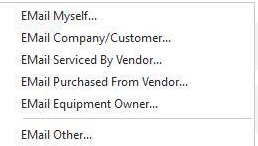
These options save you the time of looking up the email address - if the email address is already attached to an equipment-related field.
·Bookmark Current Equipment - bookmarks the current asset for quick future recall. After an asset is bookmarked, this menu item will be modified to allow immediate recall of the asset:
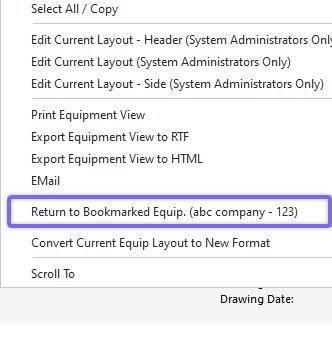 |
|