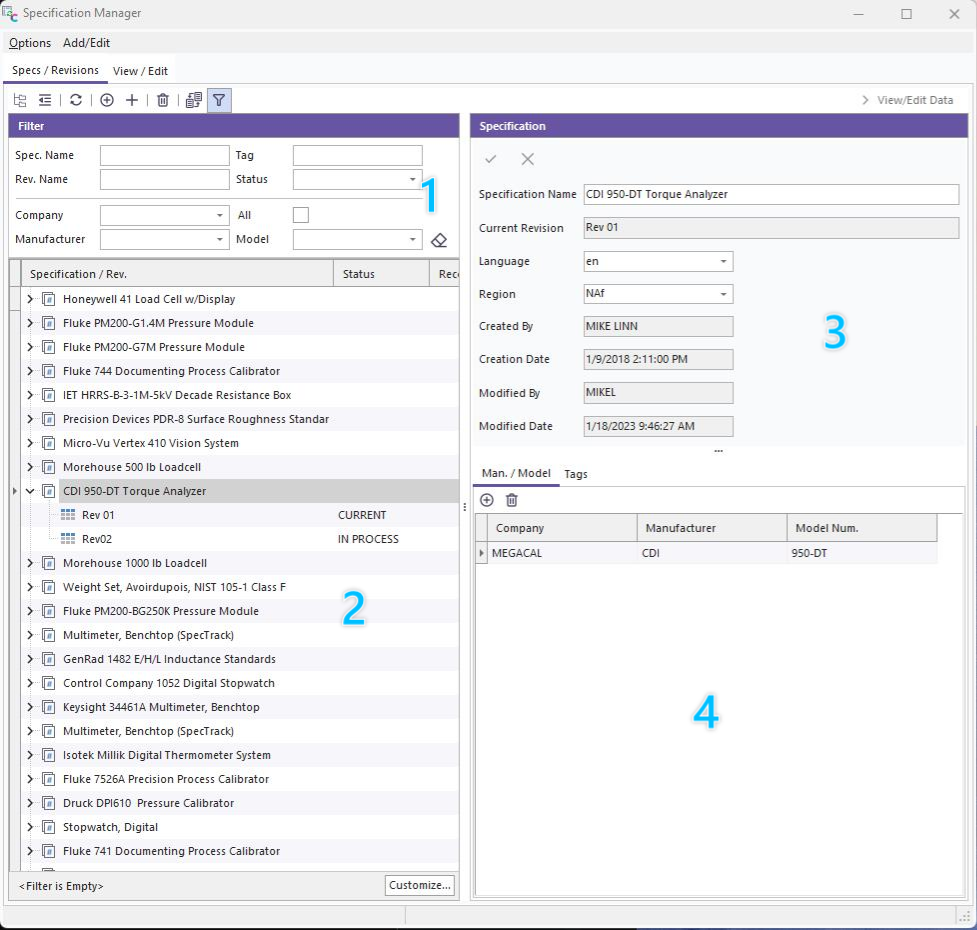
Spec Manager - Main Interface
The SpecManager main page consists of several sections.
Specs/Revisions
On the Specs/Revisions tab you will see:
- Filtering options for searching and finding specification entries
- The Spec/Rev tree
- Spec/Rev details
- Manufacturer/Model and Tags listing
Menu Button Bar
![]()
 Expand All - Expands all items in the Section 2 tree.
 Collapse All - Collapses all tree items in Section 2.
 Refresh - Refreshes the Tree with any changes.
 New Specification - Opens a dialog to add a new specification.
 New Revision - Opens a dialog to add a new revision.
 Delete - Deletes the selected item. Deleting a specification also deletes any revisions associated with it.
 Sync - Keep Specs data tab synced with selected revision.
 Filtering - Opens and closes the Section 1 filtering options.
Section 1: Filter Options
This section allows the user to filter and search based on the name of the specification or revisions, as well as the metatags listed within the tags tab (section 4)
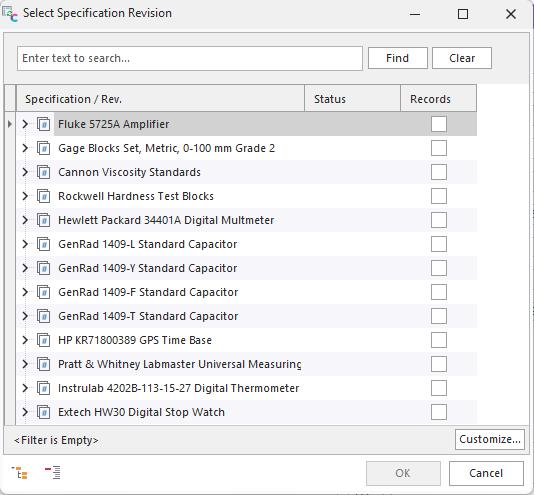
Specifications are stored under the selected company. When you first open the SpecManager the specs and revs will automatically be filtered by the current default company. To see all specifications for all companies, check the 'All' button and clear the filter by clicking the eraser button next to the Model field: ![]()
Section 2: Specifications Tree
This section lists all of the variouis specifications and their related revisions in the database. The top level is the specification while the sub-branches indicate revisions:
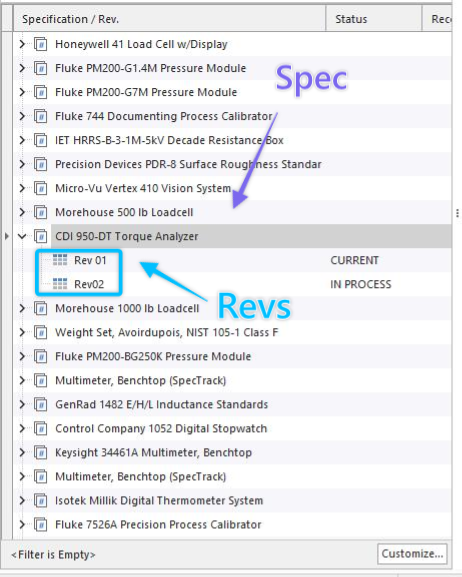
To sort, click directly on the column header.
When clicking on a specification in the tree, the right-panel (section 3) will update to show the details for the overall spec. When you click on a revision level branch, section 3 will update to show the revision details.
 vs.
vs. 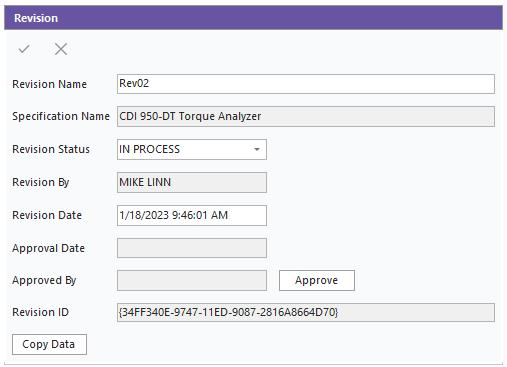
Section 3: Specification/Revision Details
This section displays a form with the overall details of the specification/revision.
Specification Name - it is recommended to use a name that is easy to identify the item or items that the spec describes. Typically you will want to use a concatenated string consisting of the Manufacturer + Model(s) + Options + Equipment Description
For example: “Hewlett Packard 8642B-001-002 Synthesized Signal Generator”
In the case of class or grade specified equipment like weights, it is suggested to name the specification with the Description + Standard + Grade
For example: “Weights & Masses ASTME617 Class 1” or “Gage Blocks ASME B89.1.9 Grade 0”
The publish or release date of the standard need not be included here, as that would be considered a revision to the original document. It is more appropriate to name the revision by the date of release. Ultimately, you want to name the specs in such a way that the user can easily locate the appropriate specification from a drop down list.
Current Revision - displays the name of the revision marked as the current one -- not editable
Language - select the language that the document is published in -- selectable
Region - Not in use -- TBD
Created By - Auto-completed upon creation of the spec with the name of the current user -- not editable
Creation Date - Auto-completed upon creation of the spec with the current date/time -- not editable
Modified By - Automatically logged upon a modification with the current user name -- not editable
Modified Date - Automatically logged upon a modification with the current date/time -- not editable
Approved By - Automatically logged upon approval of a revision with the current user name -- not editable
Approval Date - Automatically logged upon approval of a revision with the current date/time -- not editable
Block Export - Checking this box will prevent/omit the spec from being exported via the Export/Import module
Support Email - Email of the individual to notify if an issue is found with the specification
Current Rev ID - GUID for the specification current revision
Notes - Free text entry field for notes. For instance, if the spec only applies to certain serial numbers, you can note that information here.
Revision Name - Name of the revision. In most cases, this is the date or revision number for a published document.
Specification Name - Pre-filled with the name of the parent specification -- not editable
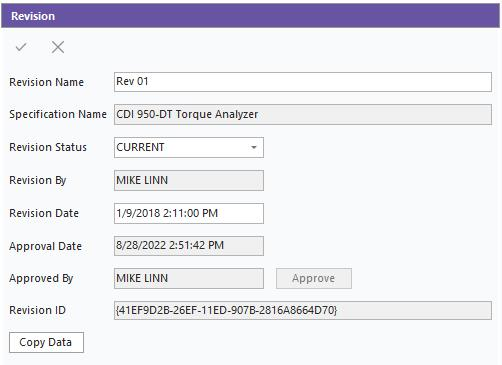
Revision Status - User selected, dropdown list consists of 'Archived', 'In Process', 'Current'
- Archived - For retired specs, this revision will not show in dropdown lists.
- In Process - Used for new revisions as they are being created and before they are approved, not available in selection lists.
- Approved (Current) - Indicates the specification has been reviewed and approved for use.
- Automatically set with the current user when the 'Approve' button is pressed
Revision By- Name of the person who created the revision. Auto-completed, not editable
Revision Date- Automatically set when the revision record is created. Can be edited by the user to reflect an earlier publication date.
Approval Date - Date/time of revision approval. Auto-completed, not editable
Approved By - Auto-completed, not editable
Revision ID - GUID for the specific revision, not editable
Approve (button) - This button logs approval of the revision and automatically fills in the Approved By, Approval Date and sets Revision Status to 'Current'
Copy Data (button) - This button opens a dialog and allows the user to copy the specification entries from any other revision.
Note: 'Copy Data' does not allow you to overwrite existing entries. You will need to delete the existing revision and create a new one without spec entries, then use the copy button to import the data.
View/Edit
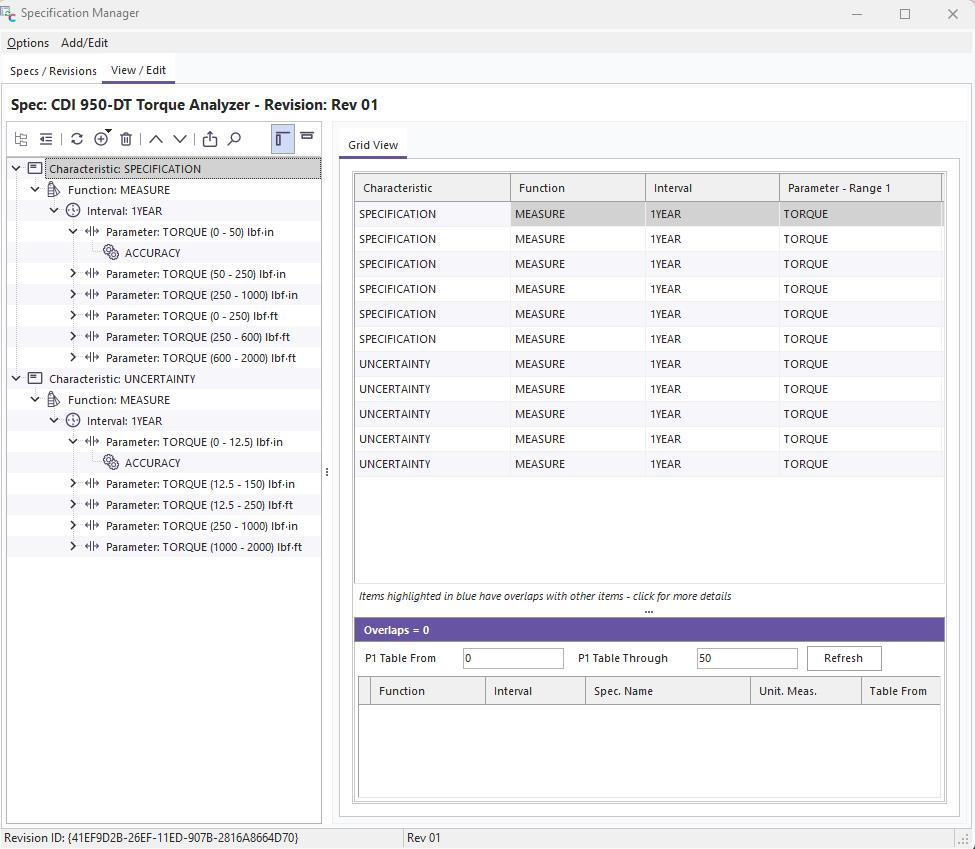
Within the View/Edit tab, there are two ways to see the actual specification entries associated with each revision. Either double-click on the desired revision within the Specifications Tree, or click to highlight/select the rev and then click on the View/Edit tab at the top of the window. In this screen, you are presented with a window that has two sections. The left-hand side displays a tree structure showing the various 'nodes' that represent a hierarchy of information. This is a visual representation of the information required to find a particular specification value.
Menu Button Bar
![]()
- Expand All - Expands all items in the tree
- Collapse All - Collapses all tree items
- Refresh - Refreshes the Tree with any changes
 New - Options to add a new spec item
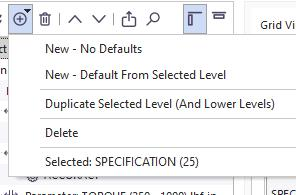
- New - No Defaults -- Creates a new spec entry with no data copied from another spec
- New - Default From Selected Level -- Creates a new spec entry and copies in all data from that point in the tree and above
- Duplicate Selected Level -- Creates a new spec entry and clones all data at that level and higher, as well as all sub trees under that level.
- Delete -- Deletes the selected level and ALL sub levels for that branch
 Delete - Deletes the selected item
 Move Up - Moves the selected item up in the tree
 Move Down - Moves the selected item down in the tree
 Push to Equipment Structured Specs - Pushes the spec items into the Specs tab of the equipment view
 Search - Opens a search finder above the tree

 Left Align - Displays the tree to the let of the specification grid/detail
 Top Align - Changes the orientation of the tree to the top of the page
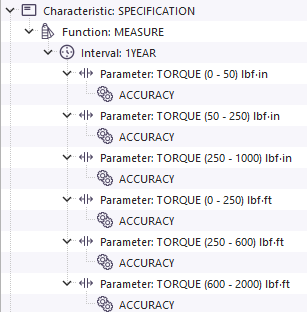
Specification Tree
The specification tree is a graphical representation of the selected 'nodes' that constitute the specification details. These are used by the uncertainty lookup functions to locate the appropriate specification values.
Click on the ![]() icon to the left of the item to expand the 'branches' of the tree data
icon to the left of the item to expand the 'branches' of the tree data
Spec Detail View
The right-hand panel displays the spec detail view. This shows a grid representation of the same data in the tree until you reach a Contribution Level.
Once a Contribution is reached, the grid will refresh to a form displaying all of the data comprising the "spec"
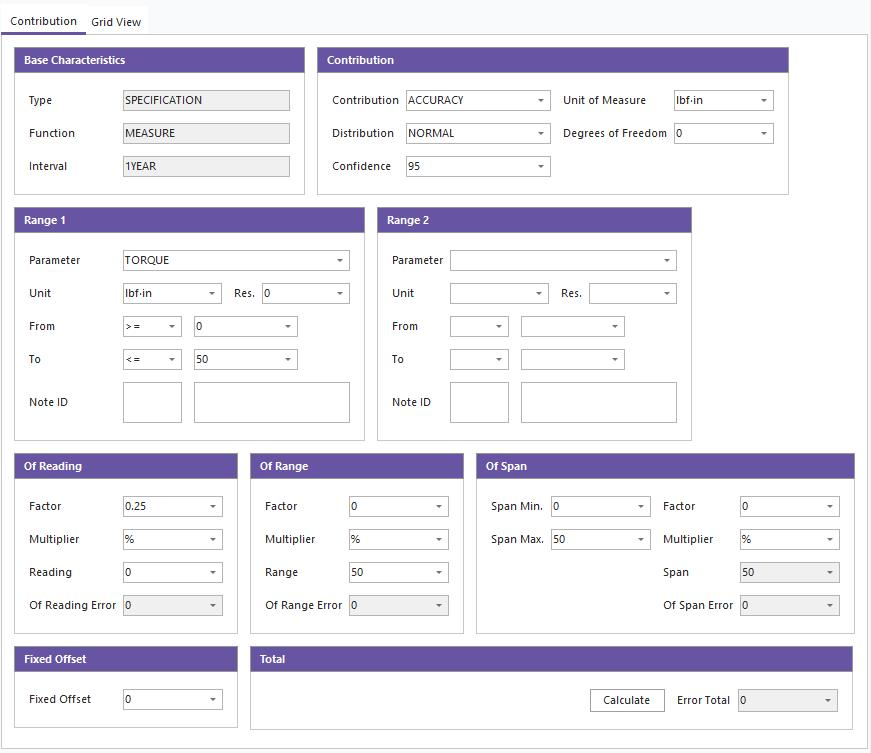
Base Characteristics
- Type - (REQUIRED) There are two type options: SPECIFICATION, UNCERTAINTY
- Use Specification when you are entering details from a Manufacturers manual
- Use Uncertainty when you are creating a 'spec' representing inherited calibration uncertainty for a GROUP of items
Typically, the uncertainty would reside at the Equipment Specs tab as the uncertainty is usually assigned to a particular serial number of a device. In other words, the reported measurement uncertainty on a calibration certificate is assigned to the particular instrument listed in the certificate and is not appropriate for all examples of that man/model. There may be rare instances where the user may want to place the calibration uncertainty in the SpecManager, but the majority of times will only use the specification entry.
- Function - (REQUIRED) There are three options here: SOURCE, MEASURE, AUX. This represents whether the particular spec is classified as input, output or auxiliary
- Interval - (REQUIRED) Many times, manufacturers publish tolerances with an interval.
- Sometimes that interval equates to the time between calibrations, sometimes it refers to a zeroing operation.
- SpecManager offers many options: NONE, 20 min, 24HOUR, 90DAY, 180DAY, 1YEAR, 2YEAR
- The vast majority of specifications reviewed fall under 1YEAR and 90DAY, however there were other intervals found and thus included here
Contribution
-
Contribution - (REQUIRED) The contribution is maintained by an add/edit list and comes pre-populated with many of the common specification or uncertainty contributors.
- Most used is ACCURACY, however there are others that may be needed for a particular instrument type.
-
Unit of Measure- (REQUIRED) Represents unit of measure in the spec and pulls from the Units of Measure list in the main client.
- Units must first be entered in the Add/Edit - Systemwide... Unit of Measure list to be available in this dropdown list.
-
Distribution - The statistical distribution that represents the specification data
-
Degrees of Freedom - If the contribution is statistically derived, you can enter the degrees of freedom for future use
-
Confidence - The confidence level of the specification.
- Typically, this is listed in the manufacturers documentation and should be accounted for when including the specification in an uncertainty budget.
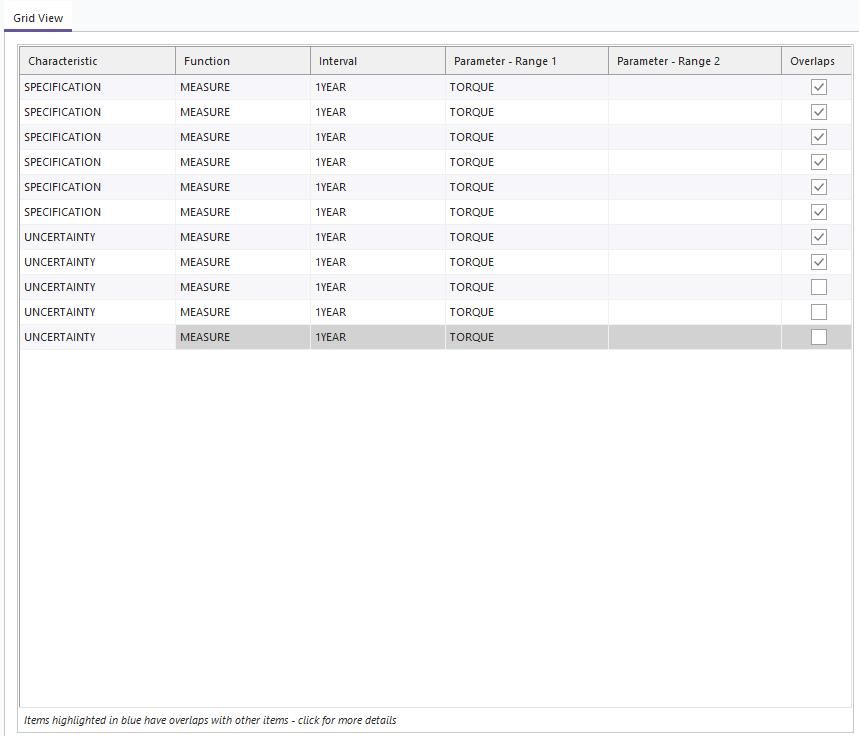
Range 1 / Range 2
-
Parameter- (REQUIRED) Parameter is the actual measurement in question. This is maintained by an add/edit list, accessed via the Add/Edit - Parameter menu item in SpecManager.
- Most parameters should be pre-loaded when you install IndySoft.
- Administrators should not allow parameters to be added arbitrarily, as these names are key to locating the proper specification values.
- Parameter 2 is always sub parameter to Parameter 1
- Examples include: P1 - VOLTS-AC, P2 = FREQUENCY P1 - THERMOCOUPLE, P2 = TYPE K P1 = HARDNESS_ROCKWELL, P2 = HRC
- A Parameter 1 entry is always required, Parameter 2 4entry is only used when needed.
-
Unit - (REQUIRED) The unit of measure for the parameter lookup. This pulls from the Units of Measure in the main client.
- Units must first be entered in the Add/Edit - Systemwide... Unit of Measure list to be available in this dropdown list.
-
From- (REQUIRED) The lower/starting value for the parameter range
-
To - (REQUIRED) The upper/ending value for the parameter range
- The From and To are the bounds for the specification range.
- Use the <,>,= selection to indicate whether the limit values are included.
- Take care of overlapping ranges. If a range band overlaps with another, the system will notify you.
-
Note ID - Used when importing specifications from other software packages.
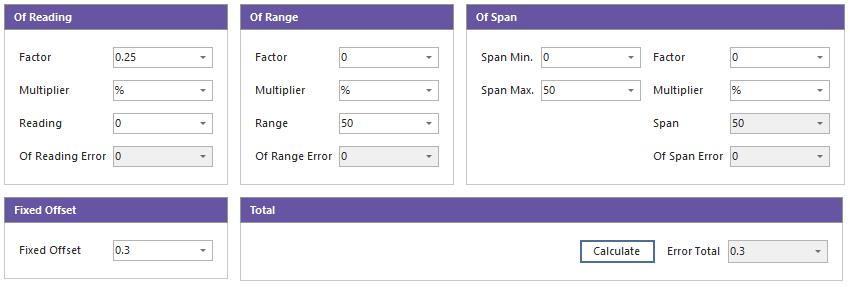
Error Calculator
The error calculation section is comprised of fives parts: Of Reading, Of Range, Of Span, Fixed Offset and Total
Each part represents an error component seen in the literature to build a total specification error. All of these are additive and when summed, generate a single Error Total that is returned to the lookup function that called for it.
-
Of Reading- Of Reading is used to calculate the 'Of Reading' or 'Of Indicated Value' portion of the error.
- Percent I.V., ppm Of Reading, etc. are handled by the portion.
- The factor (multiplicand) and the selected multiplier % (10^2^), ppm (10^6^), ppb (10^9^) are multiplied by the reading value passed in from the lookup function to calculate the Of Reading Error.
- The Reading field here is used only for testing purposes.
-
Of Range - Of Range is used to calculate the 'Of Range' portion of the total error.
- The factor (multiplicand) and the selected multiplier % (10^2^), ppm (10^6^), ppb (10^9^) are multiplied by the value in the range field to calculate the Of Range Error.
- The Range value should represent the upper bound of the instrument range.
-
Of Span- Of Span is similar to the range but allows a lower bound than 0. Span is the algebraic difference between Span Max and Span Min.
- The factor (multiplicand) and the selected multiplier % (10^2^), ppm (10^6^), ppb (10^9^) are multiplied by the calculated value of the Span field.
- Of Span should be used when the lower bound of the instrument range is not 0.
- For instance, a pressure gage might have a span of -10 to 100 psig -- thus, the total span would be 110 psig
-
Fixed Offset - Fixed Offset is a 'floor' added to the total error. If the equipment has a single spec value, you would enter it here.
-
Error Total - Error Total is the sum of all error values and is returned to the TotalError() function.
- Error Total = (Of Reading) + (Of Range) + (Of Span) + (Fixed Offset)
-
Calculate - By entering various component error values, including the 'Reading', and pressing the 'Calculate' button -- the system then stimulates a call to the ErrorTotal() function and calculates an Error Total. This is strictly for validation purposes to ensure the returned error value is as expected.