Workflow Configuration - Event Tabs
Configuration Wizard - Event Tabs (Step 3 of 22)
The Event Tabs screen is used to specify which portions of the event should be displayed when performing or editing an event. The dialog is split into two sections; the left side relates to the visibility of certain event data types, and the other refers to the display and behavior of some of the screens.
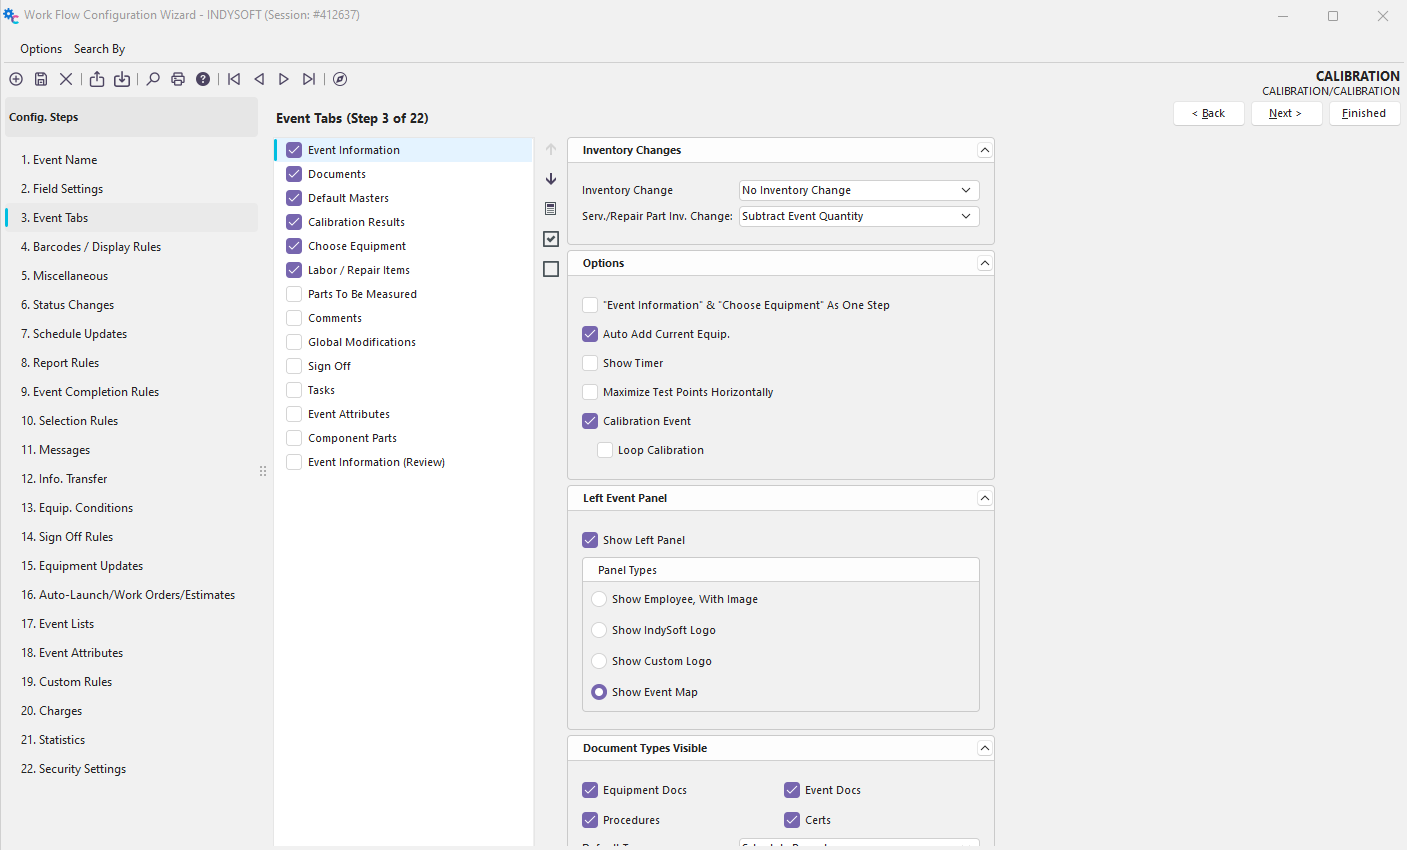
Configuration Wizard - Step 3 of 22 - Event Tabs
Visibility of Event Data Types
The left-hand side of this screen is used to specify what general type of data is needed during the event. There are 13 possibilities.
Event Information
This option will request basic event information specified in the Field Settings tab. This will be combined with Choose Equipment if 'Event Information' & 'Choose Equipment' As One Step is checked (see below).
Documents
This option will display a dialog during the event requesting optional document attachments and displaying equipment-related documents.
Labor/Repair Items
This option will display labor and repair items during the event.
Default Masters
This option will allow you to choose the masters used during calibration.
Calibration Results
Checking this option will allow you to record calibration results during an event.
Parts To Be Measured
Checking this option will allow you to specify part information measured by a piece of equipment. Later, all equipment used to measure specific parts can be reported on using the Reports - Part History Recall report.
Choose Equipment
This option allows you to select equipment to be used for the event.
Comments
An optional comment-only dialog.
Global Modifications
This will allow you to enter audit trail information and modify equipment information.
Sign Off
This option allows you to require a particular individual to sign off on an event before it is marked as complete.
Tasks
This option will allow you to schedule tasks on the equipment.
Event Attributes
This option will show the names and values of the event attributes.
Component Parts
This option will allow you to select component parts.
Icons
![]() This icon will move a highlighted Event Data Type Tab up in the order it will appear when performing this event.
This icon will move a highlighted Event Data Type Tab up in the order it will appear when performing this event.
![]() This icon will move a highlighted Event Data Type Tab down in the order it will appear when performing this event.
This icon will move a highlighted Event Data Type Tab down in the order it will appear when performing this event.
![]() This icon will Group Visible Fields that have a checkmark together.
This icon will Group Visible Fields that have a checkmark together.
![]() This icon will mark all fields as visible (select).
This icon will mark all fields as visible (select).
![]() This icon will mark all fields as not visible (de-select).
This icon will mark all fields as not visible (de-select).
Right Panel

Inventory Change
A drop-down list will allow you to change the status of the inventory.
·On Hand to Checked Out
·Checked Out to On Hand
·Add to An Order
·On Order to On Hand
·Modify Check Out Status
·No Inventory Change
·No Inventory Change - With Quantities
·On Hand Adjustment
·Reduce On Hand Only
Service/Repair Part Inventory Change
·Subtract Event Quality
·Add Event Quality
·Ignore Event Quality
Show Event Att. Below Tabs
Check this option if you would like to display the event attributes below the event tabs.
'Event Information' & 'Choose Equipment' As One Step
If both the Event Information and Choose Equipment items are checked, selecting this option will combine the two dialogs. This is helpful when you want to see all information on the screen at once and keep the number of steps in an Event at a minimum.
Auto Add Current Equip.
This option will always default the event to select the equipment you currently have on the screen. This is usually checked on events not involving the Choose Equipment option. This option is typically turned off if the equipment is a multi-equipment event.
Show Timer
The Show Timer option displays the time of the event. This timer lets you record a total event time and offers reset, start, stop, and edit time functions. This value can automatically be copied into the 'Total Time' field when closing an event.
Show Equip. Out to Employee (at the bottom of the event)
This option will display a grid at the bottom of the event showing all equipment currently checked out to an employee. This feature is handy for making Check-In events quick and easy. This option can only be checked if 'Inventory Change' is set to 'Checked Out to On Hand.'
Maximize Test Points Horizontally
This option is only relevant if the 'Calibration Results' tab is selected. This feature automatically maximizes the event screen when displaying calibration test points. This lets the user view as many calibration test point columns as possible.
Show Left
This option displays a panel on the left-hand side of the event. This panel can show 1 of 4 things.
Show Employee, With Image
This option will display a picture of the specified Employee (if available)
Show IndySoft Logo
This option will show the beautiful, glorious IndySoft logo
Show Custom Logo
This option will display a custom logo that you choose, such as your company logo
Show Event Map
This option shows a layout of the event wizard
Document Types Visible
Choose the document types you want to be available during the event using the checkboxes. Select the 'Default Type' from the drop-down list if you choose more than one. This will designate the tab the user will be defaulted to when entering the Documents tab of the event.

![]() Version 13.1 || New checkbox to 'Check for Emp. Procedure Trainings' -- validates procedure usage against employee procedure training records
Version 13.1 || New checkbox to 'Check for Emp. Procedure Trainings' -- validates procedure usage against employee procedure training records
See Add/Edit Procedures for more information.
Test Point Group
This allows you to specify a specific 'Group' type when pulling test points for calibration. For example, if you select 'Calibration' in this box, then any test point with a group of 'Calibration' will automatically be included in the calibration. All other groups (except empty groups) will be left out. As long as the column contains the test point group, it will be included, so you can mix items to support 2 test point groups (i.e., 'Calibration; Verification.'). Finally, if you enter a unique entry here called 'USER SELECT,' the user will be prompted to pick a group type during the calibration. In this case, IndySoft processes through all unique test point groups for equipment and will provide the user with a list to choose from. If you want to include rows with blank or empty Group type fields, place an exclamation mark before it. (i.e.!CALIBRATION).
Event Info. (Final) Bookmark
Calibration Event
If the event is related to a Calibration event, check this box. Checking it will include the event in the export/import process. It will include these events when printing stickers, event docs, and certificates.
Loop Calibration
Turn on this option if the event is a loop calibration. When this option is on, then the options below it become relevant:
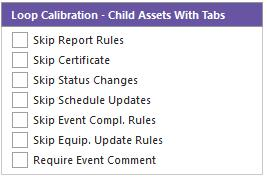
Within a loop calibration event, the child assets can be selected for service within the event. When this happens, a sub-tab is drawn in the event (much like in a ganged event). This allows the service on the child asset(s) to be performed simultaneously while the loop is executed. These options above relate to the finish of these child events within the loop calibration. By default, the same Report Rules, Certificate Rules, Schedule Updates, Event Compl. Rules, Equip. Update Rules, etc., will be performed, as will happen when the loop parent event is finished. If you would like to skip out on any of these child equipment options, turn on these related checkboxes.
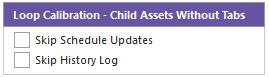
The options above apply to all the assets in events that do not have tabs, so no special work needs to be performed on these child assets when used within the loop. Typically these asset will also receive the same Schedule Updates as the loop parent, and a log event is added to the History of each child asset. Use these options to skip either of these defaults.
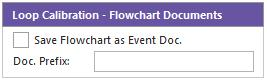
Finally, a small flowchart document can be saved and attached to the loop parent and each child asset. This flowchart document and other event documents are visible to the right of the history grid. This flowchart is a snapshot of the loop flowchart at the time of completion of the event. So, any asset(s) that require special work are highlighted in the flowchart in red. The blocks in this flowchart are interactive (just as in the loop calibration event), so you can double-click on any block to navigate to that child asset or double-click on the title to go to the loop parent. Use this option to opt out of the flowchart document and/or to specify a custom prefix for the document name. |